gmrhodes13
-
Posts
31,208 -
Joined
-
Last visited
-
Days Won
1,070
Content Type
Profiles
Forums
Gallery
Articles
Everything posted by gmrhodes13
-

0KTrooper KB Props TFA Build - My First Ever Build
gmrhodes13 replied to 0KTrooper's topic in TFA Build Threads
Everyone has a slightly different way of doing it. When using filler (bondo) I try to sand larger areas with a block (rubber or wood with sandpaper wrapped around) this helps to give a flatter sanding of areas. I scuff the whole area with 240 sandpaper, add filler primer (spray putty) (with black mist coat), let dry for a few days then sand with 240 grit wet and dry sandpaper, I use water with a drop of dish liquid, helps reduce clogging of the sandpaper. Any imperfections I then add some blade putty, allow to dry for a few days then sand again wet with 240 grit. Once happy I give two coats of primer so there's a nice even base, light sand with 600 grit, blow off dust and then you can top coat. I also use automotive acrylic paint, goes on lighter than enamels, dries quick and you can go a little heavier with the coats which reduce "orange peel" (bumpy appearance), you can also sand and buff acrylic paint. As I say people use different methods, this is just what works for me. -
That is you forum profile link not your membership link, try this one https://www.501st.com/members/displaymember.php?userID=34352&costumeID=124 Appears though you already have TK access, you may have lost "detachment affiliation" it can change at election time, or if you have not logged into the forums in a year you may no longer have access to some areas, this can be checked through your legion membership area, link here https://www.501st.com/holocron/member/legacy. You need to see APPROVED next to FISD, if you see "Pending" or "Retired" please reach out to your GML to update More info on Detachment Affiliation https://www.whitearmor.net/forum/topic/43940-what-is-detachment-affiliation-and-why-is-my-info-not-correct/
-
Your link doesn't appear to be working, try this one https://www.501st.com/members/displaymember.php?userID=14899&costumeID=124 Appears though you already have TK access, you may have lost "detachment affiliation" it can change at election time, or if you have not logged into the forums in a year you may no longer have access to some areas, this can be checked through your legion membership area, link here https://www.501st.com/holocron/member/legacy. You need to see APPROVED next to FISD, if you see "Pending" or "Retired" please reach out to your GML to update More info on Detachment Affiliation
-
Your link is going to another members info, try this one https://www.501st.com/members/displaymember.php?userID=32939&costumeID=126
-
Always a good read. Here is your original post from November 2006, it's in a the archives
-
0KTrooper KB Props TFA Build - My First Ever Build
gmrhodes13 replied to 0KTrooper's topic in TFA Build Threads
There's definitely some areas which as you have found need some work, this takes up the time, what you do now will be seen in the finished product. When you come to add some spray putty or primer I find adding a very light mist coat of black can help, when you start sanding the paint any high or low spots you will easily see as the black with either remain or be sanded off, old auto painters trick. Blade putty for any scratches or little holes Keep up the great work. -
I recently found that my helmet had discoloured after 10 years of trooping, it's been on a shelf for the last 2 years because of Covid. So I remembered reading about Retr0bright, purchased all the ingredients and gave it a go. After applying a coat to the yellow areas I placed outside, in the sun on a mid 20's (deg C) afternoon for 2 hours and WOW could not believe my eyes, after washing off what was left of the mixture I was left with a pristine helmet once again. I can definitely recommend this stuff Retr0bright (FYI) I used the second mix mentioned Lorne's Variant Recipe
-
That's your 501st forum profile, this is the link you need to your membership details https://www.501st.com/members/displaymemberdetails.php?userID=26088
-
Forgot to mention, I also find adding in thin coats I get less air bubbles, something to do with the acetone curing the ABS
-
I've encountered this a few times, appears once you sand through the skin the internal color can change, also may find very small pin holes. I managed to mix up some waterbased acrylic to closely match the armor color and touch up. I would see how it looks being worn and see were the belt will sit, you won't need to supply a close up of this so it may not even be seen
-
I would be more than happy with that outcome, well done
-
Correct I doubt most would notice, That being said Chris made the files so they could be vac formed over so you may need to soften some of the corners/edges, I don't know if he tweaked them at all prior to releasing them. Chris is approved with the vac formed armor but I am yet to see anyone print the files and be 501st approved, that's not to say they can't be. Chris' WIP thread is here
-
This is the link you need to add https://www.501st.com/members/displaymember.php?userID=33622&costumeID=124
-
The HWT uses original trilogy armor not Rogue One which are the files Jason used. Chris's OTTK files are available here
-
Hello and welcome aboard, research is the key, also check against the CRL's and also , good luck with the build
-
Follow Dave's @Helotech build and you can't go wrong, one of the best SDS update builds out there
-
UPDATE, staff have requested a time slot for FISD group photos, once one has been issued the info will be posted
-
Occasionally I use a mp3 payer with the Aker with a push button remotes, some audio files here https://www.whitearmor.net/forum/topic/52403-stormtrooper-lines-audio-files/#comment-744770 Another how to talk thread https://www.whitearmor.net/forum/topic/47603-howto-talk-like-a-stormtrooper/#comment-662265 Things to do when trooping https://www.whitearmor.net/forum/topic/36633-things-to-do-while-trooping/#comment-484153
-
That is correct. Cover strip widths Arms front and back 15mm Thighs front and back 20mm Shins front 20mm, rear 25mm Make sure you rough up all surfaces with some coarse sandpaper so the glue has something to grip too, E6000 is the best to use One of my commission builds for reference At times magnets, clamps and masking tape may be needed to get the pieces to lay flat. I normally leave E6000 for @ 24hrs, any pieces under strain I leave for 48 to 72hrs. Some great reference if you need them in our gallery sections
-
And research thread
-
-
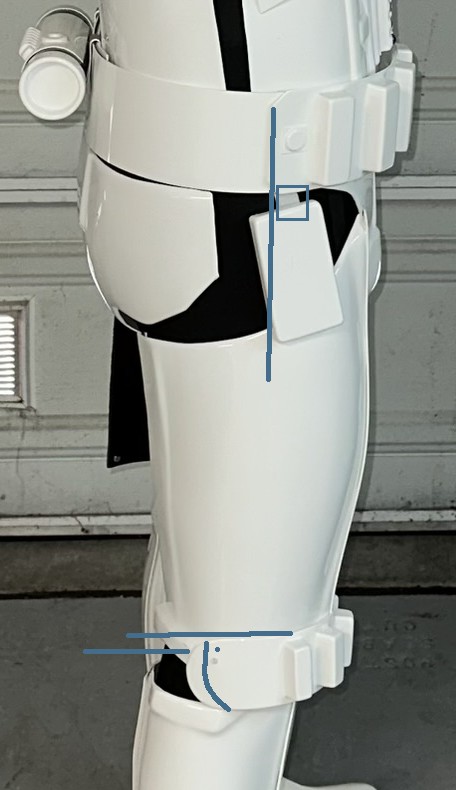
Shoulder bridges should be glued down at the front, can see velcro. Remove velcro in front and glue. Free floating in back? Glue on front and you can have elastic on the back holding down. NOTE: As seen in the photos below, there are no large tabs on the rear of the shoulder bridges. This is not specifically mentioned in the CRL, but removing them is highly recommended if possible. Belt needs to be fabric Front is ok (Abs) what wraps around needs to be fabric (elastic) ? Front is ABS plastic, rest of belt (wrap around) needs to be fabric Drop boxes should be just under the belt, no large gaps on elastic Thigh cover strips should stop above the lower ridges, not continue to the bottom. thigh cover strips lightly rounded before bottom? Answered below. The cover strip needs to stop above the lower ridge No gaps between both halves, fill with ABS paste or Sugru Rear thighs are overlapped and should be butt joined and cover strips. so they "butt" together, then velcro is fine on the cover strip itself. All pieces, arms, biceps, thighs, front shins should be butt join and coverstrips glued, rear of shins are velcro. https://www.whitearmor.net/forum/topic/41251-butt-joint-and-cover-strip-method/ This is the same with the forearms and biceps, should be butt joined and cover strips Same as above OK Calves should cover outside over inside, your right leg is covering from inside over outside Ok OK Blue on an plate buttons looks very dark, should be French Blue #14 Ok OK Holster should not be held on by loops, should be short straps attached to lower section of belt. Ok OK https://www.whitearmor.net/forum/topic/49928-anh-holsters-variants/ You do have a gap in the sides, ok for basic but would need to be reduced for higher levels. Ok OK Shins on rear should close from the outside over the inside so the opening is not seen from the outside. Ok OK Thigh ammo strip should not be curved on top, should be a straight corner, only curved on bottoms. Also looks like it is secured with screws in the bottom corners, should be attached in the top corners and on the lower ridge, should be held with cap rivets. Ok OK Also move down onto lower ridge, rivet @ 10mm from corner Detonator clips too small Ok OK - also screws should be black


-
Shoulder bridges should be glued down at the front, can see velcro. Belt needs to be fabric Thigh cover strips should stop above the lower ridges, not continue to the bottom. Rear thighs are overlapped and should be butt joined and cover strips. This is the same with the forearms and biceps, should be butt joined and coversrips Calves should cover outside over inside, your right leg is covering from inside over outside Blue on an plate buttons looks very dark, should be French Blue #14 Holster should not be held on by loops, should be short straps attached to lower section of belt. You do have a gap in the sides, ok for basic but would need to be reduced for higher levels. Shins on rear should close from the outside over the inside so the opening is not seen from the outside. Thigh ammo stop should not be curved on top, should be a straight corner, only curved on bottoms. Also looks like it is secured with screws in the bottom corners, should be attached in the top corners and on the lower ridge, should be held with cap rivets. Detonator clips too small
-
There are a few issues with the SDS straight out of the box which don't meet basic approval, a couple of previous SDS pre approval threads with what needs addressing https://www.whitearmor.net/forum/topic/47281-jayse01-requesting-pre-approval-review/ https://www.whitearmor.net/forum/topic/47286-helotech-requesting-pre-approval-sds @Helotech's build thread with SDS updates https://www.whitearmor.net/forum/topic/47323-helotech-sds-hero-build/