0KTrooper
-
Posts
17 -
Joined
-
Last visited
About 0KTrooper

-
TK SPartan TFA FOTK Build Thread (KB Props)
0KTrooper replied to TKSpartan's topic in TFA Build Threads
Yes I do have a thread for this build. Went ahead and put my question and photos in there. Thank you! -
0KTrooper KB Props TFA Build - My First Ever Build
0KTrooper replied to 0KTrooper's topic in TFA Build Threads
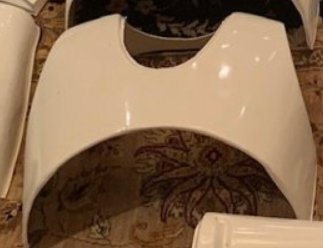
*Bicep Question* I have done most of the bicep trimming and I am trying to line up how to pieces will be glued. I am not quite to the point of gluing yet, but I am just getting it prepared. I know that a strip of ABS should go behind the long side of the pieces, but I haven't prepared that yet. When lining up the pieces in the way they will eventually be glued, I feel like I am having to put quite a lot of pressure on the long edges of the pieces. This seems to be putting quite a bit of strain on the plastic and it wants to pull back to its natural resting state. What type of glue would be recommended for this portion? Will it hold and is it ok for it to lock in so much strain on the pieces? Here is the natural resting state of the plastic when clamped on one side. Here is how it looks when both sides are clamped. As you can see, the gap in the middle is really fighting to pull apart. I can make it lay flat when applying more pressure to the middle, but this adds lots of strain to the middle of the plastic by adding extra curvature. Is it ok for it to remain this strained forever when glued or will it weaken? -
TK SPartan TFA FOTK Build Thread (KB Props)
0KTrooper replied to TKSpartan's topic in TFA Build Threads
Hi Mario, I'm back with another question. I greatly appreciate your kindness and willingness to help me through my build. It has been very helpful in piecing together my first armor! My question is about the biceps. I have them trimmed and I am trying to get them ready to glue together. When I put the short sides together and try to bring the long sides together, it is possible but seems like I am having to bend the pieces quite a lot to get the edges to meet up. I am worried that if I attempt to glue there will be a lot of strain on the plastic. Did you have a similar issue with the KB biceps? Did they meet right up or did you glue with that much strain? Not sure if I need to apply some heat and try to form the plastic into a little tighter of a curve... that seems risky. Thank you in advance for any advice you may have! -
0KTrooper KB Props TFA Build - My First Ever Build
0KTrooper replied to 0KTrooper's topic in TFA Build Threads
Was going through a move over the last month so I didn't get to do too much work, but I still made some progress after getting settled back down. The chest plate, yoke/back, and shoulder bells are nearly completion. Yesterday I put primer on all of the pieces. I am happy with how they look so far as a uniform color, albeit paint has yet to be added. Used a white primer as recommended by other troopers so that if the armor is scratched it won't be too noticeable. The one issue I am having trouble addressing is particles (dust, plant matter, bugs, etc) landing on my pieces while in the process of spraying and drying. I am new to the hobby, so all of the tools and supplies I have, I got specifically for this build, so I am pretty primitive when it comes to the methods I have been using. I simply set up a table in my home garage. I don't have access to a fancy paint booth or something along those lines, but if I do not find a solution to this issue, I would not be happy with the finished product due to all the matter landing on my pieces. Any tips on how to solve this issue? I would like to use the cheapest and simplest method possible to get good results, but if I still am having issues I am considering investing in a mobile paint booth (basically just a small tent). Not sure if I'd need an extractor to go along with it. Any tips would be greatly appreciated. Thank you all in advance! -
0KTrooper KB Props TFA Build - My First Ever Build
0KTrooper replied to 0KTrooper's topic in TFA Build Threads
Thank you both! -
0KTrooper KB Props TFA Build - My First Ever Build
0KTrooper replied to 0KTrooper's topic in TFA Build Threads
Chest indent mod & Question: Here is the sanded indent piece. I used a belt sander to speed up the process. After it was sanded I drew in the lines of where to cut on the chest. I used a dremel to cut the rectangle out of the armor. My palms were sweaty, knees weak, arms were heavy lol. I was scared, but I took my time and did it as carefully as possible and I am happy with how it turned out. There was very little space to fill on either side when it was done. I then glued from behind using two part epoxy. After allowing the glue to dry I added filler to the crack and sanded. After I was done I added a coat of primer to see how it is looking. **QUESTION** If you look closely in the last photo you can see the outline of the filler/piece itself through the primer slightly. Will this go away with more coats of primer and once the actual paint is put on, or does it require more sanding? Thank you everyone! -
0KTrooper KB Props TFA Build - My First Ever Build
0KTrooper replied to 0KTrooper's topic in TFA Build Threads
Question: I have successfully cut the chest indent mod hole and glued the piece into place. (Pics later) Now it is time for some filler. Is Bondo an acceptable filler to use for this step? I don’t know a lot about which fillers are considered flexible/not flexible or if that even matters for this particular step. Suggestions? Thank you everyone! Sent from my iPhone using Tapatalk -
0KTrooper KB Props TFA Build - My First Ever Build
0KTrooper replied to 0KTrooper's topic in TFA Build Threads
I decided to take a break from working on the helmet for a while so that I can feel like I am making some actual progress... lol. The helmet has been taking ages, so I recently switched over to my armor for a while and started making some moves. I got my yoke and back piece glued together, created my first batch of ABS paste (I think it was too thick, but it didn't cost me anything but time). I applied the ABS paste to the crack then went through about 5 rounds of filling, sanding, priming, looking for imperfections and repeat. I think it turned out pretty solid! It might be a crazy Idea, but I haven't cut out the arm holes all the way yet. I wanted to see how everything lined up before finishing those off. I feel like the areas on the sides (under the arm pits) line up a bit odd when glued together (maybe because of how the plastic is formed), but I am thinking of ways to trim it all to fit nicely and look right when the chest plate is on. Once I finished filling in the cracks I decided to jump over to trim and sand the shoulder bells and inner lips. I'm sure I am doing all this in a weird order, but it makes sense to me haha. Trimmed and Sanded: After this I hopped over to the chest plate and took out the pill holes. Started by sanding from behind then finished off with some needle filing. I also used a belt sander to sand the mod piece from behind. Here it is before: I finished it up and it is looking pretty nice, but my phone reached max storage. Pics to come later when I clear up some space... My next step is to cut out the hole in the chest and get that piece fit in there! -
0KTrooper KB Props TFA Build - My First Ever Build
0KTrooper replied to 0KTrooper's topic in TFA Build Threads
And just like that.... got the eyes cut out and a layer of primer on. The primer revealed a few imperfections that I am working on fixing, but all in all it is in pretty good shape. I love how it is starting to look! Can't wait to get it perfect and to start getting some paint on here! -
0KTrooper KB Props TFA Build - My First Ever Build
0KTrooper replied to 0KTrooper's topic in TFA Build Threads
Great info! Thank you! -
0KTrooper KB Props TFA Build - My First Ever Build
0KTrooper replied to 0KTrooper's topic in TFA Build Threads
What order would you recommend I do everything in from this point? I feel like I am close to being done with fixing a lot of imperfections, however there are some that remain. I have never used a filler primer until not so I’m not sure how much I can expect the primer to fill imperfections. From the maker of the helmet, they said at this point to dry sand 220 over the entire surface, use a filler primer, wet sand with 400, then paint. Would you agree with this? Would I need to do more work fixing imperfections that the primer may reveal at some point during that process? When you say sanding the paint, are you referring to sanding the primer and the dusting of black paint you recommended above? Sorry for all the questions! This is my first time doing a project like this. Thanks in advance! Sent from my iPhone using Tapatalk -
0KTrooper KB Props TFA Build - My First Ever Build
0KTrooper replied to 0KTrooper's topic in TFA Build Threads
Big Update! I am pretty bad about keeping my thread updated and organized, but I am still working on my trooper even when I am not posting! I am SLOWLY but surely making progress. I sure am taking my time. I have glued my back and yoke (images to come in a later post when it's further along). This post, however, is about my progress on my helmet kit. I have been putting a TON of time into it. Lots and lots of filling and sanding. The helmet kit was pretty rough when it arrived in the mail, but the small changes I am making sure are starting to stack up. This will be a very image heavy post showing the progress I have made. As shown in the previous posts above there was a large seam line running all the way across the helmet, essentially cutting it in half. Some of the areas that this seam passed by did not line up exactly right. Most of my time went into getting rid of the seam and realigning those areas. Since then I have been fixing small imperfections like little cavities in the surface, as well as cracks. The most challenging part was cutting out the tube stripes which is what this post will mainly feature. The photo below shows what the stripes were originally like. Recessed, but not cut out all the way. There were also some globs of the material used to make the helmet inside some of the slats. I started my work by using my dremel with the sanding drum bit on the underside of the tube stripes to get the holes started. Once I had them opened up enough I began the long process of using my files to get the inner walls of the slats flat and rectangular all the way around. Along the way I accidentally filed one of the stripes too far. You can see this in the above image. It is the stripe on the far right. I was able to use filler to fix the issue and continue sanding and filing. Eventually I reached the point that I was pretty happy with the inner walls of the stripes. At this point I began to focus on the top edges as they were still looking pretty rough. I used a filler to reinforce these edges, then started sanding to make them look sharp. While I was using this filler I also went over some of the cracks and cavities elsewhere on the helmet. Before: After: After sanding over the filler and getting everything to my standards, I decided to spray a small bit of filler primer over some of the tube stripes just to see how it is cleaning up, and I am very happy with what I am seeing!! I can't wait to get a true layer of primer on there and paint it! I feel like I have just about all the detailing done before being ready to paint. Other than one thing... cutting out the eyes! I got started last night. A small hole was already present, so I filed until until I had a hold big enough to fit my dremel sanding bit inside. I got rid of the majority of material on one side, but stopped using the dremel and switched back to files. I want to be very careful about this. As you can see I am not done yet on the eyes. A long way to go but it is a start! So that is my update! Hopefully I will be painting before too long and then I will move on to really focusing on the rest of the armor! -
TK SPartan TFA FOTK Build Thread (KB Props)
0KTrooper replied to TKSpartan's topic in TFA Build Threads
Mario, thank you so much for the info! Your thread has already been so much of a help for me during my build. I have another question for you if you don’t mind. I am working on trimming the back and yoke pieces and I am preparing them to be combined into one. Based on your pictures it looks like you may have done this, but did you have to trim the portions of the back piece that rest on your shoulders to be more narrow? When I put my yoke and back pieces together it seems that the parts that jut out of the back are too wide to allow for solid contact for gluing without lots of pressure from clamps and magnets. Please see the pictures for a visualization of what part I am referencing. I’d appreciate any advice you can give me. Thank you in advance! -
0KTrooper KB Props TFA Build - My First Ever Build
0KTrooper replied to 0KTrooper's topic in TFA Build Threads
**UPDATE** I haven't given up on this build yet! I am a University student, so I got quite busy for a bit, but I am back to building! Before my life got so busy I did a ton of sanding on my helmet. Slowly but surely it began to clean up. A LOT of work to go on it, but progress pics are below. I currently dropped the helmet off with my sister who is going to be doing some work on it. In the meantime I have begun the process of trimming my armor. The chest plate is now trimmed and edges are sanded. **QUESTION** Lastly for this post I have a question. I am now working on trimming the yoke and back pieces, and I am working on getting them to line up correctly for when I begin the process of combining them into one piece. The area of the two pieces that will rest on top of my shoulders seem to be quite bulky when the two pieces are layered on top of each other and don't fit together that nicely right now. Furthermore, the shoulder pieces on the back seem to be jutting into the curved part of the shoulder area on the yoke, thus keeping the yoke from laying flat on the shoulder pieces on the back armor. However, I already trimmed off what I believed was excess material (more than what is shown in the first two photos below). I am worried this will not allow for enough contact to properly glue them together. Do I need to trim back the two areas that jut out from the back further in order to allow a better/flatter connection between the two pieces? Finally, is there a standard diameter for the edge around the armhole (distance from the arm hole to where the armor curves around to the back {marked red on image}). I would appreciate any advice! Thank you in advance! -
TK SPartan TFA FOTK Build Thread (KB Props)
0KTrooper replied to TKSpartan's topic in TFA Build Threads
Hi Mario! Your build looks great, and thank you so much for this well organized and detailed thread. I have just begun my first build ever and I have KB props armor, so this is going to be invaluable to me throughout the process. I have a question for you about how you formed your yoke. I have noticed that the KB yoke comes with the two parts that come over your shoulders connected and with extra ABS extending down towards the abdomen and around the sides, but this wouldn't necessarily be visible because it is all underneath the chest plate. From your pictures it look like you left this plastic, but I just wanted to make sure I'm right about that. Most kits I have seen just have the two parts coming over your shoulder disconnected from one another and not reaching down very far in the front. Did you leave the KB yoke how it is or did you cut it to be like other kits? Hopefully my question is making sense. I might not have learned all the proper terms yet. I put a picture of my yoke below. You can see how it is larger than most and does not have the shoulder pieces formed like most. Thank you! Edit: I can see from your photos now that you definitely left this in this shape. So now my question is just do you like it that way? Does it seem to still be accurate around the sides where the lower sides of the chest plate meet the sides of the back? Thanks again!