SolderMaster
-
Posts
686 -
Joined
-
Last visited
-
Days Won
1
Content Type
Profiles
Forums
Gallery
Articles
Everything posted by SolderMaster
-
HOWTO: Make your ANOVOS TFA kit more accurate
SolderMaster replied to SolderMaster's topic in TFA Stormtrooper
We cut the wings off, then sanded the edges flat. -
HOWTO: Make your ANOVOS TFA kit more accurate
SolderMaster replied to SolderMaster's topic in TFA Stormtrooper
Where did you find that photo? -
For accuracy, cut the pill holes in the chest, the ankle hole in the calves/shins, the pill holes in the biceps. Everything else gets decals.
-
Yup. Understood. Now come over here and help me finish mine! ;-)
-
HOWTO: Make your ANOVOS TFA kit more accurate
SolderMaster replied to SolderMaster's topic in TFA Stormtrooper
What I built is correct. It goes...armor...top step....middle step....then seam. The third step...isn't really a step. It's supposed to be the top of the backing strip. That area is a little wider than the steps themselves.<br><br> Did that make sense? -
......wow.......drool.....magnets.....more drool.....measuring......more magnets.......drool....<br><br> AWESOME BUILD THREAD!!!
-
HOWTO: Make your ANOVOS TFA kit more accurate
SolderMaster replied to SolderMaster's topic in TFA Stormtrooper
1. Looking at the photos I have, the fabric. Picture a brick wall. How the bricks lay staggared. That is the design or pattern on the fabric. Not like a honeycomb as I said before. 2. There are definately seams on the boxes. Do not bondo or caulk. 4. This one is going to be tough to explain. I built a mock up of what it should look like. Don't mind the extra score line on the bottom step...I suck cutting with an exacto. This is NOT to scale. Picture the other half of the bicep butted up to the last step. 5. YES. the belt did have nylon. It goes, nylon against the armor, then neoprene or similar approx. 3/8 inch thick, then the floor mat. 6. I really want to post this damn photo..but can't. I'll try to find something to use... 1st post updated.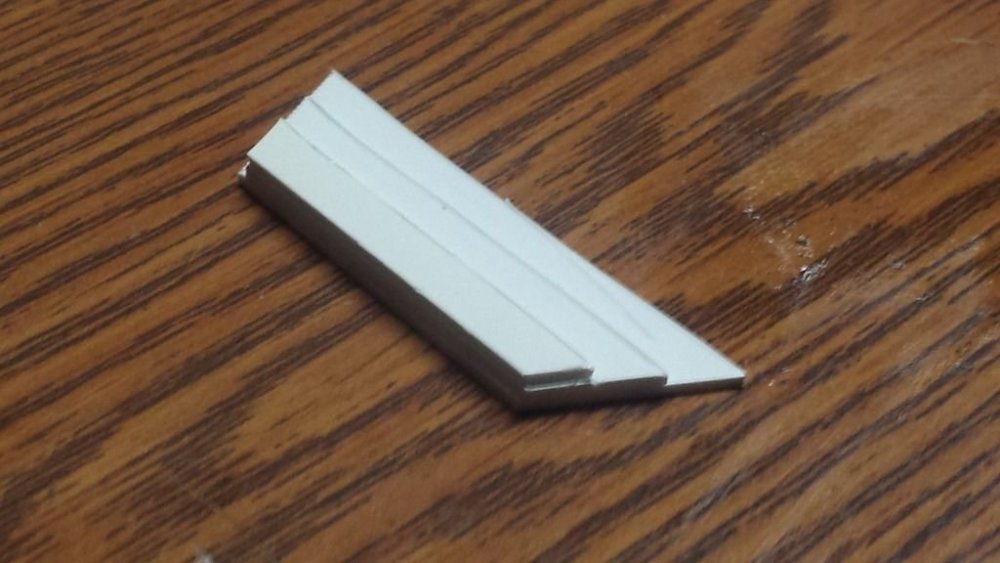
-
HOWTO: Make your ANOVOS TFA kit more accurate
SolderMaster replied to SolderMaster's topic in TFA Stormtrooper
Great questions.<br><br> 1. The screen used suit had some sort of black fabric with a distinct pattern. Almost honeycomb pattern. However, on the Disney suits we used a black counter top edging material. It had a flat side and a satin or glossy side. We went with the glossy side visible through the holes. Without posting an illegal photo, it may be awhile before I find out what type of fabric was used. I'm not a seamstress and haven't a clue what the fabric or the pattern is correctly called.<br><br> 2. I will check my computer tomorrow and get back to you on this one. Disney suits used white caulk to hide the seams.<br><br> 4. The ribbed or stepped detail was cut off and thrown away after cutting the seam. A piece was added to the back and the two halves were glued with approximately a 1/8 inch gap. The stepped detail was recreated with a piece of siding. Siding that I'm guessing would be used in model trains for a house or building. I say guessing because the team got it from the hobby shop. The detail consists of 2 actual steps. The first step should sit below the armor, the second step then the backing piece. The second step should stop at the edge of the half that contains the detail. I know I'm digging myself a hole. I will try to get something via a photo ASAP.<br><br> 5. I don't remember seeing nylon as part of the belt...I will check photos and come back to this one. <br><br> 6. Yes, black rubber of some sort. Unknown what actual type. But I've priced the rubber at McMaster and it's a little pricey. 30 bucks for a chunk that would be needed for both boxes. We did not use rubber on the Disney suits. Time was of concern, we just used the ones that came with the kit. Glue, screws, etc would get the job done.<br><br> 7. Me too. ;-)<br><br> 8. I believe whoever built the suits for the film, didn't have a freaking clue what they were doing. I swear, anyone who has built a TK would have done a better job. The suits were poorly strapped...pathetic really. We think they added the metal to prevent the shoulder bell from riding over the yolk. But, that doesn't even come close to riding over it so it doesn't make much sense. The slots cut into the armor were not needed IMHO. But, they were in the film so I must include them...however stupid they were. ;-)<br><br> I will continue to update the first post as I build and as I find more usable photos. -
TFA Functional Belt Boxes build tutorial
SolderMaster replied to ukswrath's topic in TFA Stormtrooper
I give credit where credit is due. To make a tutorial THAT detailed takes time and passion. You, Sir, have my respect. You can't teach passion. Something I've learned over the years. Those of us who truly care about troopers helping troopers, will find a way, no matter how delayed (me), to bring information, knowledge, or nun-chuck skills so everyone else can benefit. Love this detachment! -
TFA Functional Belt Boxes build tutorial
SolderMaster replied to ukswrath's topic in TFA Stormtrooper
Well done, Sir! -
HOWTO: Make your ANOVOS TFA kit more accurate
SolderMaster replied to SolderMaster's topic in TFA Stormtrooper
1st post updated with a few photos. -
HOWTO: Make your ANOVOS TFA kit more accurate
SolderMaster replied to SolderMaster's topic in TFA Stormtrooper
No hard feelings at all. I have to be careful what I show photo wise. I got the OK from Anovos to post photos of just the armor build. I can not show photos from Disney or LFL. I wish I could because it would explain so much. Instead, I have to rely on what photos I did take during the process. When I get some time, I will try and tidy up the long list of upgrades/mods and organize it better. I did want to add on the forearms...The top where the resin greeblie gets glued down, is NOT glued all the way to the opening. It is glued about 75% from the elbow down. That way, you can get your hand through the opening without skinning your hand on the edges of the opening. Again, as I build my suit, I will take photos and post up what I did. Please be patient with me as I do have other "life" obligations. -
HOWTO: Make your ANOVOS TFA kit more accurate
SolderMaster replied to SolderMaster's topic in TFA Stormtrooper
Thank you Sir. -
HOWTO: Make your ANOVOS TFA kit more accurate
SolderMaster replied to SolderMaster's topic in TFA Stormtrooper
I didn't post it sooner because I have a full time job and a family. The summer months are pretty busy which is why I have just started on my armor. We finished the last 5 suits for Disney in June. To be honest, I was pretty burnt out. I was only able to work on the Disney suits during my "free time" which was when I wasn't at my job. I also had to get clearance from Anovos. I wish I could post everything I have access to to help you guys and gals out more. I do what I can, when I can. Not much of an excuse...but it is, what it is. -
HOWTO: Make your ANOVOS TFA kit more accurate
SolderMaster replied to SolderMaster's topic in TFA Stormtrooper
All of the suits were made by the same company for the film. All suits including the photo you have a question mark by has the seam. I downloaded your photo and blew it up. You can see the seam but the quality of the photo is poor and the image blurrs as you zoom in...making it a poor example. The Anovos suits were vacu-formed. The screen used suits were 3D printed. There are going to be accuracy issues. The mods I suggested are to make the Anovos suits look more like the 3D printed ones. -
HOWTO: Make your ANOVOS TFA kit more accurate
SolderMaster replied to SolderMaster's topic in TFA Stormtrooper
This was in an earlier post...<br><br> "The build team was allowed access to Anovos photos that were taken at the LFL archives so we could build the suits as close to the 3D printed ones as possible."<br><br> That alone says I have seen more than what's available on the internet. But it's cool...I get it.<br><br> I will post photos of my armor as I build it. Again, I cannot post photos of the screen used armor as it would violate my NDA. -
HOWTO: Make your ANOVOS TFA kit more accurate
SolderMaster replied to SolderMaster's topic in TFA Stormtrooper
It's there. You may not see it in this screen cap. But it's there.<br><br> You do not have to make all the mods. This thread is for folks who want to be SCREEN accurate. I have held the screen used parts in my hands. I know what I'm talking about. <br><br> If cutting your armor scares you...it's simple....don't do it. But don't call me a liar. ;-) -
HOWTO: Make your ANOVOS TFA kit more accurate
SolderMaster replied to SolderMaster's topic in TFA Stormtrooper
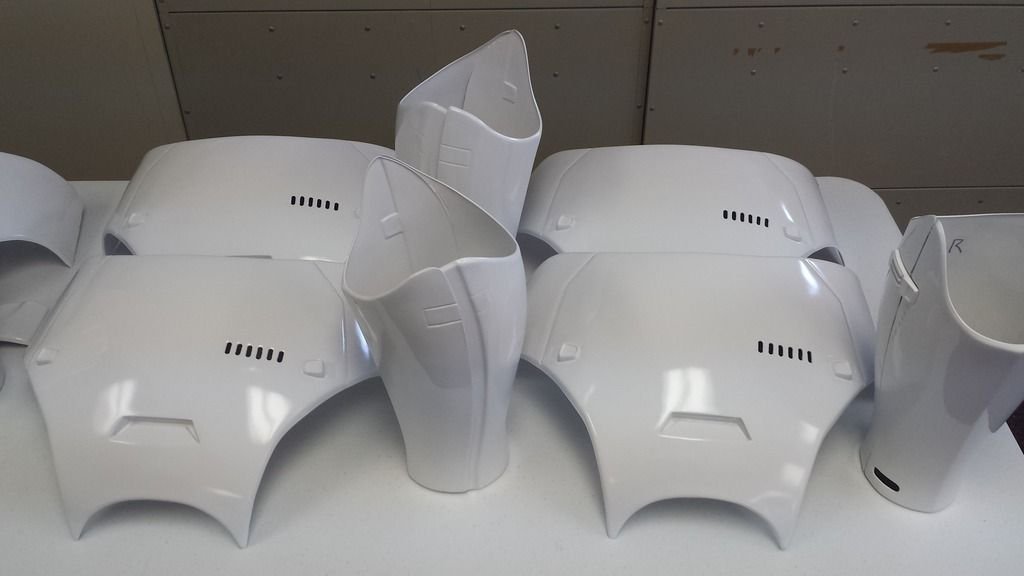
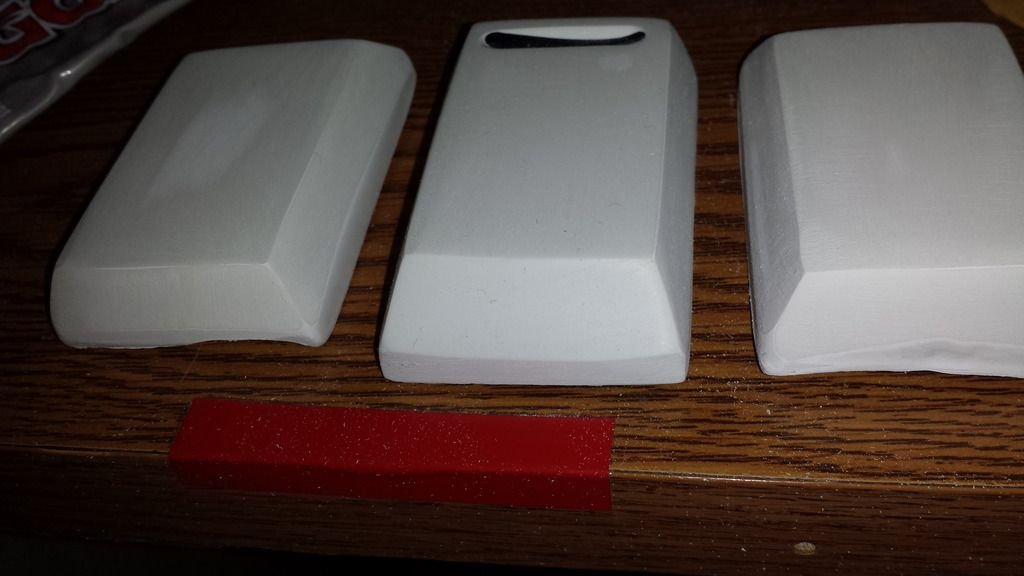
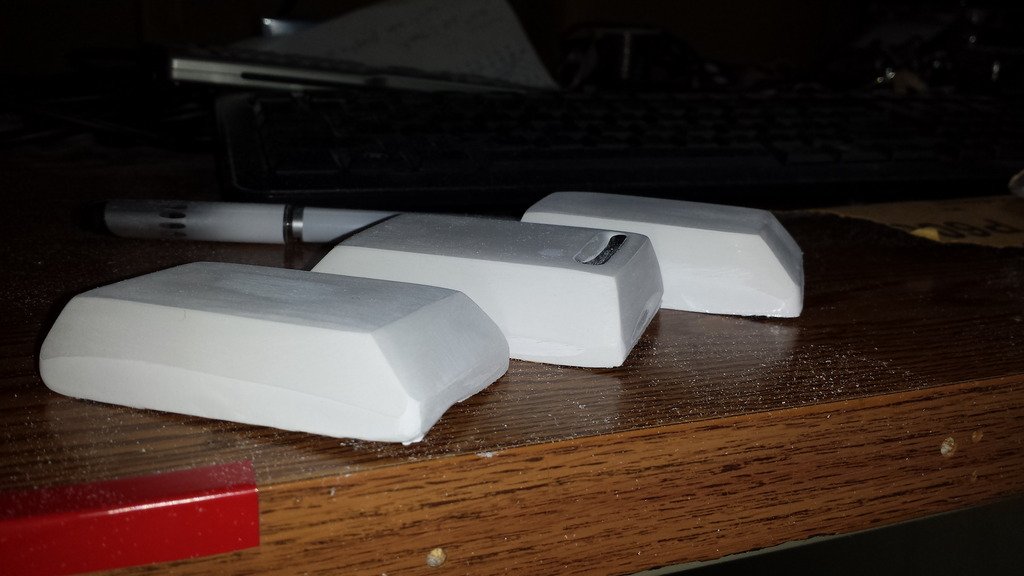
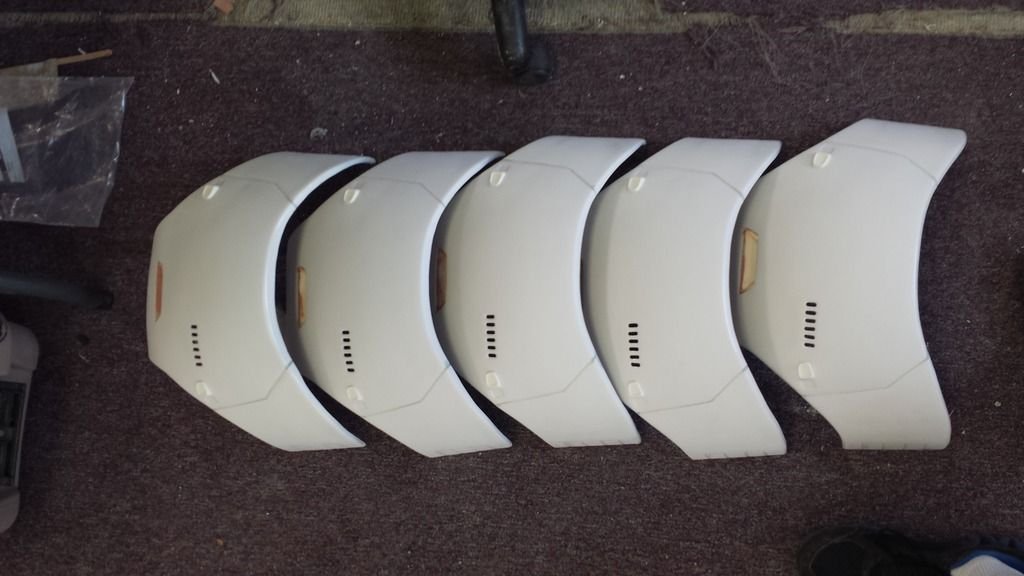
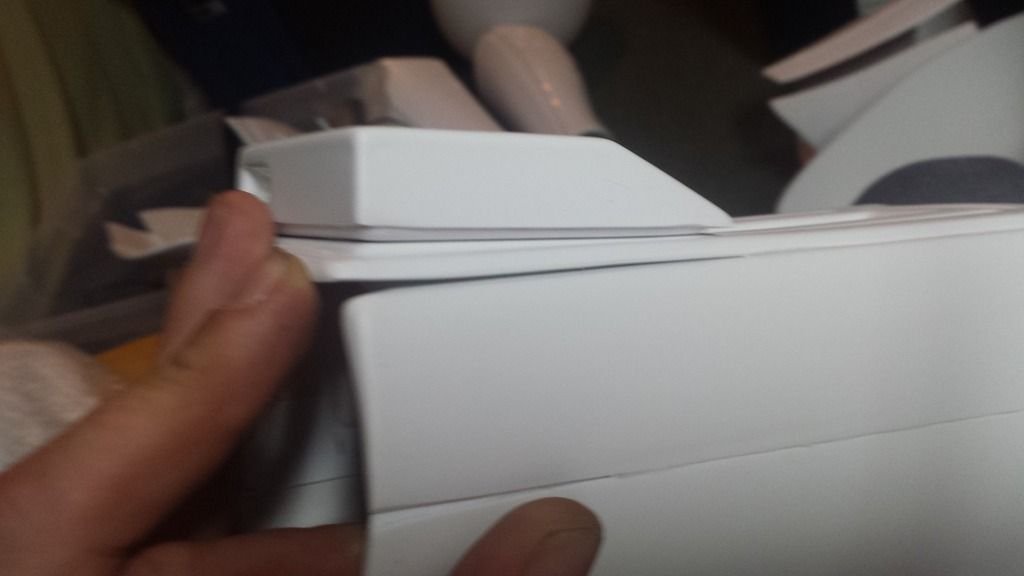
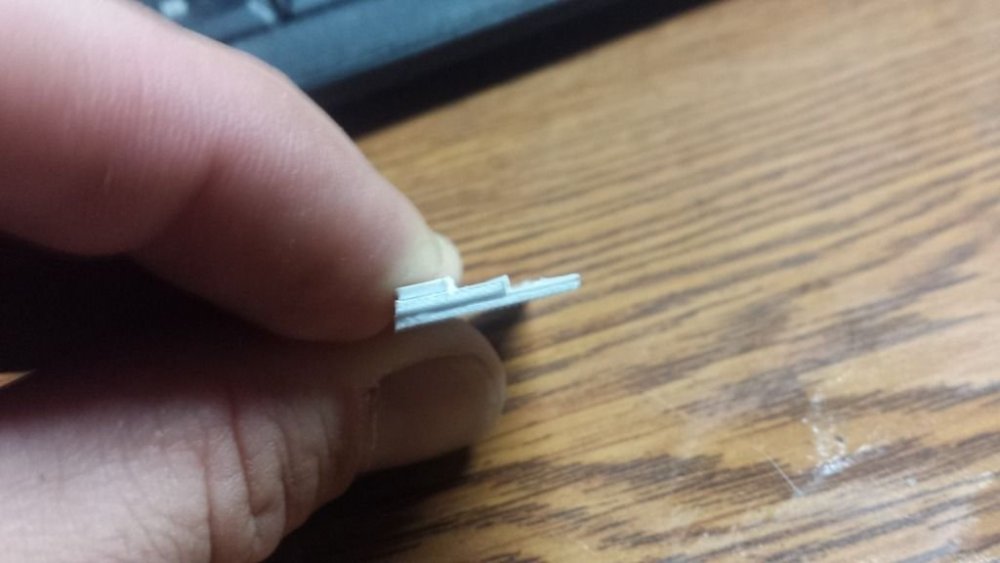
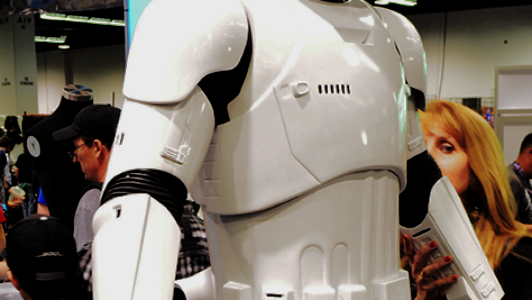
Here's a few shots...These were taken with my phone. You may have to save the file and zoom in on your computer. In this photo, you can see where the wings of the chest plate were cut off, reattached with a small gap, and bondoed the edges. Used a file to give the edge a little seam ender detail. You can also see the shin detail was cut out and backed with a black material. Chests before paint. Sanding block was used to sharpen the ab box edges. In this shot you can see the bicep steps detail was cut out and replaced to bring out the lines. The material used was thin siding for model houses. You can create the same effect with thin ABS or styrene. Also, bicep dual holes cut out and backed with black material. You can also tell the seam under the steps detail was cut and reassembled leaving a small gap between the two halves. I'll post more when I find them. Hope this helps clear the mud. ;-)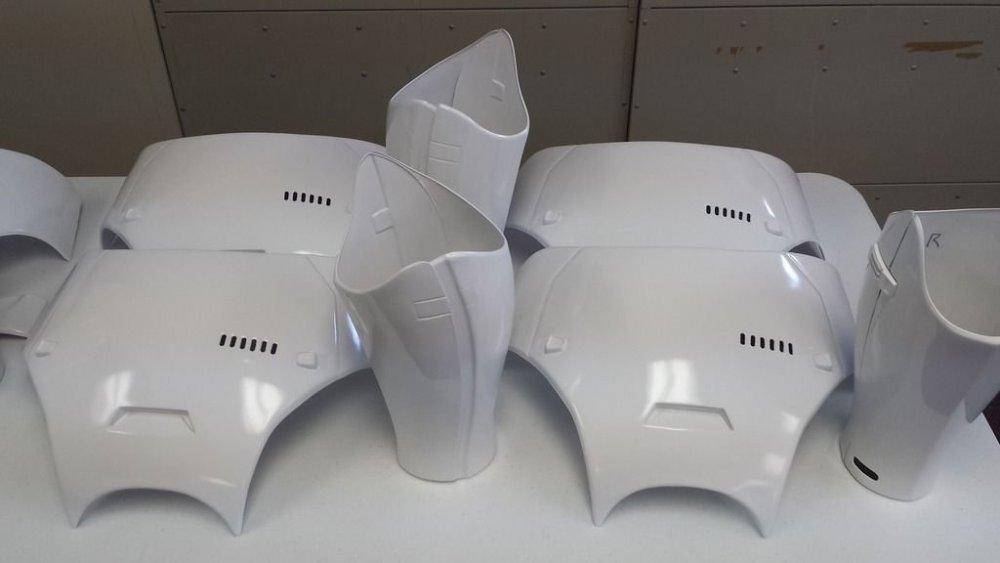

-
Are you people serious???? It's a Rubies...Nuff said.
-
HOWTO: Make your ANOVOS TFA kit more accurate
SolderMaster replied to SolderMaster's topic in TFA Stormtrooper
That's a good point. How would anyone know that I was even a part of the Disney build team for Anovos? I will upload a few pictures I know are not LFL and Anovos property, just so the credibility is there.<br> The build team was allowed access to Anovos photos that were taken at the LFL archives so we could build the suits as close to the 3D printed ones as possible.<br><br> Although, I was lucky enough to be a part of the build team, I am not an employee of Anovos or LFL. As soon as I have time to sit in front of my PC, I will get some shots uploaded. I can not upload the actual photos from LFL as that would be in violation of the Non-Disclosure Agreement I signed with Anovos. Please be patient and I will hopefully have those shots uploaded by Saturday night.<br><br> Again, great point. -
HOWTO: Make your ANOVOS TFA kit more accurate
SolderMaster replied to SolderMaster's topic in TFA Stormtrooper
I will have to use photos from my kit as I make the modifications. The photos I have access to, I cannot use per the NDA I signed with Anovos. I will ask fellow TFAs to post in this thread with their photos. I will edit the first post, or have Daetrin modify the 1st post if I can't when I get my photos taken. -
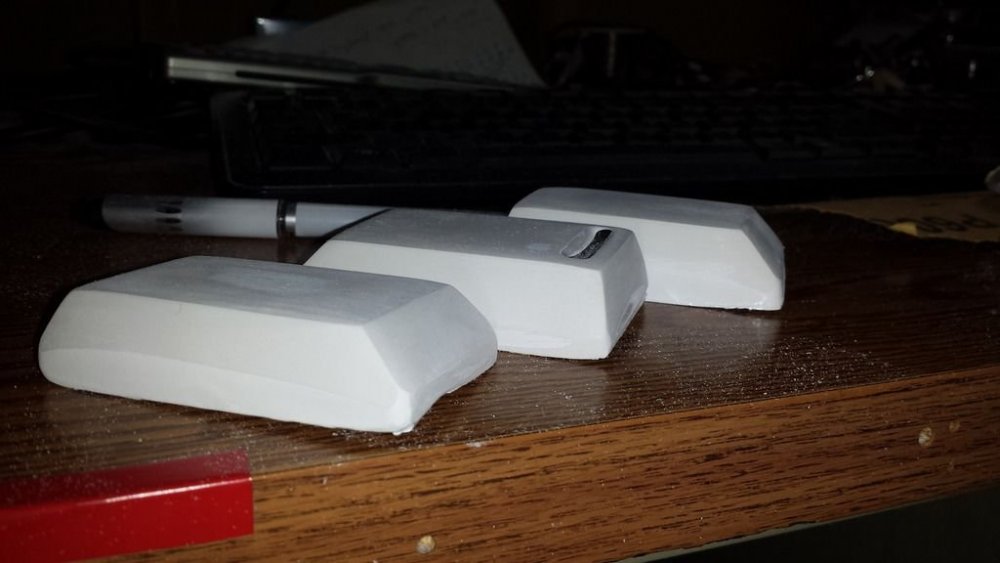
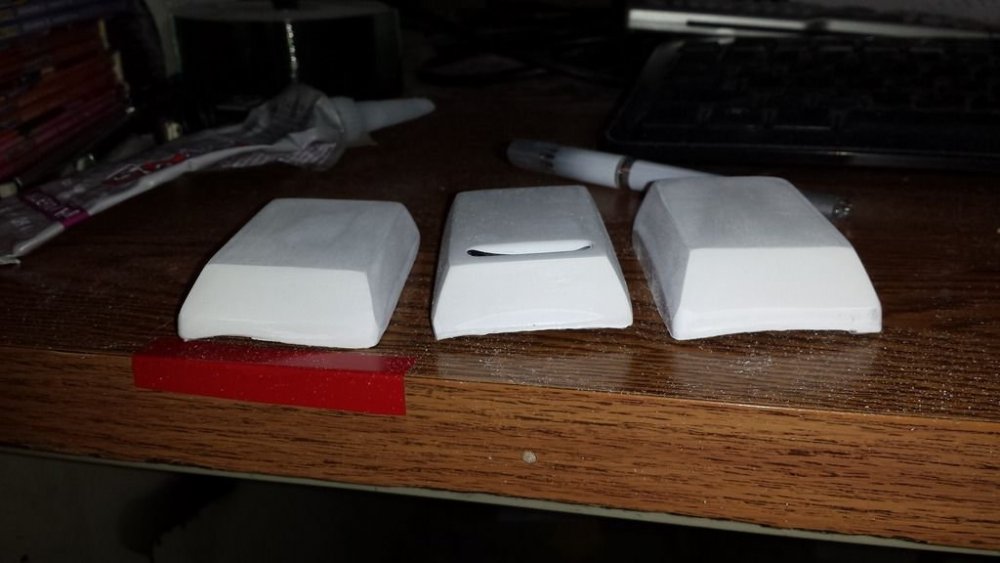
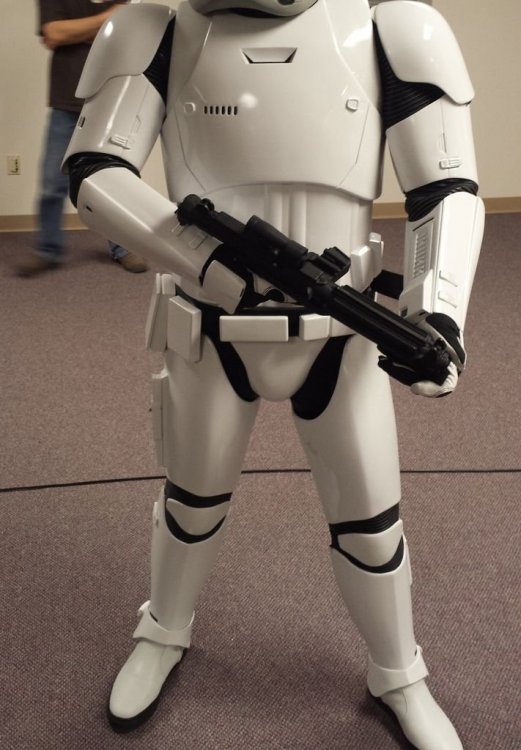
Here are a few things you can do to get your vacu-formed armor a little more accurate. 1. Cut the holes out of the chest, chest vent, shins, and biceps. Back them with a black cloth material. The material should have a brick pattern to it. Like as in a brick wall, staggered rectangular pattern. Something similar to this...only all black...and ...yeah 2. Use a sanding block on the ab boxes, left shin boxes, and forearm squares to sharpen the edges. We CA glued these on, but I like what other folks are doing using screws/bolts on the inside and drilling through the ab plate and securing with a nut. Any gaps between the boxes and ab can be closed up with either bondo, CA glue, or white caulk. 3. Cut the chest "wings" and reassemble using a strip of ABS or styrene on the back, realigning the two pieces to make a noticeable seam. Bondo the return edge on the top and bottom. Also, either sand out or use bondo to fill in the "shadow" seam line. It's subtle, but noticeable on most if not all chest plates...to the outside of where the seam actually is. 4. Biceps- Fit these as you normally would. If you need more plastic, add it during this step. Assemble using butt joints on the outside. Overlap the inside but use velcro to close it. Now, cut the seam line where the steps are, where the resin buckle gets glued. Back with ABS or styrene and realign the pieces making a nice straight seam. Leave approximately 1/8 of an inch gap. Cut out the little steps and toss that piece at your annoying cat. Replace that soft detail with some thin styrene or ABS or some modeling siding from a hobby shop. Cut to size and back the empty hole with ABS or styrene and glue in your newly made, shaper detail piece. 5. Use 3/8 of an inch neoprene foam under your floor mat belt. It should go Nylon webbing, neoprene, floor mat. EDIT [Daetrin]: using cordura nylon works well too... 6. For the two belt boxes..10H and 10K, use plain silicone rubber with a smoothe finish as the bottom of those boxes. Keep the ABS bottoms that came with you kit for trays to keep odds and ends in. With that rubber piece, 5/8" on the outer edges and 3/8" in the middle. You will have to cut a bend in the rubber so it matches the contour of your floor mat belt. If you don't, the ends of both boxes will flair out or stick out because they are flat. 7. If you want to be uber accurate, use velcro to close the inside of both thighs. 8. Cut two notches in the top of the yolk where the shoulder bell meets it. Use a chunk of steel or sturdy aluminum in between the notches sticking out toward the shoulder bell. Metal tab should be approximately 3/4" wide, 1/16" thick and protruding from the yolk about an inch. Use two 1 inch wide straps to connect the shoulder bell to the yolk. 9. Forearms: Only glue about 75% of the plate with the long greeblie. Leave the wrist opening unglued about 3 1/4 inches back. This will also help get your hand through without skinning up your hand. I appologize for the photos as most are taken with my phone. :-/


-
I'll come up with a list tonight. Great idea Mr. FISD founder guy Sir!<br><br> If I miss something, hopefully another Disney builder crew member will chime in.
-
Guys/gals, What you fail to understand or even know, is that the suits you see in this video clip are suits made for Disney by Anovos. Now, we didn't have the actors in these suits at the shop to build them to their individual body types. They were all made to be somewhat adjustable using mainly Velcro. That is why some suits fit better than others. Anovos can go to the LFL archives whenever they want, they hold a license. They can 3d scan ANYTHING. You will not get a more accurate suit unless Anovos makes a 3d printed suit...and unless you want to pay the 7-10,000 dollars for one, I would suggest everyone considers this armor accurate. With that said, there are somethings people can do to make it more screen accurate. Using a sanding block to sharpen up the corners on the ab boxes, cutting the wings off the chest and reattach with abs strip and ca glue...bondo the seem. Then file a new seem line, use black fabric or a piece of black elastic belting behind the chest, biceps, and shin holes....just to name a few.
-
Ahhh cool. Good call. Thanks for explaining!