Leaderboard


Popular Content
Showing content with the highest reputation on 03/24/2026 in all areas
-
Hola Jose Juan @JJGONZALEZ. Como bien te indica Torben, en primer lugar debes solicitar cambiar tu status del actual(miembro) a 501st Trooper en el link que tienes arriba. Para ello, debes incluir un link a tu ficha de central. Puedes ver ejemplos en las solicitudes de otros miembros en ese mismo hilo. Cuando ya tengas status de 501st Trooper, ya puedes solicitar los niveles superiores(Experto Infantería y Centurión). No puedes solicitar Centurión directamente, primero debes solicitar EIB (Experto Infantería) y cuando te aprobemos ese nivel, entonces podrás solicitar el nivel 3, que es Centurión. Echa un ojo a las solicitudes de otros miembros para que veas las fotos necesarias y la mejor forma de hacerlas. Si te queda alguna duda, pregunta, estamos para ayudarte en lo que necesites. Un saludo! As Torben mentioned, first you need to request a change of status from your current one (member) to 501st Trooper using the link above. To do this, you must include a link to your Central profile. You can see examples in other members’ requests in that same thread. Once you have 501st Trooper status, you can then apply for the higher ranks (Expert Infantry and Centurion). You cannot apply for Centurion directly, you must first apply for EIB (Expert Infantry), and once we approve that level, you can then apply for Level 3 (Centurion). Take a look at other members’ applications to see the required photos. If you have any questions, just ask—we’re here to help with whatever you need. Best regards!3 points
-
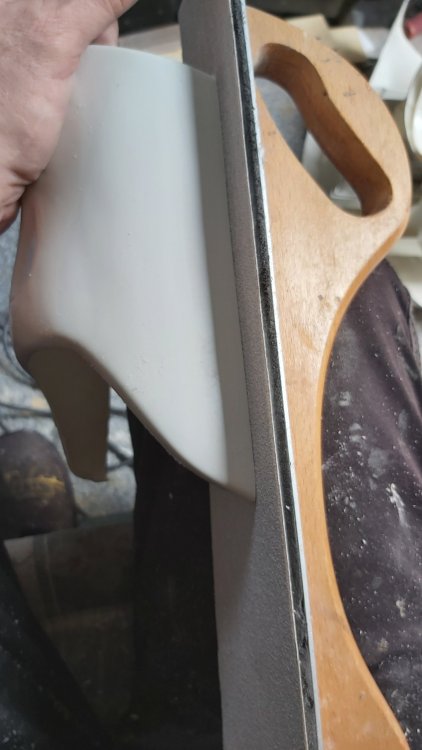
Finally been able to work on this again. Come up with a plan to work bottom up. This builds confidence as I go and introduces things like ABS slurry slowly as I work up. I started on the spats. I have finish sanded the trim lines to 120G now, probably need to do a 2nd pass at 240. I plan to make these as Ardeshir does in his video with the Velcro away from the slip end. To give these maximum flex I've gone pretty tight on the return edge, and have some foam trim coming to lock into the shin grooves. I also went pretty tight on the shin returns. Enough to have a bit of depth but not enough to dig in to anything like on my OT. I think there's about 3/4 mm of thickness, not quite as small as it looks here. Obligatory try on with completely inappropriate trousers This shows the spat return well I also drilled for the Kit Kats, and independently learned the template is rubbish. I carefully measured and marked and aligned the templates before drilling. And found I'd aligned it a bit too far left. The left side is right on the seam line, and should be in a little. To fix this I plan to slightly slot the holes in 2mm and then use a 3D printed reinforcement to fix the final position. I've drawn on some guide lines that will allow me to move them in slowly. I'll probably start at 1mm (marked is 2mm) and see how that looks 1st. Next up will be the thighs. Again I'll trim the return reasonably close and drill for the holster. I've also trimmed and sanded a few other bits bit these will get more attentions I work up the armour.2 points
-
Schweppes Mandalorian Pop Not often we get Star Wars branded products here but these were found at a local supermarket. I'm yet to give them a try Schweppes are releasing the new Limited-Edition Galactic Dark Lemonade Mystery Flavour – a mystery-themed lemonade in collaboration with ‘Star Wars the Mandalorian’ TV series... what’s the flavour?! Unleash a burst of galactic energy with Schweppes x Star Wars: The Mandalorian Zero Sugar Bounty Blast Raspberry & Blood Orange Flavour, limited edition creation from Schweppes' collaboration with Star Wars: The Mandalorian. This powerful flavour fuses raspberry flavour with the vibrant punch of blood orange flavour. With zero sugar and maximum cosmic refreshment, Bounty Blast is built for explorers who crave intensity in every sip. Whether you're navigating distant systems or just fuelling your day, this is the flavour that hits with out of this world impact. Catch it before it vanishes into the galaxy! Raspberry & Blood Orange Flavour

.jpg.9140be925592cb4c36ee2375fd50789d.jpg) 1 point
1 point -
As a first step, you would need to apply for 501st TK status. Look here: Then take a look here at the checklist; a few pictures are still missing. You also have to apply for Expert Infantary first. Then you can submit a Centurion request.1 point
-
This is a moment that feels like it’s been a long time coming for me—at least since I started this project back in December—but the third iteration of my helmet is finally “complete” (-ish). I’m still waiting on the rubber neck trim/seal to arrive, along with a temporary green visor until I feel ready to tackle vacuum forming, but this is my first fully completed attempt. Then in a couple of days, I'll go through and outline the greebles with black paint, and throw in the mesh behind the teeth. It’s not perfect, and there are definitely a few things I’d still like to go back and refine, but for now… it’s good enough for me. While this isn’t a major progress update, I have made some moves behind the scenes. I went ahead and pre-ordered the Anycubic Kobra S1 Max, which will give me a much larger build volume, heated chamber, and I opted for the AMS system to run multiple spools for longer prints. The goal there is to eventually reprint certain parts of my armor (and helmet potentially) using ABS or ASA so I can take advantage of acetone vapor smoothing and push the finish even further. Long term, I’d also love to either invest in a large-format resin printer or potentially commission a shop to print the helmet components, just so I can really take my time and chase a more refined end result. That said, I am genuinely proud of this one. All things considered, this came together in about three weeks of actual work time (with a vacation in the middle while the clear coat cured), and it’s a massive improvement over where I started. There are still things I’m not entirely happy with—but for now, this feels like a big step in the right direction. Anyways, back to the agenda—more sanding and primer, because apparently this stage never ends.1 point
-
Very nice work. A good tip to get those cut lines nice and straight is to use a sanding block or just sandpaper either wrapped or stappled to a piece of wood, it's ideal for getting your ridges to align with little to no gap.
 1 point
 -
Awesome video, John! I'm just about to start building a second set and this was such a good memory refresher of what to do (and what I shouldn't have done the first time around!). Keep 'em coming!1 point
-
Awesome work John! Keep recording like this whenever you get the time, it's invaluable for some people to see this process before getting started!1 point