Leaderboard


Popular Content
Showing content with the highest reputation on 03/23/2022 in Posts
-
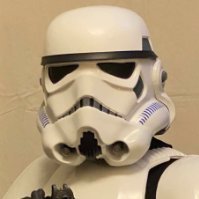
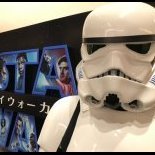
Hey troopers, We now have a white stormtrooper helmet! Yay. To be more specific, after the Oxide Red cost came 3 coats of Ford Diamond White spray paint. Here’s a little snippet of the spraying… Painting my helmet ;-) #stormtrooper #shorts #rspropmasters #starwars #spraypaint #retro And the results are as follows; The final coat is applied quite thick( giving it the gloss/shiny finish. It’s hard to get the same shine over the whole helmet, however, the main parts are nice and glossy. Here’s how it look against an ABS helmet (left) and another spray painted helmet (right). Below, the beautiful lumps and bumps: Next up, the hand painted details… [emoji2956][emoji2956][emoji2956]4 points
-
Good morning, I am from WV and part of Garrison Corellia. I am in the process of building a Incinerator Trooper and came over here to get some ideas. I have been in the 501st for just shy of a year and am loving it so far. Fair to say it has become a obsession since I am currently building three kits lol. Looking forward to seeing what people are doing with there tks and hopefully getting another approved costume.3 points
-
This has been a long time coming.. When I was young my dad used to dress us up for Halloween . He would use spirit gum , foam and spend hours painting us up to look like what ever scary creature we wanted to be that year. But one year in particular I remember he bought a don post Darth Vader, and then took a square Tupperware and our light bright to create the chest box. This creativity blew me away. I have been fascinated with costuming and especially starwars ever since. I want to say Thank you to all of you people of FISD. Thank you for being patient. Thank you for being so helpful with suggestions for adjustments. With your help my application was seamless. I am so glad to be part of this great group of people! Long Live the Empire!2 points
-
Hi everyone. Here's my modification of the Disney E-11 blaster. After seeing the various Disney blaster builds on FISD and seeing how much fun they were having with this very inexpensive, practical, yet quite accurate (?) blaster , I decided to try it myself. I started the build back in February 2020 and took about a month. Even after all the trooping and transportation and drops, it's still in good condition and is still my trusty side arm! My rules were : 1. Use only the basic tools and material I have. Keep it reasonable. 2. DIY extra parts if necessary. No resin parts, no waiting for any package to come. 3. Scavenge the electronic for another project. No pew pew on this build. 4. E-11 Reference guide and everyone's build was very much studied but accuracy not important so much. 5. Have fun. The blaster was about Japanese Yen 2,500 on the net, which was the original retail price. (approx US$20), They no longer sell it at Disney but they still pop up on the net every now and then so it is still available if patient. At least in Japan where I live. Anyway here's the Disney blaster. Here's the blaster taken apart. Electronics were taken out for another project. Muzzle, magazine well, Hengstler counter sawed off with a rotary tool. This was to start with a clean receiver which I would reattach the parts later. Remaining T-tracks shaved off, holes on the outer barrel manually drilled. The gaping hole where the Hengster and scope was fused together and sawed off were patched up with styrene board/ epoxy putty / normal Tamiya putty. The scope was missing a quarter of the body because it was take apart from the receiver. Same materials and procedure was used to close up the gaping hole as well. After all the patch up work, then lots of shaving with a box cutter, metal file, sand paper and patience cleaned up the surfaces. Henglster in the photo was scrapped and swapped with a DIY one in the end. Inside painted matt black. Here's a close up of the patch up job of the parts. Finally ready for painting. Typical of my project, Tamiya's rattle can was mainly used. Gray Tamiya surfacer, then Tamiya's matt black, then Turner's iron colored texture paint and Tamiya's matt black as final coat. Tamiya's semi gloss clear was sprayed to keep the surface consistent.2 points
-
Got replacement belt boxes from WTF as our BSP kit did not come with them. Trimmed and sanded the edges.2 points
-
Got the spats all Velcroed up. I’ll cover mask the Velcro when I get ready to prime and paint.2 points
-
Hi All, I am new here and thought I would introduce myself. My name is Dan and I'm from Toronto. I've always been a big fan of the stormtrooper armour. We used to have one setup in the computer store that I worked at. Somewhat recently I invested in a set of armour and had the chance to go out to a few events. I suspect I've made a few mistakes already based on what I've read. But I'm hoping I can continue to learn and improve. My hope is to improve my armour to the point I can get approved and participate in some more events. Excited to be here and looking forward to getting to know everyone. Dan

.thumb.jpg.b3097fdc365c52871f10763d8eeab4a0.jpg)
.thumb.jpeg.f1a88af9fa91e33edd339fcffa8cb38b.jpeg) 1 point
1 point -
Hi folks Shirt Run Open Yes this took some time with waiting on DLFL approval but the shirt run is open at last. Please note, due to the restricted time frame as we are trying to get shirts in hands for celebration in late May, the run will be short closing on the 14th April. If you want a shirt then please don't delay in ordering or run the real risk of missing out. This run is open to Full FISD members with a TK ID specifically, not a legion wide run. Closes 14th April1 point
-
Thank you very much! Any and all help would be much appreciated . I'm going to go through and compare what I have to the CRL and then post what I come up with to the review section. I need to source a few soft items like boots, belt and holster atm too. If you have any other suggestions on the best way to go let me know!1 point
-
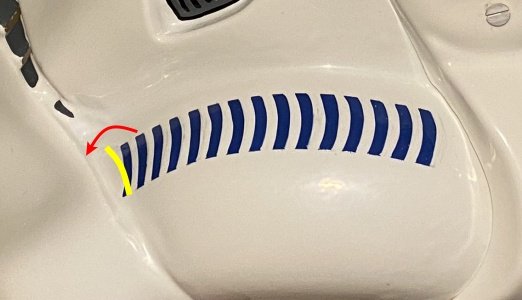
Hi Ben...Congrats, your armor looks great!!!!. If I may, I would like to add one more thing(suggestion) to Mario's and Caleb's comments. Not the biggest deal in the world, (we see this often), but as per the CRL and seen in the reference images the tops in the front section should lean forward. L2- Fall of tube stripe tops ideally lean toward the front. Reference Images Not a big deal(and it is not necessary to achieve the higher levels), but when you apply for Centurion, we hope you will consider replacing them for a better overall look. Again, congratulations, and welcome to FISD.
 1 point
 -
Thanks for all the feedback! I'll be ordering a helmet liner to wear the bucket lower, as well as a frown screen. I've reached out to the GMLs of my garrison and linked this thread.1 point
-
Hi Ben, Welcome to FISD. Great to see another RS Trooper join the forum. looking nice armor and surely it would be an easy basic approval sir. Glad to read you're aiming for higher levels and as you said a few adjustment would be necessary for EIB and Centurion and we are sure you can make it. Caleb pointed some details that can improve the great looking , additional I would like to mention a couple more. -For Basic level : Mesh may be used behind the frown to obscure the face of the wearer. Something that characterizes us(Stormtroopers) is that we are anonymous. The little ones and no so little too, like to see their characters with emotion and do not imagine that within that armor there is a fanatic like them. For this reason, we try, by adding a mesh behind the "teeth" of the helmet, to prevent our face from being seen through the holes in them. It's up to your GML to define if this is a mandatory requirement Reference image You correctly noted your AB Belt is riding a little low and the most common solution for that is to add some piece of velcro behind it to keep it in the right place. Some reference images Another detail is the photos posture, it looks like you bend your head a little and this affect the overall look of your armor. Just tell your photographer to take this in mind next timewhen taking your photos. I would recommend you to as first step apply for basic approval before making any change for higher levels. Once you have your TK number you can make the necessary adjustments to apply for EIB and Centurion.1 point
-
Hi Sean, we are always more than happy to help . That's what the FISD is made it of Troopers Helping Troopers. Enjoy being part of the Legion and the FISD and keep on putting smiles in everyone's face around .1 point
-
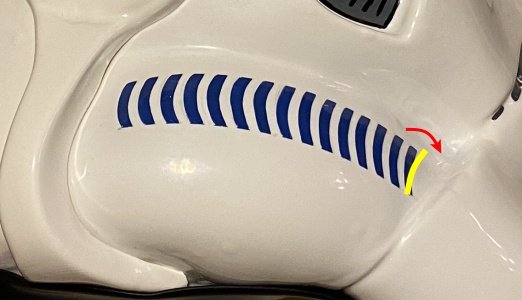
Hi Nick, painting sessions are not my favorites , but it looks you're in the right path. I would suggest to remove a little on the borders. References And some references for the tube strips and the back traps and 8 on the checks. take note of the CRL L2 requirement -Ideally, the tube stripes are positioned approximately a pencil width from the side of the cheek. -Fall of tube stripe tops ideally lean toward the front. 12 -13 lines 7 - 8 lines1 point

.jpg.b39d4e52f2bcb330e23c31defe010c27.jpg)
.jpeg.69c63bf46a13e6a3cf5a9266b352ff86.jpeg)