
Leaderboard


Popular Content
Showing content with the highest reputation on 01/10/2022 in Posts
-
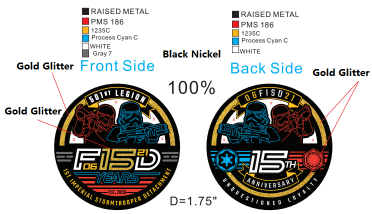
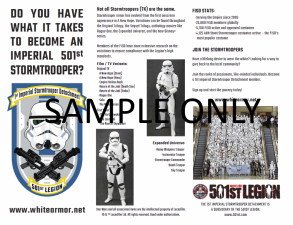
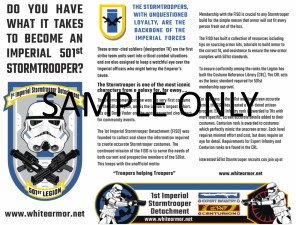
NEW In Memoriam Detachment Leader CRL Updates Detachment Affiliation Elections Merchandise Hall of Fame Just For Laughs Update Your Build Threads Around the Detachment INFORMATION & AWARD PROGRAMS Common FISD Acronyms and TK Glossary Pre Approval Forum 3D Section Field Exercise Award Imperial Attaché Program Fire Teams EIB & Centurion: What do these terms mean? Need Help Ask the Deployment Officers Advanced Tactics Awards Public Relations Staff List 2020 Follow FISD On the 24th of November Bernie Steenbergen Jr., TB-7946, passed away. Troopers who knew Bernie and trooped with him will remember him as a cheerful man who got a lot of joy and fulfillment out of his hobbies. Membership of the 501st Legion and the Dutch Garrison was a big part of his life. Unfortunately Bernie has joined the other troopers in the Hall of Eternal Legionnaires way too early. We wish Marielle, his friends and family a lot of love and strength in dealing with this loss. His girlfriend, Marielle TB-11300, wrote the following farewell note for him: “Today it has already been two weeks since you left us. Time stopped moving for me. I don’t know what to do without you. I love you so much and miss you a lot. “TB-7946 reporting for duty!” you used to shout so proudly! Star Wars and Re-enactment were your two big passions. Your house was filled with it. All our talks about DC, MARVEL, Star Wars, Transformer, Ninja Turtles, G.I. Joe, Re-enactment, history, which would last for hours – I’ll never forget those! This coming January, we would have known each other for ten years, of which three and a half years you were my sweetheart! You are the most passionate trooper I have ever known!” Our condolences go out to his family, friends. "Buckets Off" On the 9th December 2021 Phil Yellot (TK-656) passed away, he was a member of the 501st Legion since 2004. He made an imposing Darth Vader. One of the biggest highlights of his trooping experiences was to have been selected for the 2007 Rose Parade. All who knew Phil knew him as a generous, kind, gentle man with the largest heart imaginable. He left behind a huge number of friends, family, and beloved animals. Our condolences go out to his family, friends. "Buckets Off" Eternal Legionnaire Gallery: https://www.501st.com/members/memoriam.php Happy New Year and welcome to FISD 2022 I hope everyone had a safe and wonderful holiday season and are ready to get back into trooping, and being awesome on the FISD platforms. If you haven't been on the forums for a while, we welcome you to come in and check them out, re connect with our community and say hello. You might be surprised how the place looks these days. Updates: Our Celebration patch has been submitted to Legion, and we are presently waiting for the all clear, We have just launched an interest thread to help us gauge some numbers so please add your interest and approximate quantity to that post. There will be updates posted as we hear back from DLFL and pricing will be finalised when we have a better indication on total numbers. Please note this is only an interest thread, the sales thread will go live when we have all the information at hand. https://www.whitearmor.net/forum/topic/51827-celebration-2022-fisd-patch-interest-thread/ While we are on merch, we should have the design concept for the 2022 Detachment shirt finalised in the coming week and as soon as we do, that will also be posted and the approval form submitted. We are also hoping to finalise the vendor and work on distribution so make sure you keep an eye open for those pending posts on our forums. CRL proposed changes for OT TK's We have 6 proposals for changes to our Stunt and Hero original trilogy TK CRL's. These have been discussed thoroughly and are now set up under Poll's. This is your opportunity to vote for or against these proposed changes. 5 are for Centurion level only and in some cases are simple wording and explanation improvements. 1 is for a basic level amendment to the Thermal Detonator which would affect all GML approvals. The changes basically make it easier for higher level approvals to help prevent members from potentially having to pull apart and rebuild the TD if they wish to apply for higher levels. The Poll's can be found in this section of the forums. https://www.whitearmor.net/forum/forum/35-detachment-only-general-discussion/ January is the last full operating month for the term, and as of the start of February the election cycle kicks off yet again. If you wish to vote in the detachment elections, make sure you check your affiliation to FISD so you are able to participate. Legion run a mass membership update prior to Feb but occasionally a few members slip through the cracks and their connection to the detachments fails. If you find you are not showing affiliation on your legion membership, you can PM myself and I will attempt to manually approve you. This usually happens when the email you sign up to legion does not match the email you signed up to FISD with. Your GML also needs to sign off on your affiliation when you are fully approved as a TK, so you can also discuss it with them. This will need to be done prior to the election cycle starting. It has been a pleasure to serve you as detachment leader for the last two years and I thank you all for supporting FISD in any way you could. Lets hope 2022 is kinder to all, and I am excited to see what new adventures it brings. With Unquestioned Loyalty Andrew Franke TK11469 "Sly11" Detachment Leader CRL Update Polls ANH/ESB/ROTJ Currently there are some polls taking place on the forums in regards to some CRL updates, to have your say follow the links below (501st approved) ANH/ESB/ROTJ E-11 blaster ESB handguards ANH/ESB ear placement ANH/ESB/ROTJ ab plate ANH/ESB thigh ridge gap ANH/ESB/ROTJ thermal detonator With elections starting at the beginning of February it's time to check your detachment affiliation. OK so you look at your Legion profile and it shows that your detachment affiliation to FISD is pending, or otherwise incorrect. Why does this happen, and what is detachment affiliation anyway, and what will FISD do about it? The answer is that detachment affiliation is only ever used once a year, and for one purpose. The only time the Legion ever uses it for anything is to determine who can run for DL and who can vote in detachment elections. That's it. Otherwise it is pretty much ignored and not used for anything. The process of validating detachment membership is cumbersome and time consuming because people use different email information between their Legion and detachment logins, and that there is no way to bulk update the rosters. For a small detachment it is not a big deal to do this manually, but for a detachment the size of FISD with hundreds and soon thousands of 501st members, it's impossible. Fortunately we have technical folk both on FISD and in the Legion web team. Once a year they take a feed from FISD's database and do a bulk update on the Legion database. This occurs right before the election cycle starts and is done once per year. Pro tips: 1) Ensure the email address you use on the Legion & FISD boards are the exact same. 2) Ensure that your FISD profile has the correct TKID. 3) IMPORTANT! You MUST be in the right security group. It should be "501st Stormtrooper" in order for the automated system to pull you over. This thread is where you get your detachment access updated. 4) If after the bulk update is complete and your profile is still not updated, and you are 100% sure your info is in sync between the two boards, then ask for to the Legion web team. They should get feedback on why this isn't working. 5) If all else fails, ping the FISD staff. Which basically means that we'll simply tell the 501st web team to bulk approve everyone 6) If still you have no luck you can contact the legion web team directly via email: [email protected] To check detachment affiliation go to the 501st holocron here, login using your 501st forum username and password, click on YOUR PROFILE DATA, then look down the lower part of the page for YOUR UNIT AFFILIATION, then under DETACHMENT AFFILIATION. If you do not see FISD listed reach out to your GML (garrison membership liaison) as they can add it if you are an approved Stormtrooper. If FISD shows as PENDING it should be automatically updated just before elections, if not you can contact our DL @Sly11 and request a manual update. 2022 Legion Election & Timeline It's nearly that time of year again, nominations for Legion / Detachment / Garrison / Outpost / Squad begin 1st February and close 6th February. Please ensure you have spoken to the person who you wish to nominate to make sure they actually want to run. Nominations Start: 31st January @ 12.01am GMT and are open for 5 days Closing 4th February 11.59pm GMT If only one person is nominated for a particular position then it is filled and election process ends. If more than one person is nominated: Q &A Starts: Q & A's Starts: 5th February @ 12.01am GMT Ends: 9h February @ 11.59pm GMT Closing Statements: Starts: 10th February @ 12.01am GMT Ends: 10th February @ 11.59pm GMT Voting: Starts: 11th February @ 12.01am GMT Ends: 15th February @ 11.59pm GMT Transition Period: 16th February @ 12.01am GMT to 20th February @ 11.59pm GMT Take Office: 21st February @ 12.01am GMT Election Issues/Access You may reach the Legion Election Moderators by emailing [email protected] Link to legion election here Expert Infantry Coin (15th Anniversary Version) OPEN (Only a few coins Remaining) The time has come for the new run of EIB gold challenge coins! The 15th Anniversary gold EIB coins are available now. PLEASE NOTE: You must be an Expert Infantry member to purchase one of these coins. If you've ever purchased an Expert Infantry gold coin before, from any run, you cannot purchase another one. These are once per EI! You can find the sales thread here 2022 Celebration Patch RUN OPEN As always we highly recommend group orders where possible. Talk to your Squad, Unit or Garrison mates to help lessen the blow of freight. This run is being handled through Endor Finders, please see the link & password below. The Password to access the patch is: celebration2022 You can find the thread here Run will close on the 14th February so the patches can be ordered before the end of Feb and new term Here we are kicking off another New Year so let’s kick it off with this epic photo!Setting’ it off in 2022 please welcome TK - 14631 Ryan to the Stormtrooper Hall of Fame! https://www.whitearmor.net/forum/topic/48629-39-tk-14631-troop-log/#comment-678648 With Unquestioned Loyalty Aaron Gibson TK-99725 "Pyrates" Curator Hall of Fame "FISD Memes" Thank you to Luca "Morgi" TK66744 for starting a FISD specific meme thread, hope to see more of these in the future not only by you but by others as well. You can find the thread here WE NEED YOU TO UPDATE YOUR BUILD THREADS As most would be aware we are diligently working through the forums updating watermarked images, missing images and broken links, this has taken over a year so far and has been a monumental task but there is still a lot of work ahead of us. Members build threads are one of the biggest areas of watermarked/missing images and we are asking you the membership to help and update your build threads yourselves as this is just too big a task for staff. Build threads requiring updates are being moved over to this area https://www.whitearmor.net/forum/forum/241-build-threads-requireing-maintenance/ Thank you in advance for your cooperation. New FISD Tri Fold Brochure We have just launched our newly revised Detachment Tri Fold brochure. It's been quite a long time since we actually had these available and since then many things have changed leading us to updating some of the text to include new costumes, and have more relevant information. Originally these were done in a limited run by the member who created them, but nowadays, we have moved this to a print your own service making them accessible to all countries around the globe. Files are available to all full 501st members on request, and are completed in a very high resolution to ensure quality in a finished product. The thread can be found here for more information and how to access the files. INFORMATION & AWARD PROGRAMS For a full list of FISD awards head here Are you new to the FISD and wondering what the heck all those abbreviations and strange sounding terms mean? To help you @justjoseph63 has started a list of the most commonly used ones that will give you some insight. If you have ANY questions about a particular term that is not listed or suggestions for new ones please contact Joseph. You can find the list here Pre Approval Forum allows future Troopers the opportunity to submit photos of their completed build to be reviewed by the Staff, Imperial Attaches and others in preparation for forwarding it to their GML for approval. Any and all advice/suggestions given will be specific, constructive, helpful and respectful. Please note that this program will NOT take the place of your local GML, as Detachments are not chartered for costume approval and can not override a GMLs decision, but is instead a peer review program designed to help you look your best and offer guidance and positive feedback. For more information on this program, please visit the link here Don't forget to visit our 3D section when next surfing the FISD forums, there is plenty of useful information to potentially help you on your next TK adventure. You might be feeling may generous and share with our community a new TK related 3D file and maybe win yourself a 3D contributors award so check out the details below and be part of the in house 3D community. Here is a link to the FISD 3D Contributor program. Don't forget to create a troop log here on FISD and get awarded for your adventures The list of accomplished troopers keeps growing, so get on board and register your troops today Simply start (or update!) your troop log, keep the running total in the title, and post (at least!) a date and name for the official 501st event where you wore your TK! Once you've hit a milestone count, go over to the "Field Exercise Awards -- Post your milestones here" thread to request your profile be updated! Simple, right? Award Recipients December - January TK46116 "CallMeMrTibbles" Richard - Are you an approved TK that spends more time on the boards than the average Trooper? Do you enjoy using your knowledge to help out future and existing Troopers? If so, we would like to invite you to join the Imperial Attaché program! Members of the I.A. team are chosen to help out not only those here on the boards, but on a local level as well. Our aim is to have at least one in each and every Garrison, Squad and Outpost in the entire legion to be the eyes and ears of the FISD on a local level. For a complete list of Imperial Attaches, go here Some of the benefits: Access to exclusive Attaché merch., including patches, IA patch , IA Rocker For a complete list of Imperial Attaches, go here You may also be in the running for an Imperial Attaché Award Imperial Attaché Award for those attaché's who have gone above and beyond [minimum 1 year of service]. You can find a list of prior recipients here Want to setup a "Fire Team? the Fire Team program is completely optional, and is intended to help form a common identity and spirit of camaraderie among 501st Legion Stormtroopers in the same geographic area/garrison that troop together. Fire Teams are not officially recognized by the 501st Legion nor the FISD, although they will be able to access a Fire Team sub-forum on the detachment website. You can find more information here Welcome to our 64th Fire Team: Region: Los Angeles ; Southern California Garrison Name: Angel City Elite Congrats Troopers!! (NOTE 501st membership is needed to view this area) So what exactly are and levels? These programs were designed for those who choose to take their armor above and beyond the minimum requirements for basic 501st Legion approval. It gives you the chance to show a level of dedication and pride that takes your armor closer to being as "screen accurate" as possible, without as much extra work as you may realize! You can find more information on the programs here ASK THE D.O.s For those of you who have a particular issue (or issues) before or after submitting for Expert Infantry / Centurion level approval, in order to get you an answer faster you can now privately contact the entire Deployment Officer team at one time! Questions about fitting, repairs, CRL standards/requirements or anything pertaining to reaching Levels 2 and 3 are not only welcomed, but encouraged. Keep in mind that no question is too small, and that your queries will only be seen by the D.O. Staff. We are here to help in any way we can, so please feel free to send us a message by clicking on this link: @Deployment Officer Team and we will get back to you A.S.A.P.! This area lists all those who have gone above and beyond basic approval toward screen accuracy and obtained EIB or Centurion or both. FOR December / January the 1st Imperial Stormtrooper Detachment would like to congratulate the following. Expert Infantry Badge Award: Dwight "Dsposato0" TK62345 EIB 1038 Chris "Shinyarmour1" TK43118 EIB 1039 Ben "Ebio Amisi" TK19984 EIB 1040 GREAT job on your approval, now on to Level 3! Request your free EIB certificate here You can find a list of multiple award recipients here --------------------------------------------------------------- Centurion Badge Award: No awards issued Request your free Centurion certificate here You can find a list of multiple award recipients here If you see any of these Troopers around your Garrison or Squad, be sure to congratulate them! Newsletter If you have any interesting stories or photos or something you think newsworthy please send them to me via pm. For anyone interested in having a look through any of the older newsletter they have now been moved to a new archive sub forum which you can find Here With Unquestioned Loyalty Glen "Q" Rhodes TK-85421 "gmrhodes13" PRO Newsletter Staff List 2021 Detachment Leader (DL): Andrew Franke (Sly11) TK11469 Executive Officer (DXO): Tim Waychoff (Dark CMF) Chief Deployment Officer (DCA): Joseph Pedigo (justjoseph63) TK-10963 Deployment Officer: (DCA): Mario E RT (TKSpartan) TK-48117 Deployment Officer: (DCA): Jose Maria Sanchez (Chemi) TK-30173 Lead Provost Marshal (DCOG): Steven Sheades (starsaber25) TK-10466 Provost Marshal (DCOG): Chris Pearson (themaninthesuitcase) TK-10911 Provost Marshal (DCOG): Dan Branton (CableGuy) TK-42911 Personnel Officer (PER): AC (Novatie) TK-5597 Fire Team Relations (PRO): Mark Ryner (Captsafe66) TK-4584 Content Editor At Large (PRO): Christoph (Danny) Lauber (Ripper_L) TK-55550 Content Editor Support (PRO): Tony Jobe (ukswrath) TK-10116 Content Editor Awards (PRO): This will be handled by the XO Newsletter Publisher (PRO): Glen Rhodes (gmrhodes13) TK-85421 HOF Director (PRO): Aaron (Bronx) Gibson (Pyrates) TK-99725 Attaché Ambassador (PRO) Frank Peranteau (Frank75139) TK-75139 Social Media Relations (PRO): Teresa Nuthall (Soulart) TK-41307 Social Media Relations (PRO): Jim Ferrell (Rat) TK-95970 Systems Administrator (DWM): Eric Brager (Darth Aloha) TK-9674 Systems Administrator (DWM): Mathias (Locitus) TK-2959 Detachment Founder (DF): Paul (Daetrin) TK-8020 Trading Cards Content Support (IPM): Eric Ho (Hoda) TK 77520 Imperial Propaganda Machine (IPM): Brien Edick (Harbinger) TK 92802 Imperial Propaganda Machine (IPM): Jeff Salt (wingnut) TK 50297 Imperial Propaganda Machine (IPM): Richard Tibbitts (CallMeMrTibbles) TK 46116 Imperial Propaganda Machine (IPM): Adam Wolf (revlimiter) TK 11469 Facebook: www.facebook.com/whitearmor Facebook Group: 1st Imperial Stormtrooper Detachment (FISD) Official Twitter: www.twitter.com/FISD501st or @FISD501st Instagram: www.instagram.com/fisd501st On behalf of the 1st Imperial Stormtrooper Detachment Command Staff and the Imperial Propaganda Department


 5 points
 -
While that tip would have been probably been nice before the dremeling, I've apparently never had a set of spade bits. There's a couple in my drill drawer but not enough, so I've now got a nice set on the way from amazon for the next project that needs them. Thanks Tino!! It's always nice to expand the tool collection. Today's update - the Hengstler counter. I originally ordered the hollow/empty counter from Tino to keep my options on this build open. I thought it might be good for electronics. I also wanted to print my own numbers as I did on my Hellhounds build. And then I was installing a set of early Miata gauges in a cluster for photos and spotted the odometer size. Look at those numbers... those 6 digits. Perfect? MAYBE!!! I make mostly Miata parts for a living, specifically gauge components, so I have a lot of clusters laying around. I fished a parts cluster out of the shed and harvested the odometer from it. A few minutes of work got some digits free and shoved in the Hengstler box for sizing. The box both closed and showed the numbers through the window. Proof of concept! Then I spent the next hour carefully hacking the odometer into place in the counter. The reset shaft (the "top" shaft seen in the pic where I'm holding the odometer) is the exact size for the holes in the Hengstler. It's a bit too long, but a quick snip got it cut down to size. I kept the security spacers between the digits for nice spacing. I moved that blank column from after the ones to before the hundred thousands. And I had to neuter the reset ability. The white teeth got nearly completely cut out and the springy reset button no longer springs. But that's okay. Having an NA Miata odometer inside my Hengstler with my TK number is maybe the best thing I could ever hope for. I've owned an NA Miata for almost 22 years now. It's part of my soul. And now it's part of my blaster.4 points
-
I've had some extra time on my hands, so I decided to build this to round out my OT trilogy E-11 collection. Since finding an MGC blaster** is like locating the Holy grail, I found the closest 3D print I could. I'm not going to list the designer of the file as unfortunately there are many things that are not as accurate as I would like since it's the "Battlefront" version. I'm sure it would be fine for approval at all levels when built as-is, but as usual I have to push the envelope. Will it be 100% accurate? Not really, but since it will be used for display only I am hoping to get as close as I can. I have my work cut out for me, but I am looking forward to the challenge! Any comments/suggestions are welcome. ** This version is based on the Sterling Mark V Canadian C1 type as opposed to the British L2A3, so there are quite a few differences. Know in advance that this will be crazy pic-heavy, and since I have to alter so many parts I will do them in separate posts and add after completion I will add links to each one at the bottom of this post. This way it will be easier to skip to the item when needed. So, on with the show: Supplies: 1. JB PlasticWeld- (A must have. Can be drilled/sanded/painted). 2. Bondo Glazing & Spot putty- Awesome stuff. 3. Rustoleum Primer/Filler (sandable) 4. Rotary tool (Dremel type) 5. Sanding drums 6. Needle files 7. Sandpaper (80 to 400 grit) 8. Scrap ABS pieces 1 2 3 4 5 6 Here is the kit in it's raw form printed in PETG. I missed a few of the small items, but the majority can be seen. Two BIG shout-outs to: Caleb @ticopowell for not only printing this kit for me, but helping me with the designs. Germain @The5thHorseman for the precise greeblie file. You guys are AWESOME!2 points
-
Trigger area/Grip As seen in the first reference photo below (L2A3- ANH), the area under the selector switch has 2 levels, and the C1 version (second/third photos) is one solid piece. The last photo shows how this one looked at the start. To be honest, I was not going to touch this area... I mean, who the heck will notice something that trivial? ** And, the selector switch was printed onto that area. Ugh. But, as I went along (and even painted it) it bugged me to no end. So, I thought "In for a penny, in for a pound" and went to work. ** I would. Using a pointed Dremel attachment (2) I carefully drilled out the selector switch (3). The area was leveled out with the JB weld epoxy and sanded down (4). I wanted to get it a bit smoother so I used the Bondo glazing (5). Again, another sanding. I kept the selector switch, but had to add some of the epoxy to build up the bottom before filing/sanding it down (6). I drilled a hole in the switch and inserted a small nail, then drilled a hole in the area below it before attaching it back on. I still need a few coats of paint, but until then it looks passable (7). 2 3 4 5 6 7 On the right left hand side of the grip there is a hole to mount it to the base. In the L2A3 version this looks to be either a hex nut or a screw (1 & 2) depending on which reference you are looking at. BUT, the C1 has something different (3 & 4)). I used some black Sugru epoxy and a small ball bearing to get a similar effect. Again, a small detail but worth it IMO. 1 2 3 4 End result2 points
-
Fixed broken links2 points
-
Magazine well Another difference is the magazine well. The rear had the hole to mount the post that holds the grub screw and the raised triangle (3) on the side like ANH (2). After grinding down the triangle and filling the holes with JB weld (and sanding) it looks a lot closer. Reference 2 3 Finished2 points
-
So here is the plan- I recently built a spare ANH E-11 from one of Bryan's crazy accurate 3D kits, (link here), but since I will need a blaster for my current ESB armor build I will eventually need a weapon, so I decided to convert it. In looking at the reference photos here, there are 2 main versions- one using an actual Sterling L2A3 and a resin type (Pugman). Note that there are also some really odd versions, but I am not sure of their background so I am not referencing them. Because I will be using the ANH version, mine will be a based on the Sterling. IMPORTANT! For those doing an ESB build, there are 2 versions of this blaster that can be used for approval. Neither has the Hengstler counter or power cylinders, and the differences can be found in the CRL here. This version is just more involved. Sterling L2A3 version Resin cast "Pugman" version (note scope rail) Materials: 1. JB Plastic Weld epoxy putty- When dry, this can be sanded, drilled and painted. AWESOME stuff! 2. Bondo Glazing/spot putty*** (for a smoother finish). 3. Sandpaper (various grits- 80 to 400) 4. Needle files 5. Dremel type rotary tool 6. Sanding drums 1. 2. 4. 5. 6. *** Please be aware that this product should only be used outdoors or in a well ventilated area. It is also highly suggested that you use a mask and gloves. All that being said, time to get down to business. In addition to the greeblies, there are a few issues on the main body that will need to be addressed: The first thing to do is grind off the end muzzle disc, as most of the references do not show one present. After removing the disc, I filled the holes where the screws were with the Plastic Weld putty (sorry, I lost the pics of the filled part), let it dry 4-5 hours and then filed/sanded it down. A thin coat of the glazing putty made it perfectly smooth. Note that I put the new holes in the top/bottom as opposed to the sides. Before References After grinding Finished After removing the D-ring/mounting plate**, some glazing putty, sanding and paint made for a smooth finish. **You may be able to pop it off with some pliers, but I had to grind mine down. The only other alteration I made to the body was to remove the small tubular part that holds the grub screw on the side of the magazine well. After Dremeling (is that even a word? lol) it off level and filling the hole with the Plastic weld, it was sanded and painted. Before References Detail- (This is from my ROTJ build, but it gives you an idea of what to remove. Keep the triangle part. Finished Next up, the greeblies... stay tuned1 point
-
Update: I had to de-solder the wire connections for the scope display, main display, and laser in order to feed the wires through their respective holes. My soldering skills aren't the best, but I managed. Once done, all the components were re-attached and tested. I then found out my speaker wasn't working. A quick check revealed that the wire connection had snapped....yet again... for like the tenth time.... I have mentioned it before that the BlastFX kits are amazing, but I have had a bugger of a time with wire connections snapping from simply manipulating components around the blaster. This is understandable as the wires are very tiny due to the components used, but none-the less very frustrating. When it comes time to install everything and glue the bits-and-bobs on, I will probably use E6000 instead of superglue. That way I can probably pry off stuff to get to wires if needed. In this picture you can see the red/black wire extensions with connectors that I made that go the muzzle lighting effects. This was so I could take the blaster apart into two main parts: Barrel and Receiver, for transport. I really want this to fit in my TK transport case lid so I don't have to lug around a big rifle case and get stared at suspiciously... I'll have to see if this is still feasible as the barrel is very hard to slide into the receiver, and as this is simply printed plastic I don't want things cracking over time. You can also see the battery (yellow) and at the far left, the white rectangle is the bottom ejection port cover plate and will hold the on/off switch plus the 3 mode fire selector button. (Single shot, rapid shot, stun). I will still be using the kit supplied rotary fire switch that is part of the pistol grip and replicates the MG34 selector. However, if this craps out, I have an alternate mode. Everything is now fed through the holes, and I am GENTLY starting to re-assemble the blaster. In earlier posts, you see how I cut out the barrel near the receiver in order for more light from the LED string to show through. After looking online I saw a video made by 3D Props (maker of my DLT) showing the lights more toward the muzzle. It looks great! Also, the spacing of the T-Tracks at the muzzle gives more hole openings. I'm not sure how he is accomplishing this with the metal support "barrel" than runs through the barrel jacket. There is no room between the barrel and barrel jacket for the LED strip. Hmmm.....? I was considering moving mine towards the muzzle, but I would have to extend the wires, an possibly drill barrel holes again, which is a pain. I'll just have the lights at the receiver and worry about it at another time. I've also painted the new printed components, and have to wire in the On/off slider switch for the power.1 point
-
This.... looks... FANTASTIC! Well worth all that effort, Adam. Your OCTKD is in full-on mode... (welcome to the club). Looking forward to the next batch of photos!1 point
-
Thanks! This is what comes from having entirely too much time on my hands and an overindulgence in diet Mountain Dew.1 point
-
The Greeblies First up is the one that is attached to the barrel to the rear of the magazine well. It is listed as a "Nakata Browning M 1935..replica firing block" (1). However, the one shown here (1) does not have all the characteristics of the screen used images, There are 2 small curves in the corners of the top opening and 2 holes in the front (2 & 3). The one I received with the kit was way too long and lacked many details, so .... 1 2 3 since these haven't been made in many years, I turned to the person who has imo the most accurate designs anywhere- Germain @The5thHorseman . His designs are legendary and he hooked me up with the file of what has to be the best representation you can get, down to the tiniest detail. (THANKS)! I had this printed, did some filling/sanding and of course I made a mold and cast it in resin. Next up, the hammers and top greeb.1 point
-
Thanks, Richard.1 point
-
1 point
-
Rear sight This was fairly easy. Unlike the L2A3, the C1 version has tabs on the bottoms of each side, so some scrap ABS and a little filler took care of that. The sides appear to have socket-head cap screws in the centers, but they do not (at least as far as I can tell) go all the way through the sight (3). I cut down two (4) and just CA glued them into the holes. Done deal. Reference 2 3 4 Finished1 point
-
Worked on the armor some more today. Got the shoulder bells all glued up (E6000), and started work on one of the biceps. I cut out trapezoid to put in a resin cast detail later. Started taping it up to see how it fits. Tomorrow I will work on sanding edges and gluing up seems. On the seam that needs to be filled, I cut it flush so it would be easy to get smooth. I plan on filling with Evercoat Polyflex. The main question I debating at the moment is if I cut out the holes and back them with black gaffer tape I bought, or just put stickers on the after I paint. So here are progress pictures.1 point
-
I figured it out!! Below are images from my start of painting my bucket. I'm using masking tape for straighter lines on the vents, as you can see. I plan on using a second coat then letting it dry completely. I had the idea of scoring the paint along tape prior to pulling it off so it will be less likely to pull some of the paint. Hopefully this coming weekend but we'll see what life has to say about that.1 point
-
Too long! After joining the 3 pieces of the shroud, I noticed that it was actually about 5/8ths of an inch (3 cm) too long and the flash guard sat too far forward (2). After sanding down the outside and a few coats of primer/filler I cut it down (3). Holes were filled with the JB weld epoxy/sanded smooth and I had to make a new flash guard out of ABS (4). (5) shows the original position. Reference 2 3 4 51 point
-
Ejection port opening This was integrated into the print (2). I used the Dremel to remove it and sanded down the edges (3). The connector piece (4) fit perfectly inside, but I had to sand down a section (#4-in yellow) so that I could add the "front" of the bolt (5) made from an ABS scrap, but I made that part too long. It's glued now so no changing it. I used a galvanized nail with the end rounded off and the top removed for the bottom. Reference 2 3 4 51 point
-
Now to finish up.. The front/rear scope greebs have been CA (super) glued on, and to keep them secure I added wood screws from underneath. I countersunk the holes slightly to where the screw head would be flush with the bottom of the rail and would not be noticeable. For the rebar clips, I went with slotted pan head screws, as they look like the ones in the reference images. Reference Pan head (slotted) Finished product The screw on the rectangle greeb is a round-head star screw. I looked all over, but this is the closest I could come. CA glue added to keep it from twisting. The buttons and "swoop" were simply CA glued on. And here it is. I will painting the brass grip screw black and weathering it slightly as soon as the paint cures. Epilogue: Are there details that are not "ideal"? Absolutely. Will it pass at Centurion? I like to believe so, lol. Are there things that I would do differently? Probably, but I'm pretty pleased with the end result. Thanks for looking!! Since I have the molds now, if anyone wants a set of these greebs I can hook you up for around 11 bucks (including postage). PM me for more info. (Not shown actual size) NEXT UP! ROTJ build... EDIT: Completed ROTJ build can be found here.1 point
-
Okay, time for the greeblies- I looked everywhere online for these, including Etsy, RPF etc. No luck. Seems strange that no one makes these (at least as accurate as I wanted) so after referencing and comparing the sizes from the official photos I ended up sculpting my own versions. I then made silicone molds and cast them in resin. Are they 100% perfect or exactly film accurate? Nope, but for my purposes I am happy with the way they turned out. Starting with the one on the front of the scope rail: According to this site, it was a button from a Sony Cassette Corder model TC-67. I don't think so. Sort of close, but no cigar. Here are the references from the ESB E-11 reference thread I went by- This is what I ended up with. Rear of the scope rail: No sites even attempt to explain what the heck these were, so I had to go by the references and hope for the best. References My version For the left side they used rebar clips, but after searching worldwide I don't think theses particular ones have been made in a LONG time. With the assistance of @ticopowell (THANKS, Caleb... you ROCK!) I ended up designing my own version, had them 3D printed, filled/smoothed them and cast them in resin. References My version The other right hand side greeb is this one. Fortunately, my local hardware store was having a sale on Boba Fett blaster pieces so I scored on this one. I am just kidding. Back to the sculpting board. References My version Now for the right hand side greebs. Pretty straightforward stuff here- A "swoosh" cut out of ABS and some buttons made from ABS. I made the buttons concave on one side to conform to the shape of the barrel. Last up is the scope. If using the Promo version, as per the CRL for Level 2 it must be the M-19 type. There are some pretty darned good ones you can find cast in resin (links below), but I decided to go with the metal version I found here (shown below). A great seller who I have bought a ton of stuff from. Resin versions- (link here and here). Next up, painting and mounting everything!1 point
-
Very good progress, Adam. Glad to see it worked and you are happy with the result. Sorry for being late with that tip, but spade drill bits are ideal for hollowing resin scopes because these create 'flakes' instead of fine dust and do the job pretty fast. Maybe it still helps future builders... Can't wait for your next update.1 point


