
Leaderboard


Popular Content
Showing content with the highest reputation on 10/27/2019 in Posts
-
What Joseph said. Well Done.1 point
-
Halloween time is incredibly busy at my house so I haven’t had as much time as I hoped to worked on this kit after getting home from Pittsburgh last week. Oh well. I finished trimming everything except the upper back ridge, TD halves, and belt/AB boxes. I’ll trim those when it’s time to build them. I had an oh shucks moment after trimming the shoulder bell lip. There was an odd trapezoid shape in the trim line, I cut it. I definitely should not have. Oh well, I can trace these parts on any of the large scraps I have left and make new ones. Could be worse, could be the yoke return edge. I had hoped to turn the 8 forearm pieces into 4 today but I couldn’t locate half of my clamps and magnets. They’re here somewhere. I glued this half of the forearms and will have to give the E6000 24 hours or so to cure before I join the halves. I’m an likely going to need to order more magnets or gluing all of this is going to take months. Not to mention the bondo work I’ve got coming. Sent from my iPhone using Tapatalk1 point
-
For the blasters lights and sounds are very much a personal choice. I can live without the sound but the lights make a big difference. From under the bucket you can often hear people’s excitement when you power up. The pistol uses two anti tamper pan heads to slot in to the holster. T25s from memory but I’ll check. Sent from my iPhone using Tapatalk Pro1 point
-
Wow!!! Looks FANTASTIC, brother... GREAT job!1 point
-
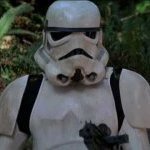
Home stretch! Helmet I forgot to detail that I had completed the helmet, it was relatively easy. Three pieces, front over back, and then the top. The face screen was a nightmare though, my trusty kitchen sheers weren't too happy with it, and the rotary tool made many many many scary noises when cutting. So I basically ended up using the cutting tool to roughly score it, and then used the scissors to cut it. Held in place with the hooks provided in the kit. Glued the top first, and then realized the bottom was very removed from the helmet, and then glued that in place too. Decided to leave gluing down the cheeks for a different time if I get more powerful magnets. Purchased a basic helmet padding kit from Prime (ugh), with focused padding on the upper forehead to keep the front of the helmet away from my face. Shins I thought these would be easy to do since we've basically been doing the same thing everywhere, but apparantly not. The shins were the curviest pieces I had to do, and it was obvious. Even now they kind of threaten to come apart, and I think post-Halloween it'll be amongst the ones I'd think about ABS pasting solidly and then painting. Decals There really wasn't much of a guide on the decals, I just kinda eyeballed it. Also, found that if you remove the decal, and then lay it on the long side it helps with placement. Fit I did a few fit walks, and found that the biceps keep sliding down. I added a layer of some of the leftover elastic I had, and it seems to have done the trick. Still figuring out what to do about the forearms, plus whenever I pull those up, they pull up my sleeve and reveal the green line of my glove. Thinking about cutting the end of the glove off, or sewing it inside. Here's what I look like as of right now, minus biceps and knees. Forearm greeblies not attached yet, and I forgot the hand guards for the photo.1 point
-
Off to a great start, looking forward to seeing your progress, good luck1 point
-
Not just the inner chest but the back needs it around the arms too Roberto.1 point
-
All the time to do things but not the energy, that sucks1 point
-
They sell AM armor so the product is legit. You can look up information about AM armor using the link Q provided1 point
-
I’m using pretty much the same set up as in Crickets build. Here’s the link.1 point
-
Sent from my iPhone using Tapatalk1 point


