Leaderboard


Popular Content
Showing content with the highest reputation on 05/04/2018 in Posts
-
Happy Star Wars day, everyone. Now, go buy your Solo tickets. Sent from my iPhone using Tapatalk2 points
-
Just a little copy/paste error - nothing to worry about2 points
-
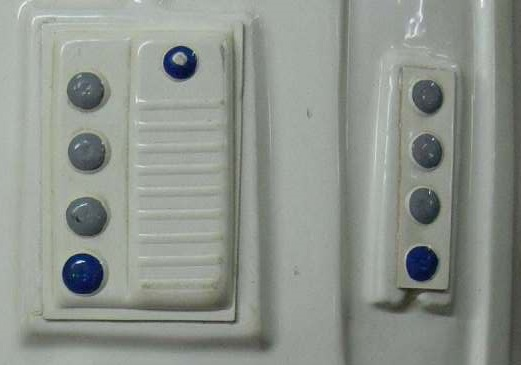
I decided to work out a complete, comprehensive list for those about to start an OT TK armor build (ANH Stunt, Hero, etc,) to help get everything in place for when "Big Brown Box" day arrives! This list does not include soft parts, (neck seal, boots, etc.) but focuses on the hardware and supplies for building the armor itself. However, a list of soft parts can be found HERE I believe I have covered most items, but would appreciate additional suggestions/corrections to add, and will keep it updated as such. Yes, it looks a bit daunting, but some of the items you will already have, and the rest can be purchased at major home improvement stores, online, or borrowed from a TK friend! Plus, it gives you something to do while you "hurry up and wait" for your kit! This list is includes items used for the EIB and Centurion programs, (marked with double red asterisks)**. These items are not required for initial TK approval, but I encourage everyone to consider them as an option. Hope this helps, and best of luck on your build! PLEASE NOTE: Some kits come with all the hardware you will need to build to Centurion level, i.e. split rivets, ear screws, TD screws, etc., however, not all armorers supply the correct ones. If you are (hopefully) planning on aiming for level 3, please check with your armorer to see if they provide these. You can also reference the photos below to see if they are accurate. These supplies are based on using the snap method for connecting the armor. Example photos are shown at the bottom for many of the items, but not all. (Everyone knows what a hammer looks like). Items with photos have a notation. 1. E-6000 glue- Great for almost everything, and removable if necessary. Highly recommended. (Pick up some wooden tongue depressors as well, makes spreading it easier)! (Photo 1) (Please see updated information on E-6000 below, after #50 before purchasing). 2. Binder or notebook- To keep notes on your research. 3. Dremel or rotary tool- A "must have". (Photo 2). Be sure to get the sanding drum attachment and extra sanding drums (Photo 3). I suggest the 180 grit type. 4. Small plastic containers- Keeps everything organized. 5. Lexan scissors- Curved and straight, for cutting ABS. (Photo 4) 6. Small spring clamps- For holding things in place while gluing. You can't have too many! (Photo 5) 7. Line 24 snaps- For strapping. You will need at least 30, and do NOT "cheap-out" on these, but purchase quality ones. (Steer clear of Wal-Mart snaps). Tandy is recommended. Tutorial located here: https://www.whitearmor.net/forum/topic/44617-snap-setting-101/ (Photo 6) 8. Snap setting tools- There are 2 types to choose from- One is a two piece set (requires a hammer) (Photo 7) and the other is the pliers style (Photo 8) 9. Hammer- For setting snaps if you use the 2 piece style of snap setter. 10. Pliers/vise grips- 11. Screwdriver- Slotted head. 12. Rivets-** 5/16 (8mm). (Photo 9) Round head bifurcated/split rivets with washers. You will need 9. (3 for the kidney, 3 for the ab, one for the cod piece, 2 for the thigh ammo pack). You will also need 3 speed (Chicago") rivets to attach your ABS belt to your canvas one. These are attached by hand and not to be confused with the aluminum ones listed below (#19). Some like to use the screen accurate single cap rivets (Photo 10) to attach the ammo thigh pack but these are not a requirement. 13. Elastic- 1 inch wide black for shoulder bells, etc. (4 ft.) 2 inch wide white for ab/back plate shoulder connection (1 ft.), 1 inch wide white for drop boxes, (1 ft.) 1/4 inch wide white** (1 ft.) for shoulder straps. 14. Nylon strapping- 1 inch wide black, at least 6 to 8 ft. long. 2 inch wide black (48 inches) for high tension areas if you are using the double snap method. (NP) 15. Exacto knife/extra blades- For cutting, trimming, cutting nylon strapping. (Photo 11) 16. Heavy duty razor knife/extra blades- For cutting cover strips and scoring around pieces that will be removed. (Photo 12) 17. Heavy duty scissors/tin snips- For (carefully) cutting large sections of ABS. (Photo 13) 18. Metal ruler or straight edge- (At least 18 inches long). For use as a cutting guide, especially cover strips. 19. Hand Rivet gun/aluminum open end blind rivets- For putting your helmet together. Available for about $10-$12.00, EASY to use! (Photo 14) 20. Metric Ruler- 21. 2 x 2 or larger piece of carpet- Protects work surface, keeps dust down, and stops small parts from rolling away. 22. Rags/paper towels- And plenty of them. 23. Blue painter's tape- 1 inch and 2 inch widths. For keeping glued parts in place and dry-fitting your armor. 24. China marker/pencil- For marking cut lines. 25. Sandpaper- I highly recommend Sandblaster Pro Flexible silicone sanding sheets from 3M, 220 grit. You will never use anything else, I promise. They last forever! 26. Sanding block- The sponge type, 120 grit. 27. Band Aids- You will need these. Might as well keep them handy. 28. Rare earth magnets- (10 minimum) SUPER strong! I use the 20 mm x 3 mm round ones. Cover them in blue tape to prevent scratching your armor. You cannot have too many!!! Tutorial located here: https://www.whitearmor.net/forum/topic/44619-magnets-101/ (Photo 15) 29. Butane Lighter- For sealing the ends of nylon strapping. (see # 44 below for a better option) 30. Large "half-round" file- For smoothing out edges before sanding. I used this a LOT, especially in the curved areas. (Photo 16) 31. Small "Needle file" set- Very inexpensive, comes in 6 different shapes, and is perfect for the teeth and eye openings on your helmet. (Photo 17) 32. Foam padding- 1 inch thick. Great for helmet and armor padding. Available at craft or fabric stores. 33. Velcro- 2 inch wide black (various uses) and 1 inch wide white, for calf closures (about 36 inches). Go for the "Industrial Strength" kind. 34. PAINT: Satin Black: Humbrol # 85 or Testors # 1747 for vocoder, trap/ tear drop/ear bar outlines/stripe(s), ROTJ and ESB frown, TD screw heads. Gray: Humbrol # 5 or Testors # 1138 for trap/tear drop/ear bar background, ANH frown and ab-buttons. French Blue: Humbrol # 14 or Testors # 2715 ForTube stripes/ab buttons. Mediterranean Blue Humbrol (Tube stripes alternative color) Testors: No exact match Gloss white for all rivet heads (excluding cod rivet). Mineral spirits for brush cleaning 35. Goo Gone- Citrus based solvent that will remove latex and enamel paint and NOT harm your armor. (Photo 18). 36. Small paint brushes- Assorted sizes. Try to buy quality ones.. Cheap brushes =cheap looking results. I suggest picking up a "filbert" (Photo 19) style brush (photo 5) as well, as it's rounded tip works great for painting the ab plate buttons and vocoder. Another GREAT way to get clean, crisp lines on the ab buttons is to use Testors Micro-Sponge brushes (Photo 20). 37. Wire or fiberglass mesh- (Window screen). For inside the "frown" of your helmet. A piece 3 x 8 inches will work fine, and you can trim it as needed. 38. Safety Glasses- It never hurts to be too careful, especially when using a Dremel type tool. For your Thermal Detonator, (TD) clips: (Note: There are some GREAT pre-made TD clips you can buy on this site, and some kits include them, but you can use the following 5 items to make your own. 39. Aluminum strip- 1 inch wide 40. Screws- Size #6 pan-head slotted screws **, 1/2 inch long, You will need 4. (Photo 21). NOTE: The CRLs have been updated and round head screws are permitted, but they must be the slotted (not philips) style. 41. Hacksaw- For cutting the aluminum strip. 42. Drill- Electric or battery operated, with various size bits. 43. Vise grip OPTIONAL ITEMS: 44. Heat sealing iron- For making return edges. Not normally needed, but there are some great tutorials on this here on FISD. Try it on a scrap first, though! 45. Soldering Iron- For making holes in nylon strapping and sealing the ends. Pretty inexpensive, and worth the cost! (Photo 22) 46. Plasti-Dip- A black rubberized coating you can spray inside your helmet, (also available in a brush-on). Or, you can use spray paint. Just remember to sand and prime first! 47. Heat gun- Not normally needed. For shaping ABS. Use this CAREFULLY, and practice on scraps first until you get the hang of it. These things can reach 1500 degrees and melt your armor. 48. CA (super) glue- Not recommended for first time builders, as it is PERMANENT, and you can't fix mistakes. Also, if it drips on your armor it is nearly impossible to remove. It can also become brittle over time, causing connections to fail. 49. Acetone- For use ONLY in making ABS paste for filling small gaps, (see tutorials). Do NOT put this directly on your armor, as it will melt it. 50. SUGRU- This is an easy way to attach the lenses in your helmet. Tutorial located here: https://www.whitearmor.net/forum/topic/44593-how-to-attach-lenses-using-sugru/ 51. Respirator- An informative post was made by Clint, (cm325i) concerning the effects of E-6000 glue on some individuals. Definitely worth a read: http://www.whitearmor.net/forum/topic/33347-e6000-warnings-read-them-and-wear-a-respirator/ 52. Cut resistant gloves- Especially helpful if you are prone to cutting yourself. Available online for about $12.00 (Photo 23) E-6000 update: Please note that there are certain online retailers (including those in Europe) that are selling FAKE E-6000 or "knock-offs" like these: The genuine product is clearly marked Made in the USA, and has a batch number on each tube. They do not sell to distributors in Asia, so if you try to save a few bucks by ordering from a seller there it is not the real stuff. If you have any doubts, you can contact the manufacturer at www.eclecticproducts.com, and they will let you know where to get it. The fake stuff is garbage and will not hold up. 1. 2. 3. 4. 5. 6. 7. 8. 9. 10. 11. 12. 13. 14. 15. 16. 17. 18. 19. 20. 21. 22. 23. IMPORTANT UPDATE! To make life easier, Ray (Dieltski) made this into an awesome Google spreadsheet, which you can download to keep track and add notes! Just click here. Thanks, Ray! .1 point
-
This is a mini tutorial about the use of Neodymium ("rare earth") magnets. As you may have read here in different build threads, these little devils are invaluable when constructing a set of TK armor. BUT.. there are a few things to consider before purchasing and then using them... For purposes of this tutorial, I will be referring to magnets that are 7/8 inches (23mm) in diameter and 1/8 inch (4mm) thick, (as seen below) with a strength of N40. First, know that these things are STRONG! (Imagine a regular magnet the same size, but 10 times more powerful). This is a good thing for our purposes, but you should know a few quick facts first: 1. I mentioned that these are strong already, but know that the strength is such that they can (and will) jump up to 8 inches to reconnect with each other or another metal object. If your finger is between the magnets and this happens, it can cause injury, from bruising to serious cuts. They also can (and will) shatter if allowed to connect from a distance, and flying chips can cause eye injuries. In a word, be careful. I highly suggest wearing eye protection. That is up to you, but please read this post from Glen located below. 2. Due to the strong magnetic field, those with pacemakers or the like should take extra caution when handling these. 3. Whatever you do, keep these away from children. Now that I've scared you a bit, on with the show! When considering what size to buy for your build, I cannot recommend the 7/8 x 1/8 size enough. The reason being is that you will only need one on each side of the connection you are gluing, and they have a large surface area. Anything smaller (or thinner) and you run the risk of having to "double up" (stack) them to get the proper adhesion, and the thinner ones shatter more easily. When you receive them, they will have little plastic separators between each one. To get them apart, the easiest (and safest) way is to slide them. As you separate them, again, be sure to keep them as far apart as possible to prevent shattering or injury. (Save the plastic inserts). After separating them, I strongly recommend doing one of 2 things... 1. Wrapping each one in masking or painter's tape, (this will prevent them from scratching your armor) or 2. Making mini "sachets" for each one. The tape method is quick and easy, but the sachets are really handy if you have the time. To make them: Cut 4" (10cm) squares from a piece of fairly thick cloth, (not t-shirt type material) for as many magnets as you have. Place one magnet in each one**, and secure it with a zip-tie. (I used a rubber band for the photo, which will not work in real life). This gives you a "handle". NOTES: **Be SURE that you do half facing one direction out and half facing the other (north/south poles). Otherwise they won't adhere. Using a sachet will not prevent them from shattering. Cricket added a great example photo and tips in a post below. After you have applied the E-6000** to the seam you are gluing, place one magnet on the top of the cover strip, and carefully add one to the opposite side (inside). To keep the cover strip tight to the join along the entire length, I suggest placing magnets every 3-4 inches apart. If you see any areas where the cover strips are not flush with the armor, add more magnets. For the ends, you can use clamps as seen above. Be sure they have rubber or plastic on the ends, though. After the E-6000 has cured (usually 12-24 hours) it's time to remove the magnets! IMPORTANT! I have found the best way to remove them is this: First, remove the clamps. Then, using one hand, grasp the magnet on the top closest to the end. Using the other hand, SLIDE the one on the inside out, keeping them well apart. Stack them using the plastic separators they came with. Now, it's time to look at that perfect seam and think "Hey, I'm one step closer to approval"! NOTES: ** As the vast majority of TKs will tell you, E-6000 is really the best adhesive out there for armor. Unless you are an experienced builder, if you choose to use CA (super) glue, know that if it drips, you run the risk of it running onto your armor or causing the magnets/sachets to adhere to your seam. You have been warned. 1. There is no such thing as having "too many magnets". I know they are not cheap, but the more you have the more pieces you can glue at one time. I recommend having no less than 12. 2. There are many sources to purchase this size magnet, and the prices can run up to $3.00 each. But, you can find them on eBay most of the time for a lot less. This seller for instance offers them for $9.99 for six, which includes postage. https://www.ebay.com/itm/6pcs-Super-Strong-Neodymium-Rare-earth-Magnet-Disc-for-sale-7-8-dia-x-1-8-thick/281060567507?ssPageName=STRK%3AMEBIDX%3AIT&_trksid=p2057872.m2749.l2649 Another good source is here: https://totalelement.com/products/3-4-x-1-8-inch-neodymium-rare-earth-disc-magnets-n52-8-pack Tim (PICTreed) found a great site that is a fantastic magnet source here: https://appliedmagnets.com/neodymium-disc-magnets-1-in-x-1-8-in-w-countersunk-hole-p-601.html 3. When you have completed your build, please consider "paying it forward" to someone in your Garrison/Squad who is starting their build by selling them your magnets at a reduced price. "Troopers helping Troopers"!1 point
-
Name: Daniel Melin TK ID: 99665 Garrison: Nordic Garrison Forum name: TheSwede 501st Link: https://www.501st.com/members/displaymemberdetails.php?userID=25259 Armor maker: TM (troopermaster) Helmet maker: TM (troopermaster) Blaster: E11 Imperial Warfighters Belt and TD is RS Propmasters Hight: 5'10 Weight: 200lbs Thank you for your consideration /TK 996651 point
-
Speaking of putting things on a guy's radar.1 point
-
Looking good, Daniel! As always. And if Dan ( @CableGuy) didn't see anything amiss, then all is good.1 point
-
That's awesome. Thank you so much. I am trooping for 3 days in a row at LEGOLAND this weekend. I with troop with a big smile under that bucket now. :-) Sent from my SM-G935F using Tapatalk1 point
-
Thanks Dan AND congratulations on your distinction Well deserved Should ad tube stripe sheriff as well though1 point
-
Well done, Andy. Superb work. See you at Centurion. :-) Sent from my iPhone using Tapatalk1 point
-
Congratulations and welcome to Expert Infantry1 point
-
Wow. Excellent work, as always. :-) Sent from my iPhone using Tapatalk1 point
-
Hey Andy, thank you for your EI application, lets see what we have here. CRL and EIB Application Requirements: All submission photos are present. Great work on your armor Andy, it's obvious you have taken great pride in your build and it shows. That said, your armor displays all the necessary elements to qualify for Expert Infantry. Congratulations Trooper! Other-Armor Fit/Assembly: In this section we review observations made by us and your fellow troopers. If there were any suggested corrections they would be made here. We only have one suggestion, and that is to trim down some of the excess material on the small AB button plate.The plate itself should reside within the boundaries of the mounting area as per the below reference image. Reference Image Centurion Suggestions: In this section we prepare you for Centurion. If there are any areas of concern they will be discussed here. And again, only one item to mention and really a very easy adjustment Level three certification (if applicable): Drop boxes are vertically aligned with the end of the ammo belt with minimal gap between belt and box Reference image Mate, what a lovely job you have done with this kit, we are delighted to say we have nothing more to add. Congratulations on a well deserved Expert Infantry badge
 1 point
 -
Since completing this build for a static display, many people encouraged me to “join a troop” and become a member of the 501st. But I really worried to damage the armor - and wasn’t sure about grown-ups running around in movie costumes. One day I met a Stormtrooper in a local traffic jam, identifying ourselves via stickers on the cars. Below is my current company car (shhh, my boss doesn’t know) However, we managed to talk about trooping and all this. At some later point I decided to at least try it and avoid any preconceptions. So I started into a foreign experience, that many of you know so very well… My day in white plastic On a recent Sunday morning I met 10 local people, while the only person I knew was the Trooper from the traffic jam. A few were members of the 501st, others not, but it was a very friendly atmosphere and I really felt welcomed right from the beginning. We drove to a hospital, specialized on children who require maximum care, and were asked to show up on their summer festival. The weather was perfect, a mix of sun and clouds at medium temperatures, no rain. In our dressing room we helped each other getting into the costumes and I was already sweating before we left the room. Felt good and curious. Then we went outside. After just a few steps, a mate in front of me stumbled at the stairs but immediately was caught by the handlers. Nothing happened but seeing this, my feelings mixed up with concerns and a little bit of panic - maybe just enough to also give some attention to our surroundings. We marched to the entrance hall. My lenses fogged up (no active ventilation in my display helmet) and it was hard to see anything. With unsure movement I walked in the group. Thanks to the handlers I didn’t get lost. Later I found ways to reduce fogging by adjusting the balaclava at my nose and slower breathing. The better view allowed safer movements and more interacting with people. From that point it was real fun. Some children were a bit scared, while others made big eyes and smiled. A lot of photos got taken that day and these here really don't judge the atmosphere. Many times I was able to convince shy kids to give me “high five” and pose for a nice picture, taken by the parents. Those were the best moments. And sometimes the adults were even more fascinated than the kids A few children in that hospital unfortunately were not able to leave their rooms and participate at the festival outside, so Lord Vader and I visited as much of them as we could inside their rooms. Sorry, no pictures. But it was amazing when a little boy noticed us entering his room and he said “Woah, I have an action figure from you!” Spent 4 hours in full armor that day (short event) and really felt a bit sad when going back to the dressing room. Although getting 3 serious armor bites at my left knee and a little scratch on my blaster (repaired the same day), I felt the strange need to possibly do this again, someday. We will see if that virus got me. Not saying yes, not saying no... But for the moment I really like to thank the Quettinger Stormtrooper for this ideal trooping opportunity, Alex (Memory) for being such a reliable handler and the Star Wars Fans Aachen for the friendly welcome and the photos from that interesting day.1 point