Leaderboard


Popular Content
Showing content with the highest reputation on 11/17/2017 in Posts
-
Teaser alert... Sent from my iPhone using Tapatalk3 points
-
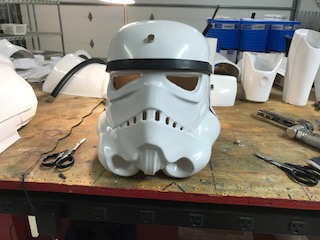
Hi Everyone! I am finally getting back to work on my TK! This week I was able to finish up the biceps and shoulder bells. The helmet was next on my list, with the help of Walt's helmet build video. I have to admit, the initial construction was much easier that I anticipated. I'll start trimming ears tonight.
 2 points
 -
Given the choices you have; I would lean to the blue snaggletooth one as well. A hengstler counter with metal component parts adds believable weight and realism. I vote for this one.2 points
-
We may have lost the tapatalk API key setting during some upgrade, but it's back in place now. Hopefully your notifications come back now.2 points
-
Nope,not a hijacking. Your Tramp is simply amazing. I will be buying your blast fx and scope reticle to put in Chris’s (Fieldmarshall) kit when it is in production. I had the pleasure of visiting Chris at his shop in South Carolina. Super nice dude. The work you did with Brian (bullhdogProps) on fitting the scope OLED in the hollow resin M38. Wow!!!! I was following the progress. I am glad to support you and your products.2 points
-
Some more pre clearance pics.... Gloves Neck seal TD Boots Blaster And the belt / holster Oh and my lid... inside I do need to replace the foam The “s” seal Front Side And back Hopefully I’m there Sent from my iPhone using Tapatalk2 points
-
I have been gathering parts and pieces since my last build... Many thanks to T-Jay for all the help and ideas, to Field Marshal..........WOW!!!! what can I say... his E-11 is damn near perfect. Also, to Dday's Pheonix Props kit, this kit is the base for this build. I just recently figured out how to repost pics. This time I am using IMGUR since photobuckets change to policy. I started with Field Marhal's M38. Since this is Aluminum, I used a Zinc Chromate primer. Once dried I used a base coat of Vallejo Bright Brass. I also "cast" the number 2 from my 1943 M38.. simply Hobby Lobby mold and resin I then over sprayed with a 2:1 Vallejo bright brass and brassy brass. I think I got the color close. I then used a super light layer of Vallejo sandy paste. Once dried I lightly sanded the "sand" with 1000 grit sand paper to give it texture. Once compete I covered with Vallejo chipping compound. I then painted it black and used water to "chip" the paint. This part takes practice and you can remove too much. But, the good thing is you can wipe it all off with water and start again. Once I got it where I liked it, I sealed it with Vallejo metallic varnish. Instead of using an airbrush for the varnish, I brushed it on. If you look at the original you can see brush strokes. I brush stoked the long axis... ooops, it should have been around the circumference. Ohh well. I dusted it with some real dirt and then darkened the white lettering. I used the "red/orange" lens from Tino's kit. I placed it behind to one that came with the M38... it gives it a pretty neat effect. Here is a close up of the chipping on the M38 and a side by side shot.1 point
-
I’ve made mine 33mm. Feels/looks right. Sent from my iPhone using Tapatalk Pro1 point
-
Can anyone tell me the height of the end cap of the TLJ Thermo Detonator? In other words, how much do I cut off from the spray paint cover?1 point
-
Yup, the ab and kidney. Just a liiitle gap there. Though I have been losing weight rapidly lately (I've made a complete lifestyle change so I can get back down to my pre-girlfriend weight) so honestly it shouldn't be a problem in the near future. For now, tight strapping might work, maybe. But I may just do a shim, which shouldn't be too hard.1 point
-
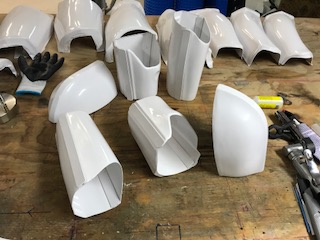
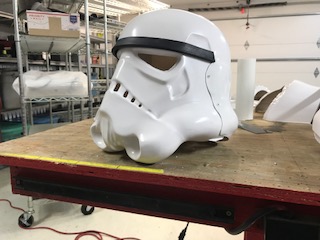
BBB Day! (This photo was taken by my girlfriend, who sent it to me before I got home to find the box) Tried the armor pieces on last night, kinda (felt like I didn't know what I was doing). The torso armor aaaaaalmost fits me perfectly---there's a small gap. So, I'll have to cut a small shim to close if off, but we'll see. For now, I don't even know where to start. I'm terrified of cutting anything. In better news, my helmet is completed and has shipped to me. Here are some pics from the fine gentleman who did it for me: I should have plenty of time to crack into the suit this weekend, since I won't be buying Battlefront 2 anymore Will have more pics soon--I'm sure I'll need help!1 point
-
Such an in depth build. Very interesting to follow and can’t wait to see it compete. :-) Sent from my iPhone using Tapatalk1 point
-
I have a blue snaggletooth fake hengslter amd thought about using this one for the sounds cards. I gutted it. Dermeled out some of the metal. The cards fit easily into this. Thoughts? Which one to use? I am leaning to the blue snaggletooth1 point
-
1 point
-
Voted! Sent from my iPhone using Tapatalk Pro1 point
-
Yeah, I learned the hard way: Not a good option if you're doing your first build unless you want to hang on for one more harvest with Uncle Owen. I canceled my order mid-September but didn't receive my refund until I threatened a "charge-back" with them around the 28th day after cancelling. Since then, I purchased a kit from RS and actually put it together these past 2 months and just found out today that I am now TK 19232! If you're still waiting for a refund, threatening a charge-back seemed to get their attention.1 point
-
The “silent second” in action. Thanks Tino1 point
-
As for your magazines, you can check out Robert's offerings, aka swpropman. He is on e-bay: NEW! Star Wars Stormtrooper E11 Blaster-1 1/2 Wave Hollow Magazine Replica-L2A3 and also from his website: The Stormtrooper Blaster Project I heard he's moving away from e-bay sales and prefers orders from his website, which I think leverages his ties with Etsy. He offers hollow, black plastic, replica magazines among other Blaster parts. I like it hollow as I plan to fit in electronics and plan to purchase from him sometime in the future. Hope this helps Stefan, another option for you, cheers!1 point
-
TLJ blasters have a second flashlight on them (same as Rogue One E-11's) on the barrel and some mounting points for a sling... I think that was it for changes.1 point
-
Good afternoon folks! Today, I tackled the End Cap. In the onset, I thought this would be relatively simple to do but as I got going and checking with SMG references and deciding what I can do to better functionality. I ended up doing quite a bit. Original End Cap End Cap and Ring Holder with T-Jay D-Ring For comparision, here's T-Jay's D-Ring and the one that's made by Doopydoos. T-Jay's is far superior. Light cleaning of the small bottom hole of the end cap using 1 / 16 " drill bit. End cap sanded. Here, although the FISD E-11 Blaster Reference showed guide lines placed on the end cap top to mark the center, I chose to turn the cap upside down and use the center hole provided. I created pilot hole using 1 / 16 " drill bit to mark the center point for carving out the shallow recess for which the ring retainer base will sit. I precision measured the diameter of the underside of the ring holder recess. Will apply initially 7 / 8 " spade drill bit to carve out the ring retainer base. I would later progress to a 1 " spade drill bit to finish the job. In hindsight, I could have stuck to the smaller size, but it's nothing a little green stuff can't fix. Sanding of shallow recess Given the recess only needs to be one or two mm in depth, I opted for manual sanding - forget the dremel. I applied industrial velcro to my sandpaper and ring holder and went to work. I gone past the one to two mm mark so again, will need green stuff to save the day. I would use a square file to get at the recess more exactly. The top of the ring retainer base is now flush against the end cap but it really should be raised a mm or so to follow SMG references. Here are some test-fit images of the ring holder on the end cap. Now, I proceeded to filling green stuff to ring holder. This closes the opening so to drill out later for a snug fit of the ring later at installation. Adding green stuff to increase curvature where ring holder meets retainer base following SMG references Here is a before and after picture of adding curvature. Here I added more green stuff, this time to the ring retainer base! This will raise it to correct height when installed on shallow recess. After the green stuff has cured, I measured out the diameter of the ring (5 / 32 ")and chose a 11 / 64 " drill bit to make the hole. I then proceeded to cut a narrow slit so to prepare for the D-Ring installation Sliver Piece reinforced with CA glue Here's the sliver piece installed overtop with the D-Ring installed Now, I decided to reinforce where the sliver piece meets the ring by inserting a plastic U-channel. I cut a hollow plastic tube to the length of the ring holder and sliced it horizontally. Added heat to ensure for it's curvature as well. Then sanded down the sliver piece so to make room for the U-channel. Finally CA glued the two pieces, installed it with the D-Ring underneath, and closed any gaps with more, yes, more green stuff. At this stage of the mod, I noticed something. The end cap doesn't need to resemble a toilet lid! You know, here it is again... I see a toilet lid everytime now...I've gone and carved out that bottom portion of the End Cap following SMG references. Here is a close-up of it before and after sanding / forming. Finally, at the gluing stage. Used E-6000 and black tape to hold in place. Green stuff to close the gap between the retainer base and the end cap. Here are close-ups of the raised retainer base. I also noticed that the ring holder had some of it's hard edges smoothed out, following, you guessed it, SMG references. So I did that as well. Used a square file and finished up with light grit sandpaper. Here are close-ups of the sanding done...before and after pictures. Done! Quite enjoyable working out the End Cap. I am especially happy with rounding out the bottom portion of the cap - gotta get rid of that toilet lid look =) Cheers! Have a terrific day, Sunny out here in the Canadian Westcoast =)1 point
-
Here is a link to YouTube. Lights and selector working. Now onto the sound card install.1 point
-
Updating first post: Run starts: January 8th Sizes: EU sizes 36/37/38/39/40 or Approximate US sizes 5.5/6.5/7.5/8.5/9.5 (per conversion chart) Price: $99.90 US, $35 Shipping to US You'll order these from http://www.imperialboots.com/ when the run begins in the new year. Set your calendar reminder!1 point
-
It seems I found a Chinese copy. 404-type 6-bit electromagnetic counter turntable I think, it is removed from the case. I order one of them. product link Weight: 200 gram $9.24 (product) + $8.13 (shipping) = $17.371 point
-
Hi all, I've made significant progress on the folding stock over the weekend. Happy to say I am well on my way to making the latch for the folding stock fully operational. I've borrowed much of the know-how from T-jay's 2nd E-11 Build on FISD. Having already hollowed out the folding stock; I proceeded to hollow out, let's call it the front end retainer, which is that part that holds the inner rod at the front end. Discovered 6" is sufficient and purchased the correct bit extender size. Used a 3/8" spade bit to make the hole. The hollow aluminum rod was drilled at the end, width wise to make way for support pins. The other end was trimmed to length to match support pins through the stock cube. Pins were cut to recommended lengths (30mm for the front and 20mm for the back) from the solid 5mm diameter aluminum rod. Front end of folding stock drilled through with 3mm drill bit then a 5mm drill bit to prepare for pin installation. There are quite a few components sourced and revised to make the latch mechanism work. A hollow styrene plastic tube at 5mm diameter was used to link the pencil to the spring coil. 30mm piece of styrene used to support spring against plastic tube. Length of components revised according to the recommended lengths and further confirmed by test fitting. Here's is a close-up of how the individual components worked together to form a functional latch. Here's the fully installed folding stock rod with functional latch components installed and pins in place. Here are some more details to come. The latch opening needs to be created and the latch itself needs to be created and installed. The 'washers' at the front end also need to be revised and installed along with the support piece that runs down the front. I had quite the ride putting this part together! Felt like I was doing open heart surgery for a bit lol I have to give a shout out to Tino for his detailed build; thank you thank you for your contributions to the forum; I would not even have dreamed of such a mod let alone do it, with out your enthusiasm and technical documentation. Three cheers for Tino! Jesse1 point
-
I added rust and carbon pigments and then finished with a top coat of Vallejo Metal varnish and dusted with real dirt. I washed the dirt off. Thought it looked a little too dull.1 point
-
The magazine I opted to use is from swpropman. I liked it because it extended less from the magazine well. His magazines come hollow, but I prefer solide resin. So I cut it to the lenght I wanted andfilled it with resin. I painted this gunmetal and then a layer of chipping compound. Then a final coat of black. Chipped away after applying water to give it the weathered metal look. Then added some rust and carbon pigments. Sealed with satin varnish, but thinking about using metal varnish instead.1 point
-
Hi all, Looks like I'll be sticking with my Doopy's magazine for now - sadly, Steve (gazmosis) is no longer making them. :-( Dan0 points