
All Activity
- Past hour
-
We must keep the meme train going even if it falls on me, Morgi or whoever that wants to spread some comedy. I think we can relate to this if it happened to anyone in the 501st it ain't FISD related but the krennic pic just made it funny af
-
 Thanks gmrhodes13! Good call on the buttons. I'll fix that while I'm at it. Is Goo Remover and Goo Gone the same thing? I'll try Goo Gone (which I have), a higher cutting compound, Retr0bright and then try wet sanding in that order.
 - Today
-

Sayless's 3D Printed R1TK Build Thread
Sayless replied to Sayless's topic in Rogue One Build Threads
Tenacious is some good stuff! Granted, it's very expensive for what it is... but I'm using the "standard" 80/20 blend with my ABS-like and it's yeilded some phenomenal results. All that to say, 1KG should go a loooong way. Good for blaster parts... or anything that runs of the risk of being accidentally dropped that you don't want shattered. -
 I suffered a similar issue with using black material for pouches on my FOTK armor. I used cutting compound which is a little more coarse compared to regular polish, I did however need to wet sand with some 1200 as some areas where pretty stubborn and then compounded. Locally we have a product called Goo Remover, I found this good for black texture marks on a white counter (oops), luckily it did come off after soaking for 1/2 hour. With using any product I advise testing on a small area first as some can eat into the plastic. For faded or yellowing armor Retr0bright can help, not sure how it will go with the dye though, may be worth a try. A few tips in this thread Getting a paint that will match the armor/helmet would be a little difficult, personally I would get the paint colour matched by an automotive paint supplier. You will also need to flip your large abdomen button plate Good luck, let us know how you go
 -
Picked up an Anovos TK suit for a song because it has purplish/blue marks on the chest, cod, and tiny bit on the belt. The guess is color transferred from the holster while in storage. Looking at Whitearmor posts, I figured I could buff them out, but so far...no luck. The following efforts have yielded NO results: Magic eraser; toothpaste; baking soda mix; 70% rubbing alcohol; dry erase marker; and Turtle Wax rubbing compound. Thoughts on what else to try? Am I stuck painting it? If so, what paint should I use?
-
 @gmrhodes13 @Chemi @TKSpartan @Doggydoc Okay! Here we go with full body of all requested adjustments, see previous posts for detail of the other fixes:
 -
Great. I wasn't liking how it looked rolling it out any further, I felt it made the TD sit too low and away on the belt. So I removed about a half inch of metal from the clips themselves to achieve the correct look and got it to sit closer to the belt as it does in the references. I'll get some full bodies done again today.
-
Correct References from another EIB submission
- Yesterday
-
Hello and welcome back to the forums Miles, this is a great thread full of Stormtrooper information you may find helpful Good luck on your continued journey
-
Sayless's 3D Printed R1TK Build Thread
gmrhodes13 replied to Sayless's topic in Rogue One Build Threads
Nice work. Of course I immediately had to Google "Tenacious" I have not delved into flexible resin as yet but it will now be on my to do list -
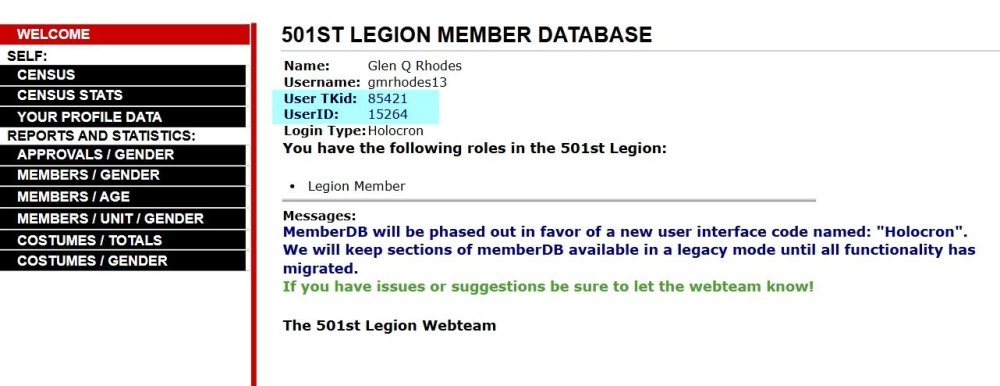
You need to be 501st legion approved to request upgraded access to the forum, take a look at the instructions in the first post of this thread as you need to add a link to your legion membership and also User TKID and UserID
-
Sayless's 3D Printed R1TK Build Thread
Sayless replied to Sayless's topic in Rogue One Build Threads
There’s been a good deal of progress on the western front… as well as a few *tiny* setbacks. First up: my soft parts finally arrived from Keep Trooping! I have to say, I’m genuinely impressed. The craftsmanship is fantastic—the stitching, materials, and overall finish are exactly what I was hoping for. The fit… well, the fit would probably be perfect if I happened to be built like a stunt performer. Unfortunately, I am built like… me. So, rather than ordering another flight suit, I dropped everything off with a local alterations shop that seemed extremely confident they could tailor it down where needed (especially in the arms, YIKES!). Time will tell, but I’m optimistic. Until then, you can make fun of my overly baggy arms. Regardless, finally putting everything on—even without armor—made this project suddenly feel very real. Comic relief aside, the last couple of weeks have been almost entirely trial and error. And with trial… comes an impressive amount of error. For those following along, you’ve probably realized by now that I simply cannot leave “good enough” alone. Which means… I’m currently working on Helmet #4. This time around I’m using Greg’s v3.5 helmet files, and I have to say—they’re beautiful. The goal with this one has been simple: slow down and try to eliminate every shortcut I took on the previous three. Of course, that immediately led me back down the rabbit hole of helmet lenses. Originally I planned on repeating my highly scientific “heat gun and hope” forming method from the previous helmet; needless to say…that wasn’t the answer. Then I remembered something sitting on my workbench: the resin printer. That decision quickly turned into another rabbit hole. Over the last two weeks I’ve been experimenting with different resin dyes trying to land on the correct shade of green while still maintaining good visibility. Which eventually, I got there. Mostly? The lenses themselves turned out remarkably clear, but remember when I mentioned I can’t leave things alone? I decided to modify them by adding a small lip/ledge to make installation easier and provide a cleaner bonding surface inside the helmet. The concept worked beautifully. Unfortunately, my print orientation did not. So… version two (or technically five?) will be making an appearance shortly. Still, I couldn’t be happier with how close these are getting. While I also on my resin "kick", I also experimented with adding a little Tenacious into the vat (with some ABS-like*) just to see what all the hype was about. I get it now. As with most of this project lately, I’ve been bouncing between sanding, painting, and modeling depending on what happened to be drying at the time. The good news is that most of the armor components are now sitting in primer, but I'm sure there's something I've overlooked (in writing this, I've realized approximately 4 things I'd overlooked). Whenever my hands needed a break from wet sanding though, I found myself back in Blender. This time, I tackled one of the pieces I’d been looking forward to the most: the abdomen. It’s easily one of the defining features of the anthology/"non-saga" armor, and there’s a surprising amount of subtle geometry packed into what initially looks like a fairly straightforward part. So… pictures are probably worth more than another wall of text. One thing I do want to say is thank you. I hope I've mentioned it a few times throughout this thread, but the amount of help I’ve received from members here—and a few people behind the scenes—has been incredible. Several new reference photos have answered questions I simply couldn’t solve from screen captures alone, and they’ve allowed me to incorporate a number of smaller details I would’ve otherwise missed. Those references also prompted me to completely redesign the rear belt (and eventually the front belt) so it now properly accommodates the spine plate and then interface correctly with the thermal detonator (which also received a few tweaks). I’m in the middle of printing those updated parts now, so I’ll dive deeper into that once they’re in hand in a few days. There are also a handful of smaller details that finally fell into place thanks to those close-up references, particularly around the abdomen greebles and inserts, that I was really excited to incorporate. Butttt, before any significant amount of white paint goes down, I want to get the internal strapping completed and verify everything actually fits together the way I’ve been imagining for the past seven months. It’s a whole lot easier to fix a problem now than after everything has been painted, polished, and declared “finished.” Everything seems to fit "digitally" but now it's time to make that a bit more real, like it did with the soft parts. So… let’s see how productive the next couple of weeks end up being. -
Thanks! I suppose the best way to do that is to rotate out from the clips?
-
 GOOD JOB! One thing we hadn't mentioned is the position of the TD's “control panel.” It should face a little more toward the front, and that's an L1 requirement. L1.: The white control panel raised ribbed pad faces the rear, REFERENCE IMAGES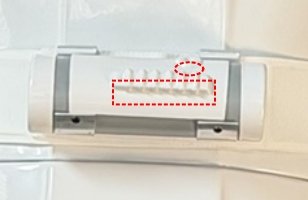
-
 Hello - please enable me to see my armor. I've been working with Glenn Rhodes, so he can vouch for me. Thanks.
 -
 Updated @niadly
 -
@TKSpartan @Doggydoc Here are some full bodies of the updates requested, and the helmet:
-
Welcome back and have fun building the TK!
-
 A trusted handler/wrangler who carries water with a bendy straw!
 -
WalterDStoltz joined the community
-
I appreciate that. I've built many a kits so I have a few tricks up my sleeves...but these videos are great to learn newer things as well.
-
So here's are some pics. This was a 3 hour rough trim and tape to see sizing. I still need to trim more but this is moving faster than I expected. There are just a few things ill need to alter. The shins are a tad to long and ill trim from the bottom following the curves and take an inch off. Otherwise everything fits pretty good. Can someone help me pic pics?
-
Hello all! I originally joined the forums 15 years ago as I planned to start my TK build. Then life got in the way. I am happy to say that I have now purchased my RS Prop ANH Stunt TK kit and look forward to getting everything squared away to request admission to the ranks. Feel free to provide any info or advice you think would be helpful. Time to get excited!
-
Welcome aboard Kevin!
-

Seeking Admin help to recover my old profile.
ant0n replied to ant0n's topic in Forum Help & Support
Yes, that's me! Rogers doesn't offer internet where I moved to, so I had to abandon all of my email addresses attached to that ISP, unfortunately. Use gmail now so that it's agnostic and I won't have that problem again. Can we recover my wreckdivr profile and attach my gmail address to it? You can then delete this profile. I just can't do a "forgot password" or anything on that other profile as I have no access to the email account any longer. Thanks for your help with this. I will wait to see what Locitus says. :) -
Seeking Admin help to recover my old profile.
gmrhodes13 replied to ant0n's topic in Forum Help & Support
Found, old username : wreckdivr email: [email protected] first post: https://www.whitearmor.net/forum/topic/33054-hello-from-london-ontario-canada/ Posts 19 Joined March 19, 2014 Last visited November 23, 2019 @Locitus should be along in due coarse to help







-
Albums
-
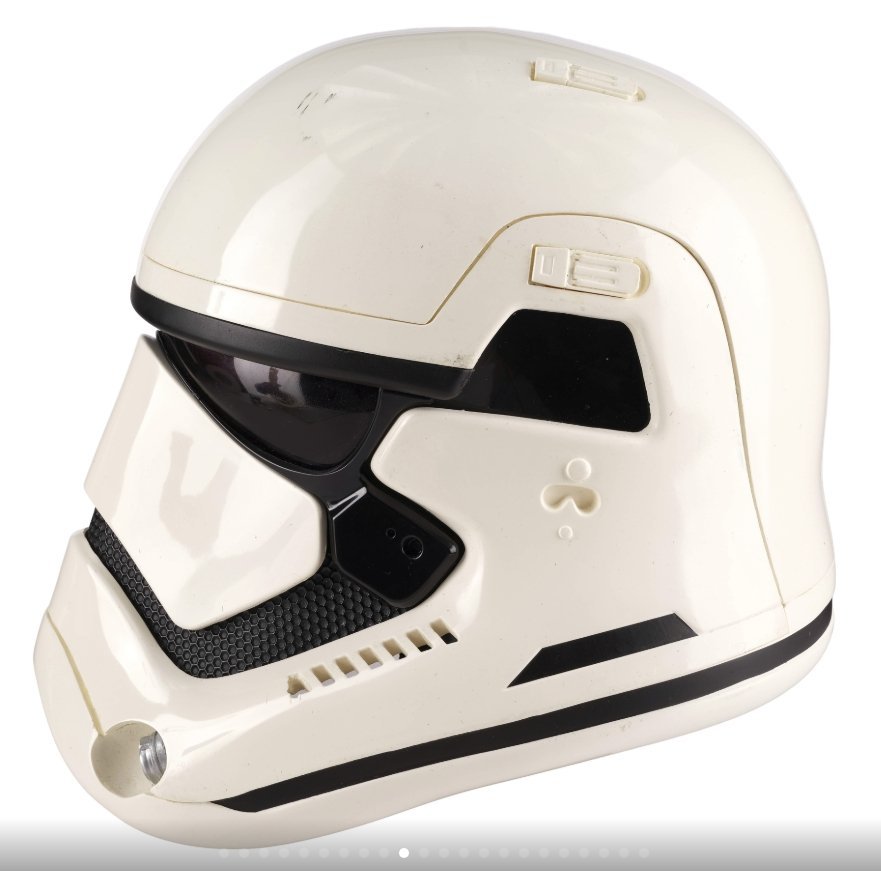
TFA Screen Used Helmet- Propstore Auction
- By gmrhodes13,
- 0
- 0
- 6
-

Andor Behind the scene Credit Makinarium UK
- By Sly11,
- 0
- 0
- 3
-

ILM-Made Stormtrooper Appearance Costume 1995
- By gmrhodes13,
- 0
- 22
-
.jpg.4442dc5fe3f1c7f833bba442847f56e5.jpg)
R1 Visual Dictionary, Promo & Behind The Scenes
- By gmrhodes13,
- 0
- 0
- 45
-

ANH Hero Helmet - Hovi & Mesh Coloring
- By gmrhodes13,
- 0
- 0
- 11
-