TK-8687[TK] Posted May 10, 2025 Report Posted May 10, 2025 (edited) 1. Luis 2. TK-8687 3. TK-8687 4. Southern California Garrison Armor: Anovos Helmet: Anovos S-Trim: Trooperbay Blaster: Etsy Boots: TK Boots Belt: Anovos/Trooperbay Latex hand guards and rubber chemical gloves: Trooperbay Neck Seal: Anovos Holster: Trooperbay Lenses: Self-made, Amazon welders lens Dropbox: Anovos Undersuit: Trooperbay 501st Legion - Vader's Fist Media consent (photos)-Yes Edited for additional pics.... Edited May 21, 2025 by TK-8687 1 Quote
gmrhodes13[Staff] Posted May 10, 2025 Report Posted May 10, 2025 You need to add your photos to the post not just links, try using the "direct link" option or the links with file extensions, ie: .jpg, ,jpeg, .png, .gif. You can also right click and copy and paste directly into your post 1 Quote
giskard8[Staff] Posted May 11, 2025 Report Posted May 11, 2025 [Moderator action] Moved thread to "Request Expert Infantry Status" where it should goes under. Good luck with your application! 3 Quote
TK-8687[TK] Posted May 12, 2025 Author Report Posted May 12, 2025 Will update. Thank you and sorry for the error. 1 Quote
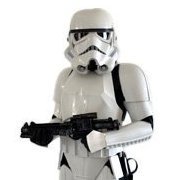
gmrhodes13[Staff] Posted May 12, 2025 Report Posted May 12, 2025 1 hour ago, TK-8687 said: Will update. Thank you and sorry for the error. You will also need to request Full TK access, currently you only have 501st access Also check this guide Quote
gmrhodes13[Staff] Posted May 12, 2025 Report Posted May 12, 2025 15 hours ago, giskard8 said: [Moderator action] Moved thread to "Request Expert Infantry Status" where it should goes under. Good luck with your application! He could not post it here as he does not have full TK access as yet 1 Quote
TK-8687[TK] Posted May 14, 2025 Author Report Posted May 14, 2025 I have TK access, may you please review? Quote
gmrhodes13[Staff] Posted May 14, 2025 Report Posted May 14, 2025 4 hours ago, TK-8687 said: I have TK access, may you please review? The process can take some time, please standby as a DO @Deployment Officer Team will be along in dure course 1 Quote
TK-8687[TK] Posted May 15, 2025 Author Report Posted May 15, 2025 Sounds good thank you! 4 hours ago, gmrhodes13 said: The process can take some time, please standby as a DO @Deployment Officer Team will be along in dure course Sounds good, thanks! 1 Quote
TKSpartan[Staff] Posted May 15, 2025 Report Posted May 15, 2025 Hi Luis. Thank you fo your EIB submission. One of us will be with you as soon as possible. Meanwhile, please add the bellow line to your personal info and indicate Yes or No . "Media consent (photos) Yes/No " 2 Quote
TK-8687[TK] Posted May 18, 2025 Author Report Posted May 18, 2025 On 5/15/2025 at 2:31 PM, TKSpartan said: Hi Luis. Thank you fo your EIB submission. One of us will be with you as soon as possible. Meanwhile, please add the bellow line to your personal info and indicate Yes or No . "Media consent (photos) Yes/No " I edited post, that ok? Quote
gmrhodes13[Staff] Posted May 18, 2025 Report Posted May 18, 2025 One thing I noticed is you don't appear to have a D-ring and it is required for L2, you may want to add one before the DO's review your application OPTIONAL Level two certification (if applicable): D-ring mounted on the rear. 1 Quote
TKSpartan[Staff] Posted May 19, 2025 Report Posted May 19, 2025 Hi Luis, I'll be doing your review. In order to continue, I'll need you to add an additional photo and make a couple of fixes to your armor . 1- Please add a close photo of you Ab-back armor left side to see the rivets position . Something like bellow reference image. 2- Cod Rivet CRL L2: A split (bifurcated) or single cap rivet is present on the lower tab (cod area) of the abdomen armor. Rivet on must be brass or silver in color, approximately 5/16" (8mm) in diameter and is not painted. The rivet on your Cod armor looks to be with painted. Just a little dab of paint remover (non acetone) could do the job. Reference images CRL L2: D-ring mounted on the rear. For some reason , your blaster's D-ring is missing and will be needed for EIB approval. Reference Images Thank You! 2 Quote
TK-8687[TK] Posted May 21, 2025 Author Report Posted May 21, 2025 On 5/19/2025 at 4:18 PM, TKSpartan said: Hi Luis, I'll be doing your review. In order to continue, I'll need you to add an additional photo and make a couple of fixes to your armor . 1- Please add a close photo of you Ab-back armor left side to see the rivets position . Something like bellow reference image. 2- Cod Rivet CRL L2: A split (bifurcated) or single cap rivet is present on the lower tab (cod area) of the abdomen armor. Rivet on must be brass or silver in color, approximately 5/16" (8mm) in diameter and is not painted. The rivet on your Cod armor looks to be with painted. Just a little dab of paint remover (non acetone) could do the job. Reference images CRL L2: D-ring mounted on the rear. For some reason , your blaster's D-ring is missing and will be needed for EIB approval. Reference Images Thank You! Getting my D-ring tomorrow and will update post with pics of all 3 requests! Thanks for the info! 3 Quote
TK-8687[TK] Posted May 21, 2025 Author Report Posted May 21, 2025 (edited) On 5/19/2025 at 4:18 PM, TKSpartan said: Hi Luis, I'll be doing your review. In order to continue, I'll need you to add an additional photo and make a couple of fixes to your armor . 1- Please add a close photo of you Ab-back armor left side to see the rivets position . Something like bellow reference image. 2- Cod Rivet CRL L2: A split (bifurcated) or single cap rivet is present on the lower tab (cod area) of the abdomen armor. Rivet on must be brass or silver in color, approximately 5/16" (8mm) in diameter and is not painted. The rivet on your Cod armor looks to be with painted. Just a little dab of paint remover (non acetone) could do the job. Reference images CRL L2: D-ring mounted on the rear. For some reason , your blaster's D-ring is missing and will be needed for EIB approval. Reference Images Thank You! 3 pics added on original post for your review please. Thank you! @TKSpartan Edited May 21, 2025 by TK-8687 2 Quote
TKSpartan[Staff] Posted May 21, 2025 Report Posted May 21, 2025 2 hours ago, TK-8687 said: 3 pics added on original post for your review please. Thank you! @TKSpartan Great ! 1 Quote
TK-8687[TK] Posted May 27, 2025 Author Report Posted May 27, 2025 On 5/21/2025 at 4:15 PM, TKSpartan said: Great ! Any other pics needed from me at this time? 1 Quote
TKSpartan[Staff] Posted May 27, 2025 Report Posted May 27, 2025 3 hours ago, TK-8687 said: Any other pics needed from me at this time? Hi brother, I'm working on your review right now . Don't worry, if I need any additional photos, I'll let you know. 1 Quote
TK-8687[TK] Posted May 27, 2025 Author Report Posted May 27, 2025 15 minutes ago, TKSpartan said: Hi brother, I'm working on your review right now . Don't worry, if I need any additional photos, I'll let you know. Sorry, didn’t mean to rush! Thanks so much, super excited for your feedback! 1 Quote
TKSpartan[Staff] Posted May 27, 2025 Report Posted May 27, 2025 34 minutes ago, TK-8687 said: Sorry, didn’t mean to rush! Thanks so much, super excited for your feedback! Don't worry, you're not pushing at all.. 1 Quote
TKSpartan[Staff] Posted May 29, 2025 Report Posted May 29, 2025 Hi Luis, Could you please add a photo of your helmet neck Trim, showing the inside section and shape ? Thank you. Almost there! Reference 2 Quote
TK-8687[TK] Posted May 29, 2025 Author Report Posted May 29, 2025 (edited) 53 minutes ago, TKSpartan said: Hi Luis, Could you please add a photo of your helmet neck Trim, showing the inside section and shape ? Thank you. Almost there! Reference @TKSpartan does this suffice? I kind of glued the ends a little to each other lol. I got trim from Trooperbay who has been recommended by many. Edited May 29, 2025 by TK-8687 1 Quote
TKSpartan[Staff] Posted May 29, 2025 Report Posted May 29, 2025 Hi Luis, and thank you for your EIB application! CRL and EIB Application Requirements: All required photos have been submitted, and on behalf of the entire D.O. staff we are pleased to welcome you to the rank of Expert Infantry. Congratulations! Other-Armor Fit/Assembly; In this area we review observations made by your fellow troopers and the DO team. Some observations may lead to suggestions to improve the overall look of your armor, and please keep in mind that we consider both text (CRL) and pictures (screen caps/reference images) when reviewing submissions. Starting from the shoulders, The left shoulder strap, seems a bit short. Maybe you can move it a bit to make it look like the one on the other side. Reference Images The raised ridges should be aligned. A simple dressing issue easy to fix. The other leg looks perfect. Reference Images *************************************************** Centurion Requirements: In this section we prepare you for our highest tier of approval. Because Centurion photos must show more detail than EIB, items pertaining to Level 3 might be seen there and not here and additional photos may be required. We try to point out all that we can from what we are able to clearly see, but the final accuracy is the responsibility of the trooper. Starting from top. CRL L3: Neck trim shall be of an s-type profile rather than a u-type profile. Your helmet's neck trim has the correct "S" shape, however, it was installed incorrectly. It should go with the flat section facing outward, on the edge of the helmet. Reference Images CRL L3: There should be a minimal gap between the shoulder armor and the chest/back plates. This looks like a simple strapping issue. shortening the shoulder strap and a bit could reduce the gap. Another trick here is to remove the Shoulder Bell's return edge to allow them to sit close the chest armor. You can also flip the bells forward a little. Reference Images Centurion is all about accuracy, It could be some light effect but we noticed your handguards have a return edge or border that you will need to trim a bit for L3. Reference Images CRL L3: Ideally there no gap between the abdomen and kidney armor. Abdominal and Kidney Plate align horizontally at top. In your case, just take care to align correctly the AB to Kidney armor every time when suiting up to avoid overlapping or any gap. Reference Images -The position of the holster. It seems to be too far offset, so much so that the rivet almost disappears under the TD. This is very noticeable brother, that's why we're requesting the fix for L3 . Reference Images CRL L3: Drop boxes are vertically aligned with the end of the ammo belt with minimal gap between belt and box. -One of the boxes is slightly misaligned. Just as a matter of taking care of this when suiting up . A useful tip is to add a dab of E6000 to the ammo box strap to keep it fixed to the Canvas Belt. Reference Images Moving down , we have the rear armor that looks like is overlapping the kidney armor quite a bit. A recommended solution , (I have use it with mine) , is to use the V tabs system. You can mold then with some ABS pieces and a heat gun, glue then to the top section of the butt plate , leaving loose the kidney lower section.. Reference Images CRL L3: Lower thigh ridge joins (front and rear) shall butt-up flush against each other. Any gaps must be backed with ABS or filled as not to be noticeable. Your thighs show a small gap that can be easily fiexed. Gluing a small piece of ABS plastic behind and filling the front with ABS paste would do the job. Reference Images CRL L3: The blaster may have minor weathering or base metal exposure however, T-tracks and grips shall be of a black plastic appearance with no silver/metallic weathering allowed. Some battle damage is always a nice detail, buy according to the CRL and on screen images, you would need to apply and extra coat Black paint . Tha T-tracks and grips must go with no weathered look. Easy fix. Reference Images That's all trooper. Congratulations and welcome to the Expert Infantry Club!!! We are pretty sure you'll do the move to the next level soon !! remember to request your Certificate HERE 1 Quote
gmrhodes13[Staff] Posted May 29, 2025 Report Posted May 29, 2025 Congratulations trooper and welcome to Expert Infantry and the EI Honor Gallery 2 1 Quote

Recommended Posts
Join the conversation
You can post now and register later. If you have an account, sign in now to post with your account.