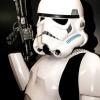
shockmatic[501st] Posted January 4, 2017 Report Share Posted January 4, 2017 (edited) 501st profile: http://www.501st.com/members/displaymemberdetails.php?userID=19843 Armor Maker = AP Helmet Maker = AP with s neck ring Electronics: ukswrath hovi mic tips and amp system, I-comm, mp3 player chatter, ukswrath enviormental hearing system, and EQDizzle USB fan kit Blaster Type = Hyperfirm E-11 with Trooper Bay D-ring, scope decal and counter decal Garrison:Florida Garrison Squad7 Name: James Taylor (J.T.) Height: 6 foot Weight: 200lbs Hand Plates Type; Trooper Bay latex hand plates on rubber chemical gloves Boots: TK boots Holster: Darman props neckseal: Darman props Det Pack Boots sniper knee leg ammo belt Belt seperate kidney and butt, snap detail no visible shoulder strap connection Chemical gloves and latex hand plates E-11 bucket Thank you for viewing my photos and taking them into consideration for EIB status. If there is anything i need to change, please let me know. I am going for this status to be more accurate. I want my TK to be as accurate as it possibly can be. edit: wrong profile include previously included. corrected Edited January 9, 2017 by shockmatic Quote Link to comment Share on other sites More sharing options...
Alay[TK] Posted January 5, 2017 Report Share Posted January 5, 2017 Looking great! Just some things I noticed... Your biceps and forearms have a lot of space between them. You might want to drop your biceps down a little further, and pull up the forearms a bit to even out the spacing there. Your right forearm is also twisted about 90 degrees over, so you'll want to make sure it's rotated so the cover strips line up. Sometimes they roll out because of wear... you can add an elastic strapping to the biceps to help that. Your knee rivet also looks like it's a little off where it should be. The CRL suggests it should be in the upper corner, somewhere around the red dot. 1 Quote Link to comment Share on other sites More sharing options...
shockmatic[501st] Posted January 5, 2017 Author Report Share Posted January 5, 2017 thanks for the input! i didnt notice the forearm was rotated until just now. its a tight fit. i just put it on wrong Quote Link to comment Share on other sites More sharing options...
shockmatic[501st] Posted January 6, 2017 Author Report Share Posted January 6, 2017 just for fun.. i'll make the above mentioned corrections and post new pics 2 Quote Link to comment Share on other sites More sharing options...
shockmatic[501st] Posted January 10, 2017 Author Report Share Posted January 10, 2017 corrections made. also some photos i forgot to include. NECKSEAL: s neckring pulling on belt box to show white strapping. ammo belt rivet moved front shot. biceps dropped and forearms raised (and properly positioned ) "action" shot if there is anything else, please let me know!! thank you all! 1 Quote Link to comment Share on other sites More sharing options...
shockmatic[501st] Posted January 16, 2017 Author Report Share Posted January 16, 2017 Is there anything else that requires attention? TK92470 sent using Tapatalk Quote Link to comment Share on other sites More sharing options...
Sly11[Admin] Posted January 16, 2017 Report Share Posted January 16, 2017 Just catching up on a few applications where we have requested changes, so will be with you shortly. Thank you for your patience. One question for you, do you intend to push for Centurions? Sent from my iPad using Tapatalk Quote Link to comment Share on other sites More sharing options...
shockmatic[501st] Posted January 16, 2017 Author Report Share Posted January 16, 2017 (edited) Oh, I wasn't trying to rush things, I was just curious if any one else saw anything so i can fix it.Unfortunately, I don't know if I can get centurion with this set of armor. Although I did have to make quite a few changes to it, I did not build it initially. All the seams are overlapping and not butt joined. So I would have to take almost the whole thing back apart to get centurion. that being said, i have done, will be doing alot of the requirements for centurion in the interest of being as accurate as possible. However, I am thinking of making this armor only HWT, and then building another TK completely myself. Then I can assemble it centurion from the start.TK92470 sent using Tapatalk Edited January 16, 2017 by shockmatic Quote Link to comment Share on other sites More sharing options...
justjoseph63[Staff] Posted January 16, 2017 Report Share Posted January 16, 2017 Looking great, J.T.! I gotta admit it was strange seeing you as a HWT on that last troop, as I am so used to your Clonetrooper. I totally stole your E-11 idea. Quote Link to comment Share on other sites More sharing options...
shockmatic[501st] Posted January 16, 2017 Author Report Share Posted January 16, 2017 Thanks Joseph! I get that alot most people are used to seeing me in my clone. But I have almost trooped my TK just as many troops. I think it's because there are so many TK and so few clones that people remember the clone. You said you were going to take that e11 mounting on the pack idea. I found a picture of someone else that had done that when I was looking for reference photos for the pack. I thought it was a great idea too. I wish I could take the credit for the idea. I don't know who the trooper was that did it first. TK92470 sent using Tapatalk Quote Link to comment Share on other sites More sharing options...
justjoseph63[Staff] Posted January 16, 2017 Report Share Posted January 16, 2017 I only put it on for 1 troop, and there was a strange reason behind that, (I will explain when I see you, LOL). I actually didn't even get to mount it, as a fellow Trooper forgot their blaster and I loaned it to him. Quote Link to comment Share on other sites More sharing options...
Sly11[Admin] Posted January 18, 2017 Report Share Posted January 18, 2017 Hi JT. welcome and Thank you for your EI application. Lets get started. CRL and EIB Application Requirements: All submission photos have been posted. Your armor displays all the necessary elements to qualify for Expert Infantry. Welcome trooper! Other-Armor Fit/Assembly: In this section we review observations made by your fellow troopers and ourselves. Some observations may lead to suggestions to improve the overall look of your armor. If any suggestion affects any application, it will be listed separately in the above or below sections. We thank you for the changes you have made to the balance and look of your armour, and if you are prepared to pull the limbs apart and rejoin them using the required But joint for Centurion, there is no reason why this armour cant get you to level 3. Rather than put to much more info here, we shall move to the Centurion section so I can list the things that would require change and correction. Centurion Suggestions: In this area we try to prepare you for Centurion. Helmet: Currently you have a standard set of decals. These will need to be replaced with a set of Dave M type hat look hand painted, or you could go to the extent of literally hand painting the Traps, tears and tube stripes. Hand painted style Side Shims: The side shims need to sit flush with the surface of the kidney plate with only one visible seam, that being the join between it and the Ab plate As per CRL For level three certification (if applicable): Ideally there no gap between the abdomen and kidney armor.A single visible seam line is present. Three rivets, approximately 5/16"(8mm) diameter, are present on the left side of the abdomen armor.Note: The original rivets used for the TK armor were bifurcated rivets or split rivets. Rivets are equally spaced along the depth of the armor and about 10mm from the edge. The heads are rounded or domed.Note: Paperclip brads are not considered to have a domed head. Rivets are painted white. A single male snap on the top right corner of the ab plate is present. A single split rivet or brad is present on the lower tab of the abdomen armor.Rivet does not need to be functional. Reference image Side rivets Limbs: A you have mentioned in your thread, yes these need to be constructed using the But joint method and not the overlap method. Hopefully your armour is assembled with E6000, easily allowing you to seperate the halves, re-trim the haves for size and then joining them with cover strips. There are a ton of great build threads on FISD, showing exactly how this is done. Reference Image Butt joint, and remember, no return edge to be left at the wrist end of the fore arms. New Knee ammo Pack: Although you have re positioned your ammo pack, it has been trimmed incorectly, and could warrant a replacement. It should only have a curve at the bottom of either end and not the top corners. Reference Image E11: Expert Infantry is as far as a modified Hasbro/Disney blaster can go. This would need to be replaced with a more accurate resin or rubber cast version CRL: E-11 Blaster For level three certification (if applicable): Hasbro blasters are not allowed, even conversions.Photos missing. Back of your belt showing drop boxes with back housings. Photo of rivet in Cod part of Ab plate (not to be painted white) Photo of snap in upper right hand corner of Ab plate (not to be painted white) And last but not least, paint your thermal det screws black for that finishing touch. Congratulations on reaching Expert Infantry, and your armour is worth putting the effort in to make that Centurion badge. Even if you decide to go HWT, some of thses changes will still need to be made . Well done sir. 1 Quote Link to comment Share on other sites More sharing options...
justjoseph63[Staff] Posted January 18, 2017 Report Share Posted January 18, 2017 Way to go, J.T.! Let me me the first (well, second) to congratulate you on a build well done! Welcome to the ranks, brother! 1 Quote Link to comment Share on other sites More sharing options...
zv288bot[TK] Posted January 19, 2017 Report Share Posted January 19, 2017 Congrats! 1 Quote Link to comment Share on other sites More sharing options...
shockmatic[501st] Posted January 19, 2017 Author Report Share Posted January 19, 2017 Thank you! Even if I don't reach centurion, I strive to make this armor, as well as all my costumes, as accruate as possible. I will be making further changes to achieve this. I will have to lose some weight to have no side shim with no gap. As far as the blaster, it is a hyper firm, not a Hasbro conversion TK92470 sent using Tapatalk Quote Link to comment Share on other sites More sharing options...
wingnut65[Staff] Posted January 19, 2017 Report Share Posted January 19, 2017 Congrats, J.T.! Welcome to EIB! 1 Quote Link to comment Share on other sites More sharing options...
Alay[TK] Posted January 19, 2017 Report Share Posted January 19, 2017 Awesome job on those corrections for EIB! Congratulations 1 Quote Link to comment Share on other sites More sharing options...
Troopacoola[TK] Posted January 19, 2017 Report Share Posted January 19, 2017 Well done J T ! Just saw you're facebook post and thought I'd pop over here and have a look! Congrats brother! Marc 1 Quote Link to comment Share on other sites More sharing options...
shockmatic[501st] Posted January 20, 2017 Author Report Share Posted January 20, 2017 thanks everyone! i will continue to strive for accuracy. Quote Link to comment Share on other sites More sharing options...

Recommended Posts
Join the conversation
You can post now and register later. If you have an account, sign in now to post with your account.