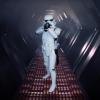
JDTrooper[TK] Posted November 24, 2015 Report Share Posted November 24, 2015 (edited) Basic Information: Name: James Suerdieck Legion ID: 11075 Garrison: Garrison Carida Mandatory Information: Armor Maker = AuthenticProps (AP) Helmet Maker = AuthenticProps (AP) Blaster Type = DoopyDoo’s Optional Information: Height = 5’ 10” Weight = 185 lbs Boots Maker = Imperial Boots Canvas Belt = TKittell Hand Plates Type = Trooperbay S-trim = Trooperbay Electronics = TK Products Neal Seal Type = Darman Holster Maker = AP TD Belt Clip = ukswrath Rivets = Echo Inner Drop Boxes = kwdesigns Mic Tips = VaderPainterStudios Full Body Front – Arms at side Back – Arms at side Left – Arm raised Right – Arm raised Right Side Detail – Arm raised Left Side Detail – Arm raised Armor Details Abdomen Details Action Shot Cod and Butt Plate Attachment Interior Strapping Helmet Details Front Side – Right Side – Left Back Hovi Tip Detail Lens Color (Backlit) Blaster Details Blaster – Left Blaster – Right Blaster – D-Ring Accessory Details Neal Seal Thermal Detonator – Back Holster Attachment Thank you for your time and consideration. Edited May 6, 2016 by JDTrooper Quote Link to comment Share on other sites More sharing options...
PGHtrooper21 Posted November 24, 2015 Report Share Posted November 24, 2015 Looks Good!!! Andy Quote Link to comment Share on other sites More sharing options...
Sly11[Admin] Posted November 25, 2015 Report Share Posted November 25, 2015 Hi James, what photo host programme are you using as I can't see the images on Tapatalk? Anyway, thanks for your application, Tony and I will review you shortly. Sent from my iPad using Tapatalk Quote Link to comment Share on other sites More sharing options...
JDTrooper[TK] Posted November 25, 2015 Author Report Share Posted November 25, 2015 (edited) I'm using Photobucket but it appears I used the wrong method to link the image. I have corrected the original post with new direct image links. Hopefully that will solve the problem with Tapatalk. Sorry for any confusion. Thank you. Edited November 25, 2015 by JDTrooper Quote Link to comment Share on other sites More sharing options...
Scotty33[TK] Posted November 25, 2015 Report Share Posted November 25, 2015 Looks good James, only thing I can see is that you may need to try and paint your shims a bit of a closer colour to the rest of your armour.<br> Good luck! Quote Link to comment Share on other sites More sharing options...
Sly11[Admin] Posted November 29, 2015 Report Share Posted November 29, 2015 Hey James, thank you for your application for Expert Infantry, lets take a look. CRL and EIB Application Requirements: All photos are present and your armor contains all specifics required to meet EIB, with that we welcome you to Expert Infantry rank. Another nice clean AP build, well done Sir. Other-Armor Fit/Assembly: I cant tell if your helmet is entirely hand painted or you have used decals, that's a darn good paint job in my books, very nice work. Also good work making AP fit around your mid section, shims are never an easy task, but i will cover this subject in the Centurion suggestion section below. If you can shorten the top straps of your shoulder bells to make them virtually touch the bridges at the top, it will just be a finishing touch to make you look the best you can, we would really like to see this done for your future centurion application. Centurion Suggestions: I can see by your build that you are gunning for Centurion and there really is only one element that requires some attention with your side shims. As per the CRL . A single visible seam line is present. You have two options here, the first generally gives the best outcome. ABS paste, a mixture of small abs off cuts and acetone. this also forms a permanent bond as it literally acts like plastic weld. Once applied and dried, it is sanded back with fine sandpaper and then polished. There are many build threads that have used this method to great success. The other is a white caulking tube, but considering you already have a slightly different shade of white between your shim and the armor, this could give a third shade of white to the area which might be just a little too much. Personally I would do a practice run in making the ABS paste and applying it to some other scrap ABS materiel and experiment with the result before applying it to your armor. Once again Congratulations on your EIB badge. Please use the photo reference guide and include the D ring shot in a Centurion application. http://www.whitearmo...hoto-checklist/ Quote Link to comment Share on other sites More sharing options...
JDTrooper[TK] Posted November 29, 2015 Author Report Share Posted November 29, 2015 Wow, that's awesome! Thank you so much Andrew. Yes, I did hand paint my helmet. Some of it was free hand, while some of it was with the help of a template. I like the way it turned out, so I appreciate the compliment. You're also right that I am gunning for Centurion. I wanted to achieve my EIB first before I tackled those side shim seams. Now that I have my EIB, I'll start working on those shim seams. I going to use the ABS paste option, so I'll be sure to practice first. I will also take care of those shoulder bell straps. Hopefully you'll see a Centurion application from me in the near future. Thanks again! 2 Quote Link to comment Share on other sites More sharing options...
ukswrath[Staff] Posted November 29, 2015 Report Share Posted November 29, 2015 Hey James, Congrats trooper, welcome to EIB Quote Link to comment Share on other sites More sharing options...
osbjdawg[TK] Posted November 29, 2015 Report Share Posted November 29, 2015 Great job James. I'm hoping to submit my app soon. 1 Quote Link to comment Share on other sites More sharing options...
gmrhodes13[Staff] Posted December 1, 2015 Report Share Posted December 1, 2015 Congrats trooper Quote Link to comment Share on other sites More sharing options...

Recommended Posts
Join the conversation
You can post now and register later. If you have an account, sign in now to post with your account.