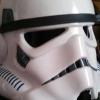
wonko Posted January 20, 2015 Report Posted January 20, 2015 (edited) While waiting for my armor from ATA I decided to pick up an extra bucket just to see how it all goes together. Spent a couple hours trimming it out and putting it together (except for the ears) and am pleased with it... for the most part. I've spent almost 3 hours total on the ears and have to say that I absolutely LOATH doing them. Anyway, I wanted to get some opinions on how things are looking up to this point. The right ear has the biggest gaps, so I'm only posting a pic of that. Thanks in advance! Brian Edited January 13, 2021 by gmrhodes13 photo updated gmrhodes13 2021 1 Quote
DroidHunter Posted January 20, 2015 Report Posted January 20, 2015 Looking good so far. That gap more than acceptable. 1 Quote
Raintrooper Posted January 20, 2015 Report Posted January 20, 2015 Insanely well done! Gaps at the bottom of the ears are actually more screen accurate than flush against the helmet.. which is next to impossible btw! 1 Quote
hon143 Posted January 20, 2015 Report Posted January 20, 2015 (edited) Honestly.....I think it looks pretty good already. But, if you want to decrease that gap, you need the ear to come down slightly. That's what is causing the gap. So, I'm guessing that the backside of the ear needs to be trimmed slightly....near the upper arch. That will shift the ear downward and will decrease the gap on the top portion. However, there may still be a gap laterally. For me, that's when I cheated slightly and used my heat gun! I carefully heated the ear right at the bend and just gently pushed it inward. This then closed the gap laterally. Edited January 20, 2015 by hon143 1 Quote
R4ZORBL4DE Posted January 20, 2015 Report Posted January 20, 2015 Looking good !! I may get an extra bucket from Terrel to display in my basement 1 Quote
wonko Posted January 20, 2015 Author Report Posted January 20, 2015 Wow guys, thanks! It means allot coming from some of the 'heavy hitters'. I hope to start hand painting tonight, and will update the thread accordingly. Ya'll just made my day Brian 1 Quote
wonko Posted January 28, 2015 Author Report Posted January 28, 2015 (edited) Things have been slow going but I thought I'd post an update. The traps are all second coated, along with the mic tips and vocoder (it's painted satin black, but was still wet when I took the pics). The frown has 2 coats, and I'm calling it done. I used Pandatrooper's "hand painted" templates for the tube stripes. Other than a little touch-up on them (and doing the other side) I'm pretty happy with the outcome. My hope is to have it completed after this weekend. If anyone sees anything that could be improved or needs changing, please let me know. Sorry for the crappy pic, and thanks for looking! Brian ---------------- Edited January 13, 2021 by gmrhodes13 link not working, removed gmrhodes13 2021 Quote
gazmosis[501st] Posted January 29, 2015 Report Posted January 29, 2015 Looks terrific so far! Nice overall build. Regarding the paint I ask again.......the tears and traps have the slightest pinstripe outlining the gray. Why fill in the entire area with black??? That just requires more gray to cover it. Lots of wasted paint and time IMHO. Quote

Recommended Posts
Join the conversation
You can post now and register later. If you have an account, sign in now to post with your account.