

wonko
-
Posts
45 -
Joined
-
Last visited
Content Type
Profiles
Forums
Gallery
Articles
Everything posted by wonko
-

Can USB rechargeable batteries be wired in series?
wonko replied to XiliX's topic in Electronics for Helmets / Blasters
Are the batteries Li-Po or Li-Ion. The most important thing to look for are balanced cells (Especially Li-Po), not necessarily getting "identical units" Li-Po batteries can be extremely dangerous if not charged and handled properly. Li-Ion are a bit more forgiving, but can still cause damage if over or under charged. Also, as far as I know you would need to charge each pack separately. You would be better either buying a pack that already has the volts you want, or purchasing 5 volt fans. I'm not sure if you're aware, but 12 volt fans can be run off 5-6 volts without problems. I run 2 12 volt fans off of 4 AA batteries (6 volts) and have no problems at all. The fans will run slower, but they will still move a fair amount of air and are much quieter than running 12 volt fans at 12 volts. Brian -
Thanks Tino. I built my first model 40 years ago and realized right away that I prefer dirt and grime over shiny and new any day. I discovered that when it comes to weathering/aging, layers make all the difference. I used layers of earth tones, and always do the highlights before giving it the final wash of grime. There's not much in nature that's plain black, so I go sparingly on black washes, instead going for dark gray's and browns. I appreciate the kind words! Brian
-
Concerned I won't be able to get my head in my helmet
wonko replied to XiliX's topic in Assembly, Mods, and Painting
I wear a size 7 1/4 hat and have an ATA bucket. My head fits fine, even with 2 fans, a hearing module, and 2 battery packs, but like everyone else, I have to screw it on. Brian -
Thank you! I agree, it's not where it needs to be. I plan to remove it and place it where it should be. Thanks for pointing that out! Brian
-
So, I finally got around to finishing up my blaster and got some decent pics. I ended up scratch building a new counter due to the fact that the one that comes with the kit just bothered me. The numbers you see on it will be replaced with some that look more accurate, and I will fix the size of the display window and add a correct lens when I get a little more time. I typically call something 'finished', then look at it for a week or so and add/change things that start bothering me. I'm open to suggestions or ideas as to what could make it better. Thanks for looking, and thanks for the inspiration I found here while working on it. Brian
-
Hearing kit speaker placements?
wonko replied to Quadan's topic in Electronics for Helmets / Blasters
Just a heads up... I purchased the same kit from Radio Shack locally, and since most of their stores are closing down I picked it up for $$8.00 (was 50% off). If you have any local stores I'd look into it. I wish they'd had more than one :/ Brian -
I ended up having to re-locate a battery box in my bucket this morning and for kicks attempted to remove the velcro from the plastidip. The velcro (with nothing but the adhesive already on it) stuck so well to the plastidip it pulled it away from the helmet. I don't think I'm going to bother with E6000 for a while and see what happens. On a side note, I've been attaching all the foam armor (that's covered in plastidip) onto my latex predator skin and haven't had any problems. It's been attached for almost 3 years now and still stuck like the day I put it on. YMMV... Brian
-
I've had no ill affects from painting the inside of mine. All I did was wipe it out with rubbing alcohol and spray 2 coats... no sanding involved. I did tape off the eyes and frown area, but the rest is covered. I just finished installing the electronics in mine and simply stuck the industrial velcro directly to the finish. I really don't see any advantage to taping off for the electronics, seeing as mine changed places 3 or 4 times before finding the perfect set up. Best part about it is if it gets messed up all you have to do is peel it off and do it over. Brian
-
LOL I found this out the hard way... Brian
-
That's kinda how I did mine. The one thing I did do that was pretty quick and easy was make the trigger functional. I also made it so the selector switch can move. I had purchased a replacement magazine from Steve, and I'm glad I did. It took a bit of slow grinding but was totally worth it. Can't wait to see some pics! Brian
-
I just finished mine and am pleased with how it came out. I discovered that you don't have to do all the mods to end up with a good looking, accurate blaster. Mine 's built for trooping, so I kept it pretty stock. Having done allot of costuming with props I learned how much of a beating they take, so I didn't want to destroy my "perfect" blaster. Plus, I can let kids mess with it without worrying about it being messed up. I have purchased a demilled sterling and plan to go all out on that. Looking forward to seeing your build. Brian
-
As much as I wish there was room for fans, it's a pretty tight fitting suit. The mask is foamed inside to fit my head, so there's not really any place there. I've seen guys put fans in the backpack and run tubes under the mask, but I'm not sure it would make enough of a difference to justify the extra complications. As hot and uncomfortable as it gets, it's worth it to experience the peoples reactions. Brian
-
Appreciate the compliments guys. I'm trying to figure out what to do where the lenses go (the black just looks so wrong). I had thought about drilling out the scope but really wanted to see how good I could make it look without any major modifications. Like I said, I plan to do probably a pipe build with all the bells and whistles at some point, so I'll save all the real parts for that. Any ideas what to do there? While I was waiting for the kit I did some research (thanks to PlayfulWolfCub) on the power cylinders to scratch build my own. Although not nearly as accurate as his, they are pretty close to the size and look I was hoping to achieve. They are constructed out of all brass, copper, aluminum, and steel, and with the exception of the front and end caps are all soldered together. I think they'll make a fine addition to my blaster. Thanks for looking Brian
-
I've been a huge Predator fan since first seeing the film. I spent about 9 months building him, and regularly attend local conventions suited up. There is nothing like the feeling of walking through the doors and getting mobbed by people who want pics and hugs (for some reason he's a chick magnet). It's 100% latex head to toe, with no cooling or fans, so usually about 3-4 hours is all I'm good for (I'll lose on average 10 pounds in that time). It was a labor of love, and when not being worn he stands in the corner of out living room keeping an eye on things. Hope you all enjoy! Brian
-
Sadly you are right, but I do one day hope to remedy that. Thanks for the kind words Brian
-
I finally received my E11 kit from DD and thought I'd share a few pics of the progress. This won't be a proper build log as I'm staying pretty stock with little modification. My plan is to either do a pipe build, or modify the real deal later, so I kept it pretty simple. I have finished the scope, so may as well start there. As always, opinions are much appreciated. Thanks for looking! Brian
-
Looks like you're making good progress. The counter turned out pretty good as well! Brian
-
Sound for your Resin E-11 kit
wonko replied to Dark CMF's topic in Build Threads Requireing Maintenance
I ordered one too with the idea of installing it in my blaster. Any hints as to the location of the sound files you used? I've looked a little but can't seem to find anything that's 'clean' enough. Brian -
I have a hunch by 'PVC foam board" you mean Sintra (a brand name)... right? If that's the case, check with your local sign shops. I have one close by that supplies me with mine, and even gives me their scraps for free. Also, I know my local big box hardware home improvement stores carry PVC post and rail covers (used for decks) that are made out of the same material as the sheet products. I love the idea of building a blaster out of locally sourced parts only, and have thought about doing it myself. I may just have to start working on one for myself. Brian
-
I love these types of builds. What are your plans for the grip? Keep going, so far so good! Brian
-
Very impressive indeed. Do you plan to offer these in kit form? Brian
-
First bucket (ATA) need some opinions
wonko replied to wonko's topic in Hard Armor (General Discussion)
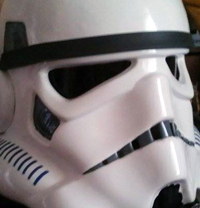
Things have been slow going but I thought I'd post an update. The traps are all second coated, along with the mic tips and vocoder (it's painted satin black, but was still wet when I took the pics). The frown has 2 coats, and I'm calling it done. I used Pandatrooper's "hand painted" templates for the tube stripes. Other than a little touch-up on them (and doing the other side) I'm pretty happy with the outcome. My hope is to have it completed after this weekend. If anyone sees anything that could be improved or needs changing, please let me know. Sorry for the crappy pic, and thanks for looking! Brian ---------------- -
That's my plan for the next one Brian
-
I ordered mine on December 29. I sent 5 emails over the following 2 weeks asking for an update and never got a reply. Just yesterday I got an email stating that my package had been shipped. I had expected it to take a while, but the lack of communication is difficult for me to understand. Oh well, at least I know it's on it's way Thanks for posting this! Brian
-
First bucket (ATA) need some opinions
wonko replied to wonko's topic in Hard Armor (General Discussion)
Wow guys, thanks! It means allot coming from some of the 'heavy hitters'. I hope to start hand painting tonight, and will update the thread accordingly. Ya'll just made my day Brian
