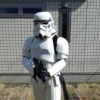
ANHnutter[TK] Posted January 7, 2015 Report Share Posted January 7, 2015 I would like to request EIB status for my ANH Stunt as follows:- Name: Amir Khan ID: TK-55007 Garrison: Japanese Garrison Armor= TM Troopermaster 2mm ABSHelmet= TM (hand painted decals)Blaster= Darth Vorhees DVH - Sterling resin cast kit (Resin and Aluminium) with additional aluminium bolt spring optional:Height = 174cmWeight = 85 kgBoots = TK bootsCanvas belt = TrooperbayHand Plates = Rubber Trooperbay on TM black chemical glovesElectronics= Icomm and Aker amp (removed for photos for ease of photo) + 2 squirrel fans in helmet courtesy of Ingrid MoonNeck Seal = Hand stitched by VeedoxHolster = Trooperbay leather holster Photos:- Front Back Right Left Right close up Left close up Abdomen close up Action shot Cod to Butt snaps Interior split rivets and strapping Helmet Front Helmet side Helmet Back Hovi Mic S trim Green lenses Blaster left Blaster Right Neck seal Thermal Detonator Holster and drop boxes If i missed anything just let me know Thanks Quote Link to comment Share on other sites More sharing options...
Pencap510 Posted January 7, 2015 Report Share Posted January 7, 2015 Looks good- nice work on a clean build! A few things stand out to me that could amount to just how your wearing your gear- but your left shin specifically looks very wide at the bottom, near your foot- could that be tapered a little bit to more fit your leg form- possibly tighten up closing near your foot? Also- your biceps and forearms seem really high. Again, this might be just how it's being worn- but lowering the biceps would bring both down. I don't think ether should affect approval! Good luck!! Ty 1 Quote Link to comment Share on other sites More sharing options...
Tusken RTT Posted January 7, 2015 Report Share Posted January 7, 2015 (edited) Great job! I was thinking the same thing on the biceps and forearms, wondering if they could be pulled down a bit. Way to go on the hand painting! Congrats on the build!! Edited January 7, 2015 by Tusken RTT Quote Link to comment Share on other sites More sharing options...
ANHnutter[TK] Posted January 8, 2015 Author Report Share Posted January 8, 2015 Many thanks all for your kind remarks and i think i just suited up in a rush. lol Have been trooping in this for about a year and a half (about 25 events) so i have readjusted the strapping many times. Quote Link to comment Share on other sites More sharing options...
Dark PWF[Staff] Posted January 8, 2015 Report Share Posted January 8, 2015 (edited) Looking real good Amir! Good Luck!Only a few things that I see that might merit commenting - even if they wouldn't necessarily affect approval - your shoulder bells (in the front view picture) seem to be set rather wide, and this may just be a result of suiting up quickly as you said, but the tops of the bells should be closer to the bridges than they look in that picture.Your shims could use a bit of ABS paste/smoothing to minimize their appearance as shims, but they are not bad.Aside from that, the clips on your TD should be up against the bottom of the control panel and held in place with black flat-head screws as opposed to rivets, even if they're never seen by anyone else. As I said, just something that could be improved for greater accuracy. Armor looks fantastic though. Clearly a very good, high quality build! Edited January 8, 2015 by Dark CMF 1 Quote Link to comment Share on other sites More sharing options...
aliens8us Posted January 8, 2015 Report Share Posted January 8, 2015 Looks damn good! My ab/kidney armor are set up on a suspenders/utility belt system to easily 'slip' into. My only issue with my kit (AP) is my left calf, because of the sniper knee plate. I'm only 5'5, so you can only trim so much. 1 Quote Link to comment Share on other sites More sharing options...
Snaps[TK] Posted January 8, 2015 Report Share Posted January 8, 2015 Looks good. Everyone's already mentioned what I noticed.... Good luck! 1 Quote Link to comment Share on other sites More sharing options...
ANHnutter[TK] Posted January 9, 2015 Author Report Share Posted January 9, 2015 (edited) Thank you all again for your great advice. For my shoulder bells unfortunately difficult to bring in much more because of my rather stocky build (too much weight lifting in my younger years has given me rather big chest, shoulders and arms for my height). I agree i may be more hasbro stormtrooper shape rather than 77 build lol. Maybe would make a good dwarf for a hobbit costume I will nevertheless try to readjust my strapping again as per advice and will work on the left calf closing at the bottom (I have two hook and eye closures fitted but higher up the calf) Edited January 9, 2015 by ANHnutter Quote Link to comment Share on other sites More sharing options...
TK-Sharp[TK] Posted January 9, 2015 Report Share Posted January 9, 2015 (edited) Hi Amir, I see you prefer Snap-Strapping as I do. A small problem that I had was preventing the butt plate (especially the right side) to overlap the kidney plate as it is with your armor. My suggestion: Try to modify the right and left strap by pulling a strong wire through the elastic and wrapping it around the snaps on both sides as shown in the pics. I hope you'll get it. The little problem was to get the wire behind the elastic in order to hide it ... Best of Luck for your request Edited January 9, 2015 by Trooper Mitch 1 Quote Link to comment Share on other sites More sharing options...
ANHnutter[TK] Posted January 10, 2015 Author Report Share Posted January 10, 2015 Thanks Michael, Great idea, i am going to try that method Quote Link to comment Share on other sites More sharing options...
gmrhodes13[Staff] Posted January 11, 2015 Report Share Posted January 11, 2015 Looking good, you could move your drop boxes out further too 1 Quote Link to comment Share on other sites More sharing options...
gazmosis[501st] Posted January 11, 2015 Report Share Posted January 11, 2015 Hey Amir!! Thank you so much for sharing your TM armor with us! You have already been out in the trenches making people smile and we thank you also for that! Now let's take a closer look at your armor! CRL and EIB Application Requirements: All submission photos have been posted. You aremor represents all elements needed for EIB. With that, I would like to congratulate and welcome you to EIB!! Other-Armor Fit/Assembly: In this section, myself and your fellow troopers provide suggestions to further improve the overall look of your armor. Unless specifically stated, these suggestions will not affect any applications and are up to you to change. Over all, you have a nice clean build. You should be proud! As many already know, I am a fan of the beefy trooper. Every Garrison needs its muscle! But sometimes, parts that are too loose can do more bother than benefit. In my opinion, the thighs and shins are the foundation that the TK stands on. These are parts that should be well fitted to the trooper to give a sleek, balanced look to the armors' base. In looking at your legs, it would seem that the fit can be tightened up a bit at your ankles and your knees. If they can't be resized then they can't. I also noticed that the cover strips on your thigh fronts are a bit wide. They should be near 20 mm but I have seen worse. The only other thing that I wanted to mention as an optional change is to lower the scope rail on your blaster a bit. The space between the receiver body and the rail really should not be larger than the bolts that connect your scope to the rail. (about 10 mm). No big deal if you don;t A good point was brought up regarding your Thermal detonator. The belt clips should be touching the control panel in the front. If you wanted to step up the accuracy, pop rivets were never used to attach the clips to the main body. You could switch them out for pan head slotted screws and paint them black to make them even MORE accurate. Well done on your handpainting! Your outlines are very consistent and balanced. I should state that you may have been a bit enthusiastic with trimming the corners of your waist belt. They should be trimmed about 10-12 mm up the from the corners on the vertical and horizontal sides. I want to add one more suggestion, and that is to glue down your rubber handplates a little more. They stick out quite a bit and will get torn off if caught on something. Centurion Suggestions: I hope to see a Centurion application from you in the future! There are, however, a few upgrades/adjustments that you will need to make prior to an application. I want to start with your helmet. I am going to show you two things on these pictures. First is the frown. The far ends stop a little blunt and need to be a bit more tapered. If you want to, you can taper the last tooth as you have it or extend the frown past the indent of the 5th tooth. The side picture of your helmet shows your helmet if the last tooth was tapered. The front shot of your helmet shows the frown with the extra tapers added. Now, the red lines on these pictures show the extra material that I would like to see you remove from the eye openings. These lines are in suggested locations just to give you an idea of what I am looking for. Use reference photos, screen shots and other TM EIB and Centurion applications to prefect the trim line locations. Next is the need to adjust the fit of your back plate to NOT overlap the kidney. The back should rest on not over the top of the kidney. This may or may not be possible, but your drop boxes are a little thick. Proper thickness should be around 12 mm but if there is no way of trimming them down without extensive damage, leave them be. Your Centurion pictures, however, need to show the outer edges of the boxes even with the outer edge of the waist belt. Next point will be a challenge. You will need to fill in the seams created by the added shims on your sides. Because the kidney has a return edge here, your best bet would be to create a straight line to trim. This will make the surfaces of both the kidney and shim sit even making filling the seam easier. You may need to make a couple applications of ABS paste to fill in everything and make it smooth but I have seen some excellent examples here. It was mentioned before that your shoulders will need to be adjusted so they sit very near if not touching the ribbed shoulder bridges. Lowering your biceps and forearms will balance things as well. Make sure you dab some white paint on your thigh pack rivets. All return edges from the wrist portion of your forearms will need to be removed as well. Most of these fixes are simple. Though the kidney/shim seam will be a challenge, it has been done many times. If there is any question about how to proceed with this, please ask me or post a thread. Congratulations again on your EIB!!! 1 Quote Link to comment Share on other sites More sharing options...
TK-Sharp[TK] Posted January 11, 2015 Report Share Posted January 11, 2015 Welcome to the ranks, Trooper 1 Quote Link to comment Share on other sites More sharing options...
gmrhodes13[Staff] Posted January 11, 2015 Report Share Posted January 11, 2015 Congrats trooper and welcome to the ranks 1 Quote Link to comment Share on other sites More sharing options...
Tusken RTT Posted January 11, 2015 Report Share Posted January 11, 2015 Congrats!! 1 Quote Link to comment Share on other sites More sharing options...
ANHnutter[TK] Posted January 12, 2015 Author Report Share Posted January 12, 2015 Thank you all for your great support and i am delighted!!I will get to work on all the recommended changes and take further pictures when complete. My shims may be the hardest but i will do some detailed research on how others did theirs to ensure i make a good job. Happy trooping to all for 2015 Quote Link to comment Share on other sites More sharing options...
Spycee[TK] Posted January 16, 2015 Report Share Posted January 16, 2015 Congratulations ! For the side shims it's not that hard, once you make a couple of tries with the ABS paste. Make sure to practice before ! And get up to 2000 sandpaper, and a Novus polisher kit. Quote Link to comment Share on other sites More sharing options...
Pencap510 Posted January 16, 2015 Report Share Posted January 16, 2015 Well done - congrats on EIB!! Quote Link to comment Share on other sites More sharing options...

Recommended Posts
Join the conversation
You can post now and register later. If you have an account, sign in now to post with your account.