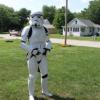
M Rose[TK] Posted February 15, 2012 Report Posted February 15, 2012 So here is my ATA helmet! Just looking to get any feedback and views from you guys. This is my first piece of armor to finish and was a bit nerve racking! I followed along with Pandatroopers "how to" which was very helpful. I wish i would have painted the inside of the helmet black, which I might still might do (I can completely disassemble my helmet since I didn't use any rivets), but thought I would get some opinions here first! Quote
gazmosis[501st] Posted February 15, 2012 Report Posted February 15, 2012 Very nice. Amazing ,in fact, for a first timer!!! Well done. Make sure you dab those ear screws with white paint. Quote
xaoslord Posted February 15, 2012 Report Posted February 15, 2012 Looks great! Luckily my helmet came pre-assembled or I would be a nervous wreck. Quote
SCTrooper[TK] Posted February 15, 2012 Report Posted February 15, 2012 Nice! You hand painted all the details, thats cool! TK 4510 sells tube stripe stencils, if you want to paint those to, or you could make your own. Quote
MisterFubar[TK] Posted February 15, 2012 Report Posted February 15, 2012 Looks great to me. I'll be tackling an ATA kit in a couple months and I'm a slight bit nervous about screwing it up. Seeing great results from a first time armor builder makes me feel a lot better about it. Quote
M Rose[TK] Posted February 15, 2012 Author Report Posted February 15, 2012 I'm waiting to get the tube stripe template in the mail that I ordered from Trooperbay, and will be hand painting them as well. Quote
SCTrooper[TK] Posted February 15, 2012 Report Posted February 15, 2012 Just make sure before you paint them on, that they on the correct side. There is a right and a left side Quote
PGHtrooper21 Posted February 15, 2012 Report Posted February 15, 2012 Very Nice! You did good by reading and doing research before you started to paint. The lines are tough. GOOD JOB! Andy Quote
captsafe66[Admin] Posted February 15, 2012 Report Posted February 15, 2012 Looks nice trooper!! Quote
M Rose[TK] Posted February 25, 2012 Author Report Posted February 25, 2012 Hopefully someone can help me out here! Someone ealier mentioned making sure I had the tubestripe templates on the correct side of the helmet. After not getting a very good opinion as to which are right or left from my husband, I decided to ask here so I can get to painting! Quote
SCTrooper[TK] Posted February 25, 2012 Report Posted February 25, 2012 If you are looking at the helmet straight on from the front, your right hand side has 16 stripes and the left has 15. Your pic of the stencils are left and right respectivly if you are facing the helmet Quote
M Rose[TK] Posted February 26, 2012 Author Report Posted February 26, 2012 Awesome! Thank you so much! Quote
SCTrooper[TK] Posted February 26, 2012 Report Posted February 26, 2012 Also when you are putting the stencils on ,take your time and make sure you press around the edges good. When I painted mine one side took a while to get the stencil to lay down smooth. You will probibly get some small specs of paint that seaped under the stencil, but the next day when the paint is dry you can remove these with a toothpick. Quote

Recommended Posts
Join the conversation
You can post now and register later. If you have an account, sign in now to post with your account.