BananoPower22
-
Posts
1,121 -
Joined
-
Last visited
Content Type
Profiles
Forums
Gallery
Articles
Everything posted by BananoPower22
-
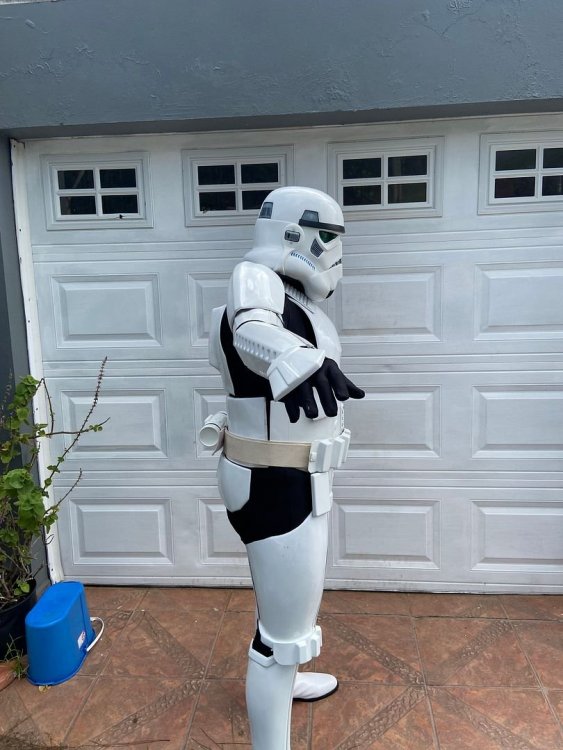
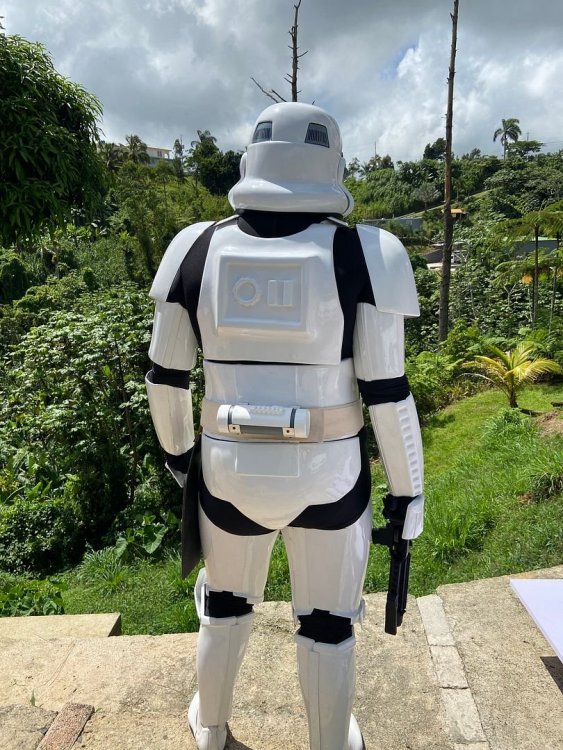
ANH Stunt Build (Back in the game)
BananoPower22 replied to BananoPower22's topic in Build Threads Requireing Maintenance
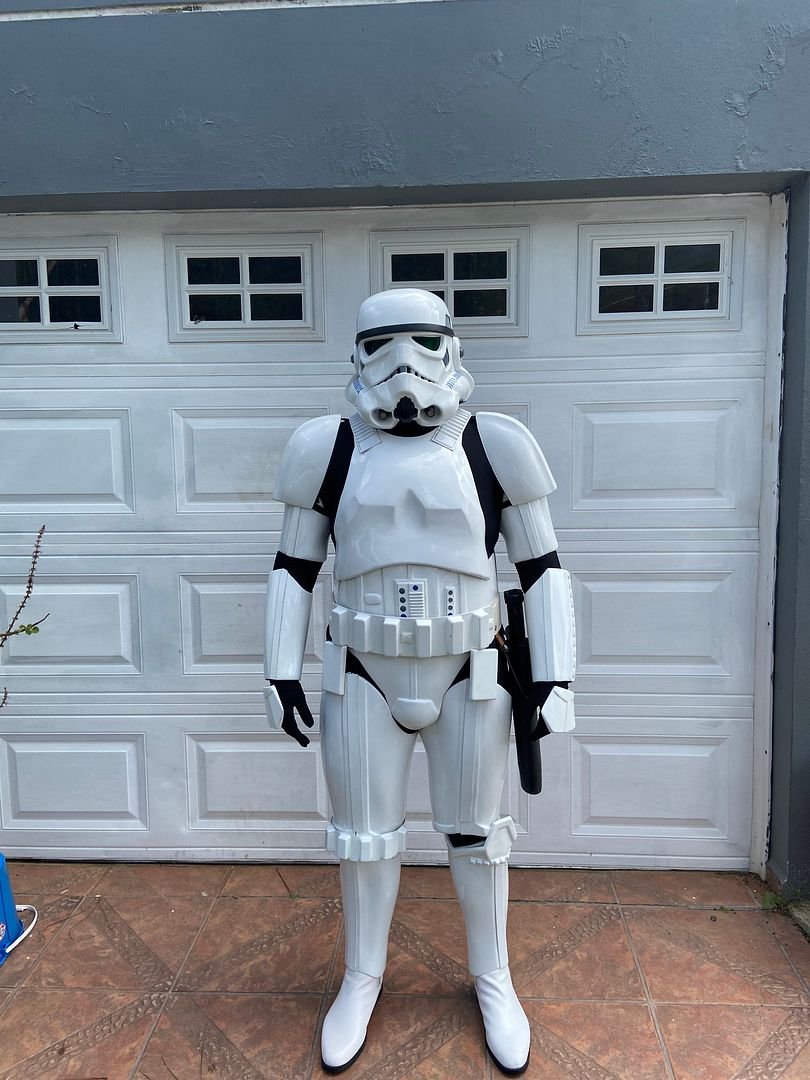
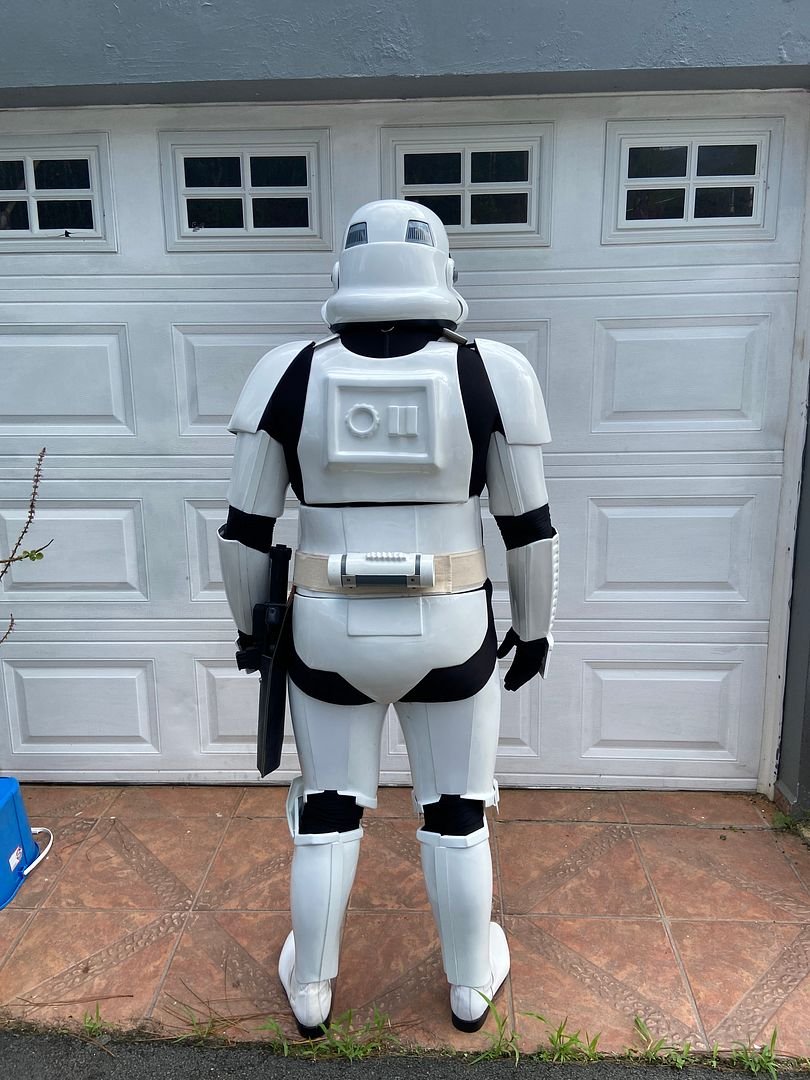
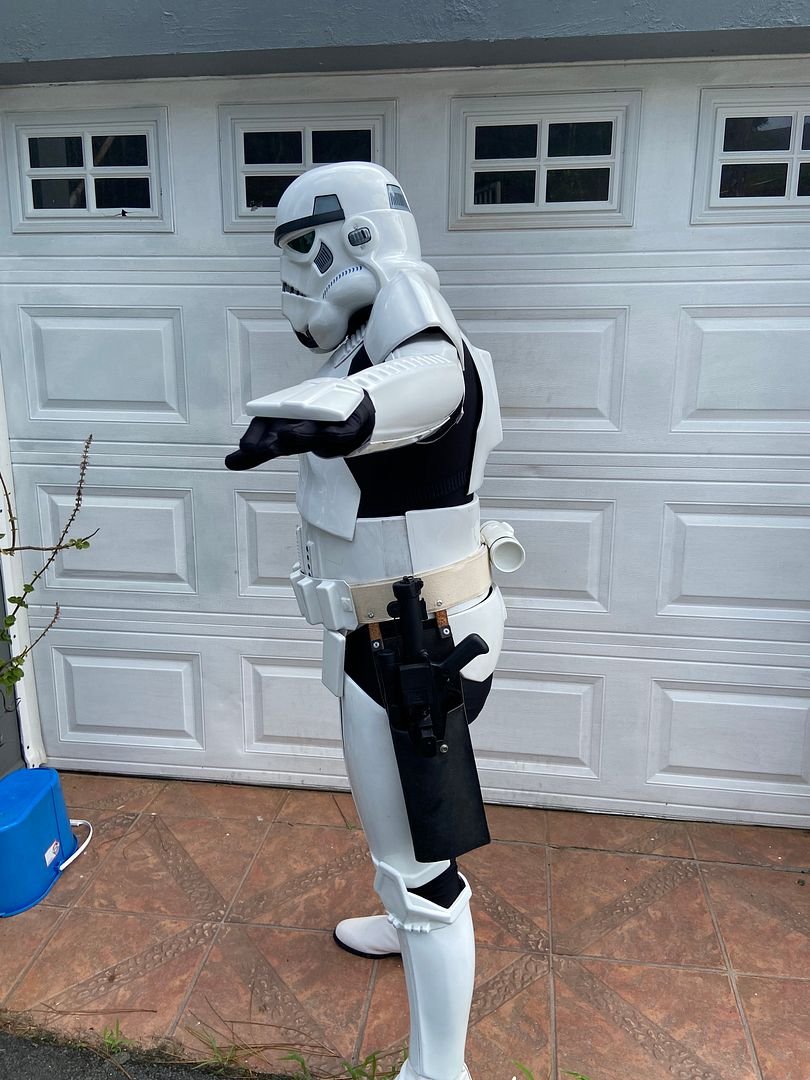
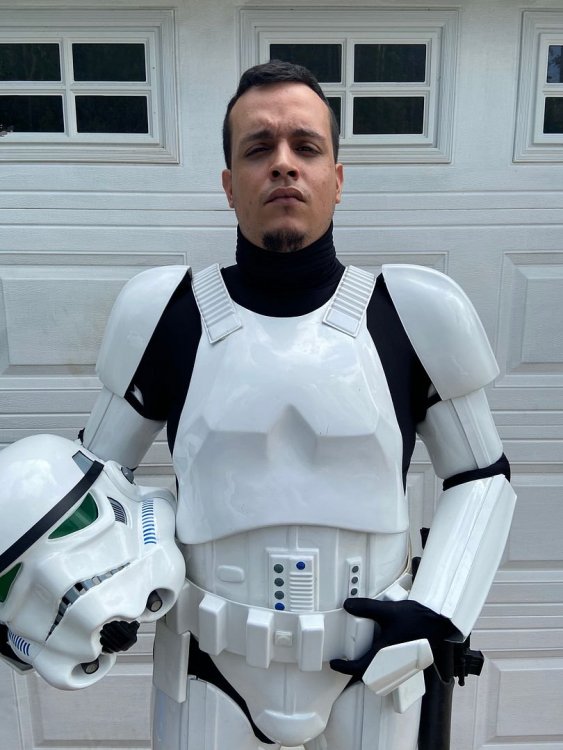
Few years later and with some help, I managed to get my build ready for trooping. There are some issues that will be fixed along the way in terms of comfort and flexibility. EIB and hopefully Centurion are my next goals. Any comments would be greatly appreciated!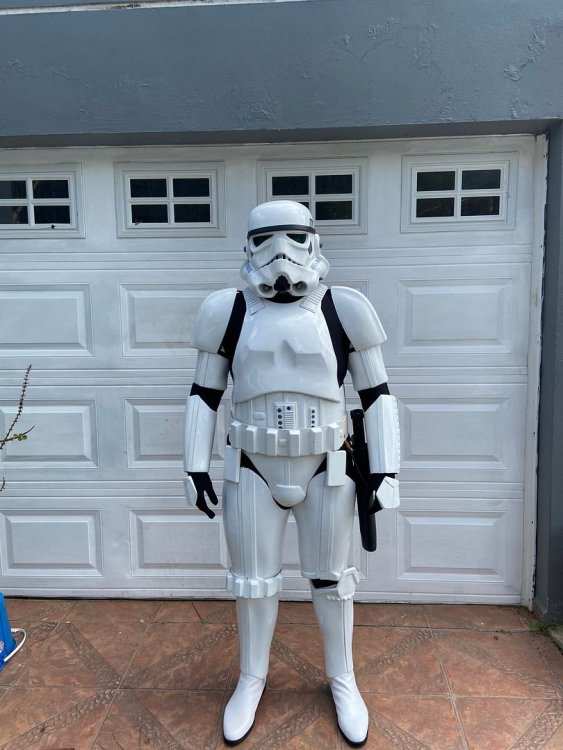


-
ANH Stunt Build (Back in the game)
BananoPower22 replied to BananoPower22's topic in Build Threads Requireing Maintenance
I think I’m done with the front of the calves. Now I just need to cut and add the rear cover strip and ((figure out)) a comfortable strapping system that I can use for the armor pieces. Thicc legs isn’t an easy gift. The thighs just have me set for stun, and actually stunned. I don’t have any pictures but i do beet to trim them and add all the cover strips, which “finally leads to biceps and arms. I’ve already got most of the armor set such as: blaster, holster, canvas belt, thermal detonator and a looot of willpower to get this done before 2020, which would be, by October 27 2010; around the time I also got approved which was Oct 30-31ish. I’m pretty excited about this and I’m looking forward to showing you guys more! Cheers 4326 Sent from my iPhone using Tapatalk -
ANH Stunt Build (Back in the game)
BananoPower22 replied to BananoPower22's topic in Build Threads Requireing Maintenance
Hey everyone, sorry for the lack of updates. I’ve been working a lot and not working on the armor, moved into a new place and new things have been happening. I’ve been slowly picking my build where I left it, and so far I’ve been working on the strapping for the upper armor area. The shoulder bridges stick out like a sore thumb because they were trimmed right of the plastic sheet here once it got home, so I’m wondering if it’s best a hot bath or just a heat gun would do? I’m also a big guy so I’ve been working around and trying to find a way to make my calves look good and take care of the cover strips. Now, that being said, I’ll post a picture below showing how the left calf looks and the cover strip is 20mm and it just doesn’t look right to me IMO. Too narrow? Am I allowed to add a few extra mm’s of plastic to each strip or will it affect me later on for EIB/Centurion? After I’m done with the calves, I’ll go up and tackle the thighs which is my second and biggest issue because THICC thighs, but I’ve enough plastic around to make it work. AP armor definitely doesn’t stops me from being a Stormtrooper despite my body type, just gotta do it right! Sent from my iPhone using Tapatalk -
ANH Stunt Build (Back in the game)
BananoPower22 replied to BananoPower22's topic in Build Threads Requireing Maintenance
I’m debating on using white or off white for the belt. Looking at reference pictures I can’t really choose from either -
ANH Stunt Build (Back in the game)
BananoPower22 replied to BananoPower22's topic in Build Threads Requireing Maintenance
I see what you mean. That can easily be sorted by sanding the tip area and exposing the resin, which is white. There are still a few details on the helmet I haven’t on worked yet. I also don’t like the brow position so I’ll try to take it a bit higher. Sent from my iPhone using Tapatalk -
ANH Stunt Build (Back in the game)
BananoPower22 replied to BananoPower22's topic in Build Threads Requireing Maintenance
So I finally got my undersuit, a 6 piece black Lycra suit actually — head, hands feet and body, but I just need the body part and probably carve a neat balaclava with the head part. The gloves it brought look pretty good for ESB but that’s another story. I took my measurements while holding the armor together with some masking tape. Took notes and Used a pencil to mark down the areas where the armor was held. This way I can see where it should be trimmed and add the strapping and little details later on I’ve got thicc thighs so I’m kind of having an issue with them as how I should trim and add the cover strips so it looks just right. It’s a bit overwhelming so I’ll start with the arms and the whole ab area once the belt is purchase and arrives. Sent from my iPhone using Tapatalk -
ANH Stunt Build (Back in the game)
BananoPower22 replied to BananoPower22's topic in Build Threads Requireing Maintenance
Can any mod with super powers add an AP to my thread’s name so other confused people can resort and maybe answer some possible questions? -
ANH Stunt Build (Back in the game)
BananoPower22 replied to BananoPower22's topic in Build Threads Requireing Maintenance
I literally had to copy it off my phone, upload it to facebook because Photobucket is junk. Update on the TD Clips: Also any comments about the AP mic tips? They’re from AP. Are they good for Centurion?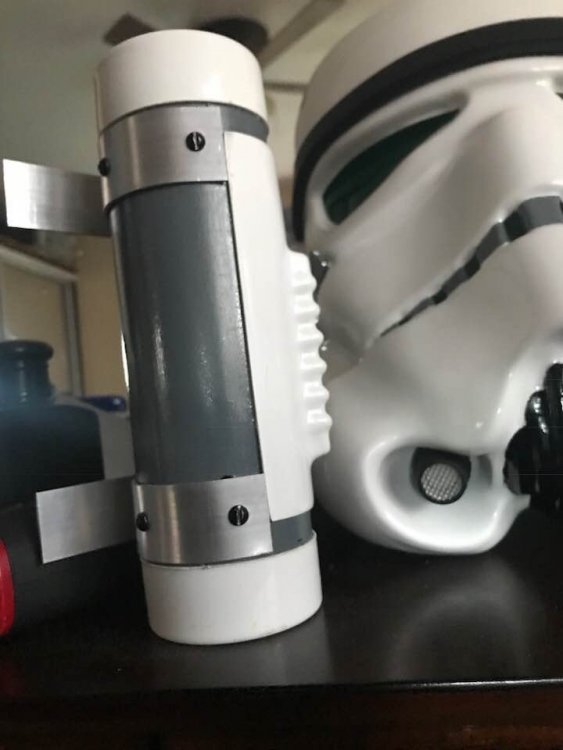
-
ANH Stunt Build (Back in the game)
BananoPower22 replied to BananoPower22's topic in Build Threads Requireing Maintenance
The type of picture I was looking for. I looked around with a little bit of help of the search bar but the results weren’t that helpful. I’ll fix this tonight and upload some new ones with the updated version of the TD. Is the faceplate and endcaps placement good? The end caps aren’t permanently set in place, should I glue or leave them as they are? You *have* to know they’re not set in place to try to force them out as well. Good place to hide deathsticks for those long shifts -
ANH Stunt Build (Back in the game)
BananoPower22 replied to BananoPower22's topic in Build Threads Requireing Maintenance
Hi Dan, the clips are sitting at both end of the TD faceplate -
ANH Stunt Build (Back in the game)
BananoPower22 replied to BananoPower22's topic in Build Threads Requireing Maintenance
Not much done but I did got most of the pieces trimmed down and sanded smooth, and assembled the thermal detonator. I’m curious for anyone that knows about The AP kit, what should be replaced/added/removed? I am still not happy at all with the brow placement and the overall look it has. I’ll tackle that eventually whenever I disassemble the helmet by giving it slight arch, just so it looks like a stunt and not a hero helmet, and add some flat black to the inside.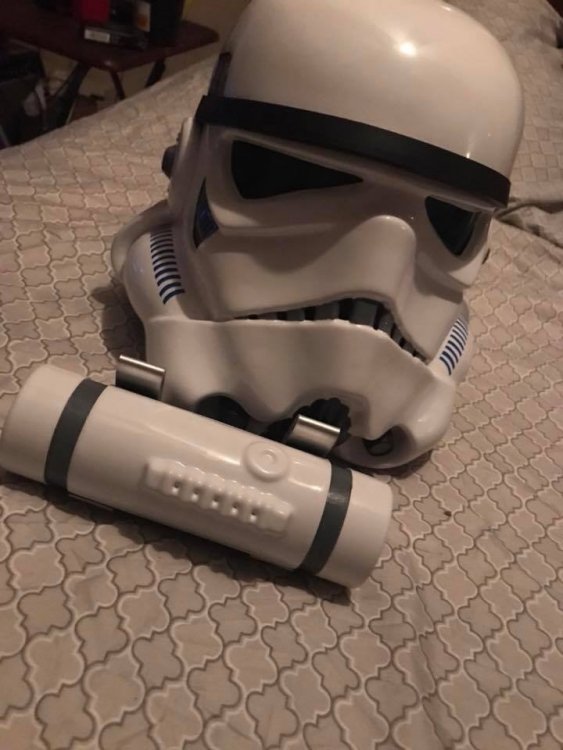
-
Hi there everyone I’ve been looking around several possible boot makers as well as belts. I think I’ve got my belt source settled - all I need is the money. I also think I got my boot source settled - all I need is the money. I’m stuck in my build because I need three key items that will help in test fitting and actual fitting: undersuit for proper piece placement and no baggy shirt or pants in the way, belt for obvious reasons and boots for proper calves assembly. Situation here is that I’m financially stuck so I have to take things one step at a time.. and a time goes by i came up with this possible idea [emoji362] Buying black Chelsea boots at the fraction of a cost of white ones, but white leather dye and actually do it “authentically” by dyeing the black boots in white with several coats. Same goes for the U shaped elastic although it’s covered by the armor piece. Is this something that has been done? I’m certainly up for the challenge of getting it done because I’m stuck in a loop where I’ve got no job but I’m willing to sell a few items so I can get some others r else I have no progress in my armor because everything is trimmed down, waiting for fitting and strapping and get my first troop done before 2018 ends. Let me know your thoughts. The two sources I’ve seen are imperial boots which unfortunately are made in Hong Kong and the shipping is too much, TKBoots’ cost is almost the same so getting a pair of black boots with free shipping and the dye will save money and every perhaps leave some extra so I can get that belt and undersuit as well. Thanks for reading! Sent from my iPhone using Tapatalk
-
ANH Stunt Build (Back in the game)
BananoPower22 replied to BananoPower22's topic in Build Threads Requireing Maintenance
I’ve noticed both biceps are symmetrical and have one side higher than the other... what should I do here? Sent from my iPhone using Tapatalk -
ANH Stunt Build (Back in the game)
BananoPower22 replied to BananoPower22's topic in Build Threads Requireing Maintenance
I apologize for the lack of updates. I’ve been sick and also unemployed and investing time in the armor has become a challenge due to various personal reasons. I still need a belt, undersuit, neck seal and boots and to my understanding these items are essential for a proper fit, so I’m stuck on a loop until I can get a job and get things going again. I am hopeful something will land soon and I’ll be able to back myself up financially and afford treatment for my illness (BPD, anxiety and depression for those curious) but finding a job where I’m from and living enough to pay bills and feed myself is complicated, but hope is the last thing I will lose. -
ANH Stunt Build (Back in the game)
BananoPower22 replied to BananoPower22's topic in Build Threads Requireing Maintenance
Almost done with the bucket, it needs a bit of clean up, S trim, Welders lens, star foam padding (maybe, or something just comfortable), still need to track down some parts I’m missing such as the undersuit, neck seal, belt, boots and the good ol’ blaster. Ivd got a pair of latex hand guards around but I have no idea where, but they’re around here somewhere... I still need to trim everything down, and I’m unfortunately 5’9 tall and I need to trim the thighs. I haven’t worked with the armor fitting on the leg armor area 100% either yet though. It’s probably going to take a lot of snaps and webbing and I’m a quiiite not there yet. (cotton, elastic?) The cover strip system is scary but I’ll tackle it down carefully once the whole fitting is done entirely. I won’t work with the calves yet but I will once I get a pair of boots and I’m able to properly fit them correctly and not wearing them or using others as a mockup and end up looking wrong. Sent from my iPhone using Tapatalk -
ANH Stunt Build (Back in the game)
BananoPower22 replied to BananoPower22's topic in Build Threads Requireing Maintenance
Not much to say but I’ve been trimming the excess plastic away. Ive gotten a struck of luck and I’ve hired again and now work has been consuming my time, but whenever I get te chance trim seal at least two or three pieces and settle everything down for later. I have ordered the frown paint so it should eventually get here. I haven’t painted the vocoder either yet because I’m procrastinating excessively, so yeah, I will eventually get to the handpainting and placing the decals on the helmet, probably at all the same time once the frown paint gets here. In terms of fitting the armor is the scariest part, but I’ve got back up from fellow troopers and I’m whenever I get the chance I work on a RO Death Trooper for an inspiring 501st member and I’m more than willing to and get it up to standards... and I’ll probably end up getting one soon, but I’ve gotta tackle a jango fett first; and most importantly the TK itself. I still have to order the boots, canvas belt and the blaster and a set of welder lens for the helmet - which I’m also considering on painting the inside black and go with a cool padding and fans, but priorities first... The white armor 4326 out -
ANH Stunt Build (Back in the game)
BananoPower22 replied to BananoPower22's topic in Build Threads Requireing Maintenance
I have been taking things one step at a time and veeery slowly ever since my dremel died, so I'm trimming with patence, an Xacto qand Lexan Scissors. Now, I've got the chest, backplate and abdomen plate semi ready to go but my major concern here is the return edge. As the kit I ordered came untrimmed so I could fit it into my big chunky body, I still wanna look good. Here's a line I've traced of what I might go with - but still havent trimmed down. Ideally, is there a measurement I should follow, or how thick it should look? If it's good like this, should the same thickness be followed back to the kidney plate, both upper and lower areas and the butt plate? this is the ab an kidney held with masking, nothing has been cut, glued, etc. Pics: Butt plate which also concerns me, the lower area where our beautiful cheeks are tucked inside, does this area in particular has return edge? I notice some screen caps, they do have return edge but some don't or is it very minimal? As in not the same thickness that the Ab, kidney, upper butt, etc. (Taken from TK300 website) A general question, is the return edge all the same all around the armor? If so this could help and i'd just measure the return edge on the lower side of the chest plate and use that and cut and devour away like Tazmania -
ANH Stunt Build (Back in the game)
BananoPower22 replied to BananoPower22's topic in Build Threads Requireing Maintenance
You mean the painted area next to the smaller 5th teeth? I will definitely paint in the name of holy accuracy [emoji41] Sent from my iPhone using Tapatalk -
ANH Stunt Build (Back in the game)
BananoPower22 replied to BananoPower22's topic in Build Threads Requireing Maintenance
I’m open to options. Humbrol admiral grey #5 or testors 1138 (I noticed the number and made the connnection, had a fangasm and I am now more enlightened) Should I proceed with the decals then? I don’t have the paint yet since I haven’t both got it and the wait time will take a bit since neither are available locally. Sent from my iPhone using Tapatalk -
ANH Stunt Build (Back in the game)
BananoPower22 replied to BananoPower22's topic in Build Threads Requireing Maintenance
I finally managed to load up some pictures. It’s not much but I’ve managed to get the helmet done. How are the teeth, eyes, earcaps and overall placement in general? If it’s wonky, that’s perfect then. I feel that I could get the eyes and teeth area a little bit more accurate, but maybe that’s just me. I don’t want to go too overboard and have to order an extra piece to be completely honest I’ve been also using lexan scissors, xacto knives and sand paper, working around the armor area pieces. I have not fully trimmed yet but once I get most of them trimmed and sanded, I’ll take some pictures. I’m still in need of a pair of boots. There are several options here and the most popular two are ridiculously overpriced since last time I got a pair for myself... so I’m thinking about heading the “most authentic way” of getting a pair of black Chelsea boots and dye them white, and always keep that dye around whenever something pops out or they’re wearing out too much. From this perspective it’s not a bad idea but once I get my hands down and dirty I’ll see really if it’s worth the shot. - I’ll be practicing on a pair of boots I got around here and see how I can get them from brown to white... the concept should be the same if I head the white dyeing route. Paint wise, for the teeth I have seen both options, humbrol or but testors. Which one is truly the way to go? I used humbrol for my past helmet builds and it was pretty good and efficient; gets the job done Sent from my iPhone using Tapatalk -
ANH Stunt Build (Back in the game)
BananoPower22 replied to BananoPower22's topic in Build Threads Requireing Maintenance
For now, for Centurion I will keep the lowbrow and everything else that is needed to achieve this goal. I might dig a few extra hidden holes and make it look very surprised I’ve been tackling the armor little by little. This would be my third helmet build so I have a clear view of what I have to do and get some good references for the authentic look I wish. Happy little mistakes often occur, and that’s okay Like buying a a 109pc dremel piece kit so I could tackle the armor as well with patience and virtue but as soon I finished the helmet and giving it the final touch ups... my dremel just died on my hands. I’m having issues uploading pictures with tapatalk. I’ll upload some showing the the ear caps, teeth area and eye sockets.. looking for some juicy accuracy tips. Sent from my iPhone using Tapatalk -
ANH Stunt Build (Back in the game)
BananoPower22 replied to BananoPower22's topic in Build Threads Requireing Maintenance
After some xacto and lexan scissors action... I’ll call it a night. Tomorrow I’ll be using a dremel for trimming the ears as seamless as possible although I don’t mind a slight wonky look. Chest, back and abdomen plate were also trimmed down with the scissors but left like half an inch or maybe a little less so I can smooth it down and not lose the return edge on each piece. Since these edges are all rough, using sandpaper grit 80/120/220/500 and if necessary wet sand with 1000 grit. Happy little accidents happen and I’ll be making some ABS paste soon. I don’t know how to do it, but I did saw a pinned tutorial and I’ll head there eventually when the time comes. Sent from my iPhone using Tapatalk -
ANH Stunt Build (Back in the game)
BananoPower22 replied to BananoPower22's topic in Build Threads Requireing Maintenance
So I’ve had my hands full of plastic the past few days trimming most of the armor pieces but decided to slow down, not rush it at all and try to make it as accurate as possible, starting with the helmet, my favorite part. I’ve always been a fan of the high brow look and, during the past months (years?) a number of new kits have popped up and they’ve all got some particular bits and pieces that make them recognizable. Puerto Rico Garrison has a lot of TKs (about time!), but I’d like to stand out a bit more- looking a bit more surprised with a high brow. I’m not entirely sure if the ANOVOS kits helmets are prebuilt as I’ve never seen a build of these but they all kind of look... the same. I like the variety each Trooper in ANH had such a brow positions and how lens were cut. I’ve already cut the eyes out using references from screen used and fan made helmets as well as some of some local and other brother troops in the world out there. Now - my real question here is how to achieve this look? I’m 99% positive I don’t have to alter the cap’n back. I was thinking more like trimming a bit from the “forehead” area that goes inside the helmet, so it’s not really visible to the public. Any input on this? The move along TD had a high brow which I love, but I don’t wanna take it all the way up there and have some room to play with it until I’m really content with the look. This is how it currently looks as I’ve not altered anything but the eyes which I’ve already cut out and I’m headed next for the teeth area and I really want these teeth to look menacing and sharp. Y’know, Tantive IV(ish) like we mean business and Vader is right up behind us. So, shall I trim the forehead just a bit, maybe round off the corners/lower it a bit more? Sent from my iPhone using Tapatalk -
Hey there troops! I’ve been out of the TK suit for a while but I’m really happy to say that I got a brand new (untrimmed) AP kit and I’m very much excited to start once again on this journey. My first kit was a heavily modified AM with some other pieces that helped me achieve a more accurate look despise my big size. Aiming for the stars this time, I’ll be going back and forth through trial and error until I can get my armor up to Centurion standards. My first goal is to probably start with the helmet and once I’m done with that I’ll start trimming the armor. I’ve got a dremel which I’ve used for my past builds and it’s still working like the first day I bought it. I also got some lexan scissors just in case ( not entirely sure if I should use the scissors or the dremel) The plastic pieces are all accounted for and the thermal detonator tube is also present along with the metal clips. I’m still missing a few pieces such as: Canvas belt Neckseal Rubber Gloves Latex Handplates (I am 20% sure I’ve got a pair I bought but never managed to glue them to the rubber gloves, so I mostly trooped with the plastic ones) Accurate boots E6000 Clamps Snaps, Rivets, split rivers? The whole load of snaps for a good and sturdy strapping so everything stays where it should be and not complain whenever I see myself in pictures saying: “ this shouldn’t look like this....” GUTS to trim the armor All in all I haven’t started anything yet. I’ll be doing some research and looking up some pictures and making a folder for references. I’m aiming for a high brow looking stunt look (very surprised look as some say. Im not a fan of low brows unless they’re Hero )
-
We are all infected. TK-0380's Deathtrooper
BananoPower22 replied to TK-0380's topic in Build Threads Requireing Maintenance
i've got my eye on you