Jancelot[TK] Posted September 9, 2011 Report Share Posted September 9, 2011 First off a disclaimer: this is only my second helmet build after the FX bucket 6-7 years ago. That said, between gazmosis' post and TK4510's very helpful printed guide (available on Trooperbay, naturally) I went in feeling I had some excellent reference material. It's not complete yet but it's ready for painting and details. Most of the time things have gone smoothly, and at other times mistakes have certainly been made. I thought I'd post some pics and notes of my trials. Step 1: Cut out the eyes and frown holes. Not too much to report here. Just took my time, double-checked reference pics often and slowly carved away with an Exacto knife and sandpaper. Step 2: I trimmed the front to give as much room as possible for my large noggin'. Although in looking back I should've left the line across the middle straight and not cut in to it. Step 3: Next up is to put the black trim on the cap+back and line up the front. Then drill some holes for the rivets and lock it down. Mistake 1: The clamps are a great way to hold it in place. However, I discovered that they were holding my helmet in a way that made it look like the line up was good, but that it was actually incorrect when the pressure was released. Oops. Next time I will manually hold the side I'm working on and clamp the other. I had to drill out the rivet and re-position it. Aluminum rivets were critical to the ease of this process and I'm going to use them exclusively over steel going forward for just this scenario. That's better: Step 4: Next is drilling and riveting the bottom parts of each side. I then trimmed the ear pieces very conservatively and outlined where I wanted them on the helmet. Note: I ended up moving the right one back a bit as the fit was odd. Mistake 2: Turns out I placed the rivets in the exact spot where the bottom screws for the ear pieces needed to go. Sigh. Had to drill them out again, but this time one was steel as I pulled it form my own toolbox to replace the earlier one. Much more difficult to remove. Luckily the scratches and marks are on the inside and/or covered up by the ear pieces. Just had to take my time and take frequent breaks so as to not get frustrated and make a mistake. Step 5: Trim the ear pieces down to fit and drill the holes. Note, ear are not bolted down. I just loosely place them on the helmet for position and fit. Step 6+: Paint the frown, mouth and ears. Apply decals. Pics to follow. To be continued... Quote Link to comment Share on other sites More sharing options...
TK_LEPER Posted September 9, 2011 Report Share Posted September 9, 2011 Lookin' good! Quote Link to comment Share on other sites More sharing options...
TK bondservnt[501st] Posted September 9, 2011 Report Share Posted September 9, 2011 AP is easy. cmon... let's see the rest! Quote Link to comment Share on other sites More sharing options...
gazmosis[501st] Posted September 16, 2011 Report Share Posted September 16, 2011 Nice job so far!! Did you just not tighten the screws on the right side? The ears looks a little....loose. I just can't see how people could wear the FX helmets. No offense to those who own them but......... In seeing yours. I like the high brow line. Mine ended up a little lower. To each his own. Great job so far!! Quote Link to comment Share on other sites More sharing options...
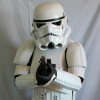
Jancelot[TK] Posted September 22, 2011 Author Report Share Posted September 22, 2011 Thanks, all. I had just loosely placed the ears on for placement before I painted them. Works been crazy, but I've found a few minutes here and there to make some progress. Just need to put in the mesh and I'm complete for the external details. Work on the foam and electronics are underway as well. Hoping to have it ready for a troop on Sunday. Step 7: Painting. Although I masked off the frown it probably wasn't necessary as I hand painted it. Complete: Well, except for the mesh, but that's simple. Eventually I want to go back and paint all of the details. Quote Link to comment Share on other sites More sharing options...
NoVATie[Admin] Posted September 22, 2011 Report Share Posted September 22, 2011 Great job! Quote Link to comment Share on other sites More sharing options...
pattrooper Posted February 9, 2013 Report Share Posted February 9, 2013 nice work. Quote Link to comment Share on other sites More sharing options...
bluehickey Posted February 9, 2013 Report Share Posted February 9, 2013 An MTK is the helmet I wear as well, it's a great looking lid! Quote Link to comment Share on other sites More sharing options...
gmrhodes13[Staff] Posted February 9, 2013 Report Share Posted February 9, 2013 I did like your trimming of the eyes and teeth, some just don't seem to get the teeth trimmed enough in the corners, very nice indeed Quote Link to comment Share on other sites More sharing options...
Jancelot[TK] Posted February 10, 2013 Author Report Share Posted February 10, 2013 My first build thread that kicked off the urge to finally replace my old FX kit completely. I ended up giving this helmet to my brother for his 50th birthday. Thanks, all! Quote Link to comment Share on other sites More sharing options...

Recommended Posts
Join the conversation
You can post now and register later. If you have an account, sign in now to post with your account.