Search the Community
Showing results for 'cover strips'.
-
Looking great, Jeremy! As for "...everything seemed great aside from one little bit sticking up but I put some extra magnets on there and left it overnight, although I might have to put a wee bit of glue on later if it still doesn't stick all the way", a way to help prevent this (and the strip popping loose in the future) is to use interior cover strips as well on joins that don't lay flat for added strength. You should have scraps from your trimming and these are perfect for this. They don't have to be pretty, as no one sees them anyway! Two areas I strongly suggest adding these strips to are the inside fronts of the shins. Those seams get a lot of wear and tear from opening and closing when putting your armor on, so a little reinforcement will help prevent any issues. You shouldn't need them on all the joins, and yeah it takes a bit longer to glue them in but well worth it.
-

TikiTechie TLJ First Order TK Build Thread
TikiTechie replied to TikiTechie's topic in TLJ Build Threads
Day 6 Overnight glue set for gauntlet. It's pretty much how I imagined with a fairly prominent seam. I think the glue shifted a tiny bit and made it more visible, but even with no gap there's going to be no way to seal that without showing something. This is where I miss cover strips. The right shin looks pretty good. The seam is pretty even so I'm reasonably happy with it. I did a try on and this thing will definitely need some padding to keep from jangling. I tried out white paint for the first time Behr Gloss White is the one I've heard of most recently. I was thinking maybe that would blend with the ABS but doesn't seem to be. I think it's ok as-is for the clip pieces, but painting the kit is drawing ever nearer. Does this white look correct? -
Didn't have too much time to work on it today but I got the first of 4 cover strips I'm going to put on glued today so woop de doo, I really hope it turns out well. I measured and cut one of the 15mm strips I had and after 45 minutes of getting my courage up I glued it with some good ol' E-6000, 8 neodymium magnets, and two clamps. Everything looks good now but we'll see in a day's time. Definitely getting more magnets though, don't want to have to be waiting a whole day before I can glue something else in the near future lol.
-
1. For fitting, how exactly does one go about doing that? I know there needs to be a return edge on the inside of the forearm, and no return edge at the wrist, but how do you determine what it should be at the other end? Depends on your size, if you have skinny arms like me you can't trim too small, you can leave extra return edge on the rear or you can remove it all if you have larger arms. Great thread on return edges 2. I've noticed that AM builds usually have some wonky forearms when they arrive and mine is no exception, how would I go about fixing this? I've heard people use heat-guns or a hot water bath to help adjust this sort of thing. - - (Do you just heat it up and bend it slightly until it sticks?) - (I've used tape to just temporarily hold it together here.) Only those experienced with heating ABS plastic should attempt this, there is a fine line from being pliable to molten mess, best to use a hot water bath if you really need to adjust. Most of the time you can pull the pieces into place, using masking tape you can press down on pieces then wrap the tape around while it dries, clamps and magnets are also useful. Make sure you rough up both surfaces with coarse sandpaper before apply E6000. And for pieces under strain/stress leave to dry longer 48 to 72 hours. Many add inside cover strips for strength, I find I normally only need them in the shins as those pieces are constantly open and closed.
-
Right so I've decided to finally begin working on my build now that life is less busy and I picked the forearms to start, after finding them and reading some other build threads I started cutting out some 15mm strips for the cover strip (I think that's what it's called anyways.) I do have a few questions about the rest. 1. For fitting, how exactly does one go about doing that? I know there needs to be a return edge on the inside of the forearm, and no return edge at the wrist, but how do you determine what it should be at the other end? 2. I've noticed that AM builds usually have some wonky forearms when they arrive and mine is no exception, how would I go about fixing this? I've heard people use heat-guns or a hot water bath to help adjust this sort of thing. - - (Do you just heat it up and bend it slightly until it sticks?) - (I've used tape to just temporarily hold it together here.) 3. What grit of sandpaper should I use to get things ready for the butt & strip/joining method? I've got a sheet of 220 grit and a sponge block of 120 grit, but I haven't experimented with either and how both bond better to E-6000 and some spare ABS.
-
Definitely cover strips in the insides, these flex all the time from putting on and taking off so the extra strength will pay off in the long run. I have roughly 5mm return edge around the tops on my thighs. If you find them too tight on your leg you may be able to add mobility cuts, references here Note check your height and gaps first, adding mobility cuts to someone tall with large gaps can make those gaps look even larger.
-
Nice. Thanks for the input. I knew about some of those. I like the tab idea, thanks for the link. The gap at the chest and shoulders - going to try to rotate those a bit. I have a large chest and gut so that doesn't help either lol. My gml was ok with the cover strips for basic. I'm a bigger guy so getting things like this to fit are tough. I'm really pleased with the first suit up.
-
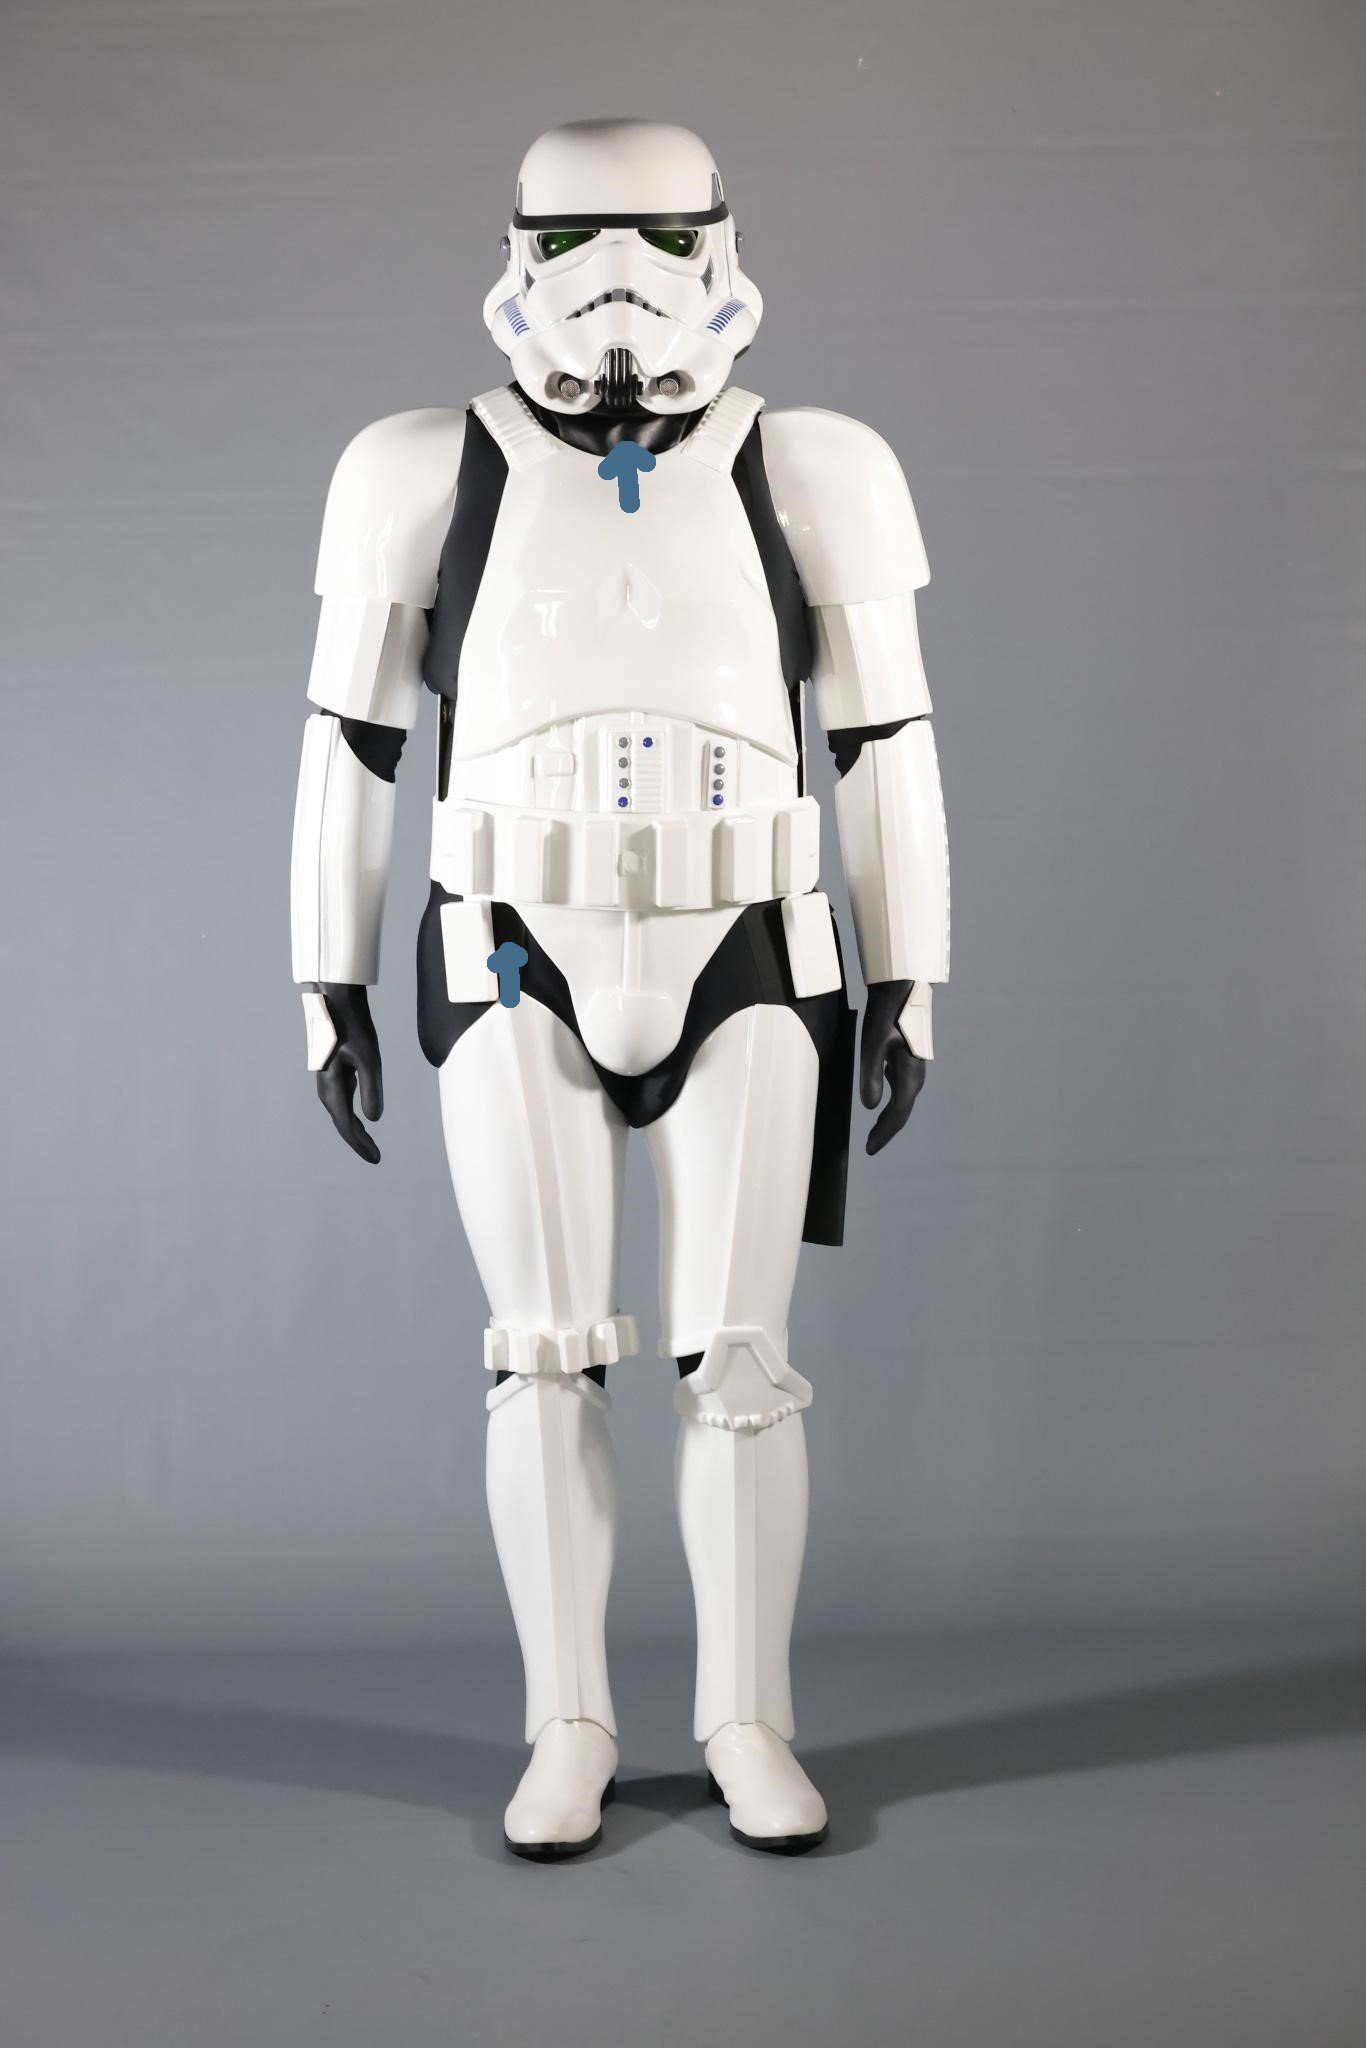
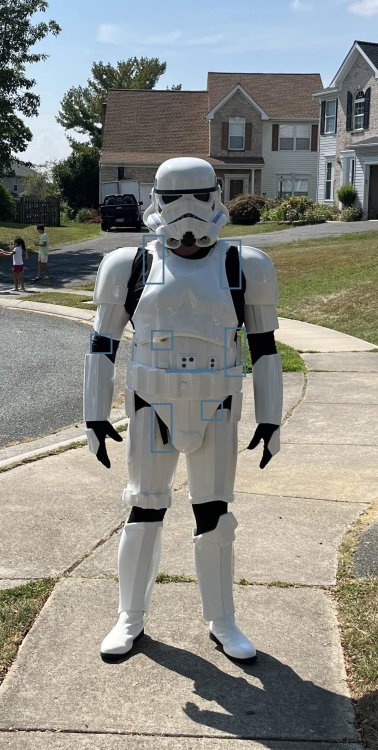
Hi David there are a few things standing out, some strapping hanging out over the armor in some places, just under chest, over thigh and over kidney on the rear. Your shoulder elastic is being pulled a lot and can be seen outside of the shoulder straps. You could try rotating the shoulder bells to close some of that gap. I would try to even out the gaps on your arms, biceps could come down a lot more. Belt too high over ab buttons Kidney plate sticking out on the sides, adding tabs behind can help Thigh and shin cover strips are quite large, we suggest adding larger to the rear as it's not seen as much, entirely up to your GML if they are acceptable. Boots will only cover basic approval due to the stitching. You may want to see if you can bring your abdomen up a little, it will give you more room at the top of the thighs. No neck seal or detonator which no doubt you know
-
Does get hot just standing, walking around air gets in between the armor and keeps you cooler. You do have a few issues with gaps and position of armor, your chest should come up it is sitting too low, you notice this more on the side image, note how far down on the front the chest is when you compare to the backplate. A comparison from another trooper, note the gap between the large ab plate and chest. Yours they are almost touching. I would say you are just on the edge of sizing on this armor so some modifications may need to be made so it fits you a little better. Thighs are pretty low I would suggest adding either larger cover strips on the rear so they can come upwards more or you may even need to add some shims. Compare with troopers in this image and you should see what I mean. A few threads adding shims to thighs
-
Ah, I did not know the cover strips could be angled!!! And yes I knew about the sanding both. But didn't realize that much drying time. Good to know. Thank you Sent from my SM-S918U using Tapatalk
-
Generally we try to add any larger cover strips on the rear as we are mostly seen from the front. I would however contact your GML in regards to widths, some are a little stricter than others so worth a check.
-
Hi David! If you decide to pull off your shin front cover strips, it is acceptable for there to be a visible ridge (or shoulders as you describe them) on either side from pulling the armor out. Just be sure that you add in a rear/inside strip to ensure proper adhesion. You could also consider utilizing wider cover strips on the back for your thighs, as you mention, which should give you some extra wiggle room. You may just need to create a backer plate to fill in part of the gap of the raised ridge at the top, depending on what type of mobility cuts you do. Here are some reference photos of the screen used suit from RS, all found from the FISD Gallery. And while those images doen't really show it, the extra surface and ridge that is prominent at the top of the shin, has also existed at the bottom and even the middle of leg pieces as well, so you really should be fine in pulling out the pieces a bit.
-
I am working with a WTF kit that was built to my body size, the builder did a fantastic job. The biceps cam in too tight to fit but I fixed those with no issues. The shins however are a different animal. I need about 1.5" to get them closed at the top. I've seen various types of shimming here and I'm look for the best possible way. This is no fault of the builder, I went back over the measurements I provided and I was off. Since I'm a bigger guy I think the cover strips are maxed out. I am looking for the best way to shim without having to paint since the kit is built (so no slurries). My thought was to pull apart the front of the shin and create a gap under the cover strip and glue it back down. I can reinforce with some spare ABS and done. But that will leave "shoulders" on each side of the cover strip. I don't know if that's acceptable or not, I didn't see anything about that in the CRLs for basic approval. I can increase the size of the cover strip in the back but that means going over 1.5". I think it starts to look odd. And it leaves a gap at the top of the rear so the lip part wont meet. I've seen some with sort of a relief cut on the back side (almost like a U shape) and that might cover up the gap. But again, larger cover strip.
-
 I'm on a good one and may bust this out into its own thread, but the next two are for once you're ready to glue. I'm sure there's another supply list thread out there but some of these are specific, and the links are current. If you are a first time builder, I STRONGLY recommend you use E6000 glue and utilize interior cover strips first during your build. CA glue has its time and place, and pros who can get it right on the first time often swear by it, but E6000 is the correct choice for this armor. The downside is that it does take time to dry and therefore you need to clamp your pieces together firmly for best results. Spring Clamps FASTPRO Nylon Plastic Spring Clamps, 4 sizes - $18.99 USD on Prime for a 12 pack at time of post Spring clamps are awesome and easy to use for the first half of your build when you're gluing in your underside cover strips, and for the ends of your joined pieces. It's nice to haver several and a few different sizes to suit your needs. Magnets N52 Neodymium Rare Earth Magnet Discs, 18x3mm - $65.00 USD with free shipping on eBay for 50 at time of post Clamps are cool, but will only get you so far once you start joining complete pieces together. To help clamp your coverstrips tight, I recommend N52 rare earth magnets, and have found that the 18x3mm are usually the perfect size and strength for armor building. The link above is the cheapest I've been able to find for the VERY SPECIFIC magnets that I like to use, but these are simply the best I've found. But BE WARNED - these magnets can and will jump over a foot to come together, and can shatter and throw sharp pieces that can and will cut you. Many times, I have also been pinched and caused blood blisters or other skin injury. These things are powerful and brittle, and DO NOT MESS AROUND. Always place them very intentionally, and I like to test and alternate the polarities while placing them in a line - that way they are always pushing AWAY from each other, and not tempted to pull together and stack. Remove them after 24 hours just as carefully. I sometimes double up for areas that need a little extra persuasion, and always scuff the surface I'm gluing with sandpaper or an emory board for maximum mechanical adhesion. As for how many you need - I've found that once I'm done trimming, my build is often only limited by how many pieces I can have simultaneously gluing, which is limited by how many clamps and magnets I have. So buy as many as you can reasonably afford - I recommend 50, as you undoubtedly will lose a few to cracking.
 -
Update Corrected Cover Strips I went ahead and did the deed. Starting with what I thought would be the most difficult first. I carefully cut away the dried E6000 on the back of the left thigh from the inside panel. Then made an angled cut of almost an inch! Yikes. But I wanted it as straight as possible, while hoping that the strip would angle back in rather than go further the other way. When I was test fitting and bending before my cut it seemed to be angling the right way. (Always test fit with painters tape!) I committed and made the cut. Re-glued it and waited. The fit was already tight but I had a good bit of return edge. So after drying I sanded away all of the return edge. Tried it on over the undersuit and violà! It fit AND was straight! While I was at it I went ahead and sanded a bit behind the knee for mobility, careful not to cut above the raised ridge line. Sorry for the butt shot. I tried to crop it down to spare your eyes: I’ve also corrected the rotation of the TD. I’ll post a photo of that next time I test fit the full uniform. Thoughts? Thanks for your feedback and guidance.
-
 Late to this party because I kept putting off finding the link in my amazon history that I'm sharing below. A DEBURRING TOOL. I didn't discover this until about 2 years into my build. LOL. Basically it's a blade with a slight bend in it that can be used to deburr (smooth) the edges of plastic. Essentially a beveling tool if you press with it hard enough. It works wonders for smoothing the edges of armor you've cut/trimmed, including curved pieces or straight cover strips. If I ever have the pleasure of constructing another suit from kit-form again, I'm even tempted to try using a deburring tool exclusive, with no sand paper, just to see if I can! https://www.amazon.com/gp/product/B003JY7LXI
 -

Looking to Build an Approvable TK
gmrhodes13 replied to Tilheyra's topic in New Member Introductions
The issue with a Shock Trooper is the game is based of a ROTJ stormtrooper although the helmet is ANH, there are some differences between ANH/ESB and a Shock Trooper, it's mainly for EIB or Centurion but to build it correctly some changes should be noted from the start of the build. You may also want to check with your GML (garrison membership liaison) as some can be stricter on base approval. Here's just a few items ANH/ESB is butt joined with covers strips, Shock Trooper is OPTIONAL Level two certification (if applicable): Overlap construction must be used. Butt joints and cover strips are not allowed. Butt joined ANH/ESB/HWT Overlapped - Shock Trooper/ROTJ Shoulder Armor No elastic around the bicep is present. Shoulder Straps OPTIONAL Level two certification (if applicable): Only 4 ridges of the shoulder straps overlap the chest plate. The front of the shoulder straps do not have a wide flat area only small ridges. Armor A white flexible U shaped gasket or molded lip shall be present around all edges..jpg.6b081d74b9d8c9f34c6b708fa0a339a1.jpg)
.jpg.302eaa9dc3c4894a328e81c5c9f78592.jpg)
-

Tim’s first time build (RS Prop Masters ESB TK)
TrickyT81 replied to TrickyT81's topic in ESB Build Threads
Hi all, I’m about to move onto, from my point of view, the most crucial part of my build; the shins. To give some context, here are the reasons for this: 1. My height. I’m rather “short for a stormtrooper” so I will need adequate clearance between the between the thigh and shin to avoid clicking or overlap of the sniper knee 2. I have chunky calves. I have already tried to compensate for this in my measuring and may need to think about additional steps to help them fit comfortably without putting strain on the joints. 3. This is an RS kit who provide 2 right shin moulds (or 2 left) so I will need to compensate for this as I’m aware that the outside of the shin (above the ankle) drops lower than the inside. 4. Also because of the RS kit, the back of the shins don’t align at the top too well (see picture below of my commission build). With that said, and I know I need to add the cover strips and elastic, my first question is around getting both shins to the right height by trimming the bottom into shape. Below is a picture of my starting point with no trimming in place and where I think the top of the shin should be (yellow line) plus a picture of the back. Should I aim for getting both shins the same height so when the sniper knee is added, there is a sufficient gap, or should I treat each shin separately? Thanks all, Tim Sent from The Empire -
New TK build - RS Props (TI-97531)
gmrhodes13 replied to RippTiger's topic in Tutorials, Tips and HOWTOs
You can also trim the ends of the cover strips which are also over hanging, and cutting on an angle is fine
-
 My take is the R1TK is a great looking armor in many areas just because it has more detailed machined appearances. The cover strips look so detailed and the helmet is quite detailed with the cutouts. That being said, that’s about as far as I will say I prefer R1. When it comes to costuming I still stick with the OT ANH above all others as first, it’s classic. Everyone recognizes it and it has a timeless appearance. Even in ways that it could be dated, it still holds up the test of time and stands a testament to the costume makers on what they were able to do with their technology and creativity. Wearing the costume is much more comfortable. Having had an FOTK and seen the build process for the R1TK I can tell they are both fairly similar in one area that is super uncomfortable for me and that is the abdomen. True, no stormtrooper can effectively bend over well because of the armor, but the wrap around abdomen is so much more restrictive than the two piece. The overly detailed soft parts too. I like the classic black gloves with not fine detailing and the ability to just wear black spandex underneath and not have any special strapping or details is great. In the end of things it’s personal preference, but that’s my take on the armor. Sent from my iPad using Tapatalk
 -
Tim’s first time build (RS Prop Masters ESB TK)
TrickyT81 replied to TrickyT81's topic in ESB Build Threads
Hi everyone, So it has been a good while since I last posted on my build thread so let me bring you all up to speed with where I am I’m the journey and why it has been so long since my last post. While progress has been slow as I’ve been taking my time as well as being busy with other interests, I’m actually quite far ahead now and my confidence in the process has definitely increased. All pieces are trimmed and I’m part way through adding the cover strips. I’ve had great help from my Armourers at UKG to get me to this point. Sadly though, my original Armourer, CableGuy Dan, passed away not so long ago (may he rest well in the galaxy) so I was assigned a new armourer who has been great. So where am I now? Well, as mentioned, I’m adding the final cover strips to the limbs and I’m now looking to start piecing together the body armour. I’m going to be going for the snap setting method as outlined in Joseph’s guide and waiting for the materials arrive. My question at this point is probably an obvious one; should the exterior of the armour ‘mimic’ the original suits e.g. the small screws on the chest plate that would have held the original strapping. If yes, what size screws do they need to be? looking forward to the help you can all provide for the next part of my build. Thanks, Tim -
A Trooper needs help - my calves :(
FN1313 replied to patty1985eu's topic in Hard Armor (General Discussion)
Even at larger size AM armor may still need some help if shins are too big. As long as rear cover strips are straight and not too extreme in size most GMLs I’m sure would be okay with them. The other thing is you could shim the armor and then fill in the seams with abs paste then sand and polish. A process that sounds scarier than it actually is. Just more time and patience required than anything. Sent from my iPad using Tapatalk -
I was really happy with the 3D prints for the back and abdomen details and the fact that I didn't have to sand down the resin from 850 AW so I decided to print the cover strips as well. Things went well for the first batch until there was an overnight printer jam during the second batch
-
Waiting for cover strips on the shins to finish glueing. In the meantime, I trimmed the torso and will probably tackle the chest plate either tonight or tomorrow. I left at least 8 mm on the top for the screws and 1-1.5 cm on the sides. I left a little more than 5mm around the cod piece area but could trim more off easy.
-
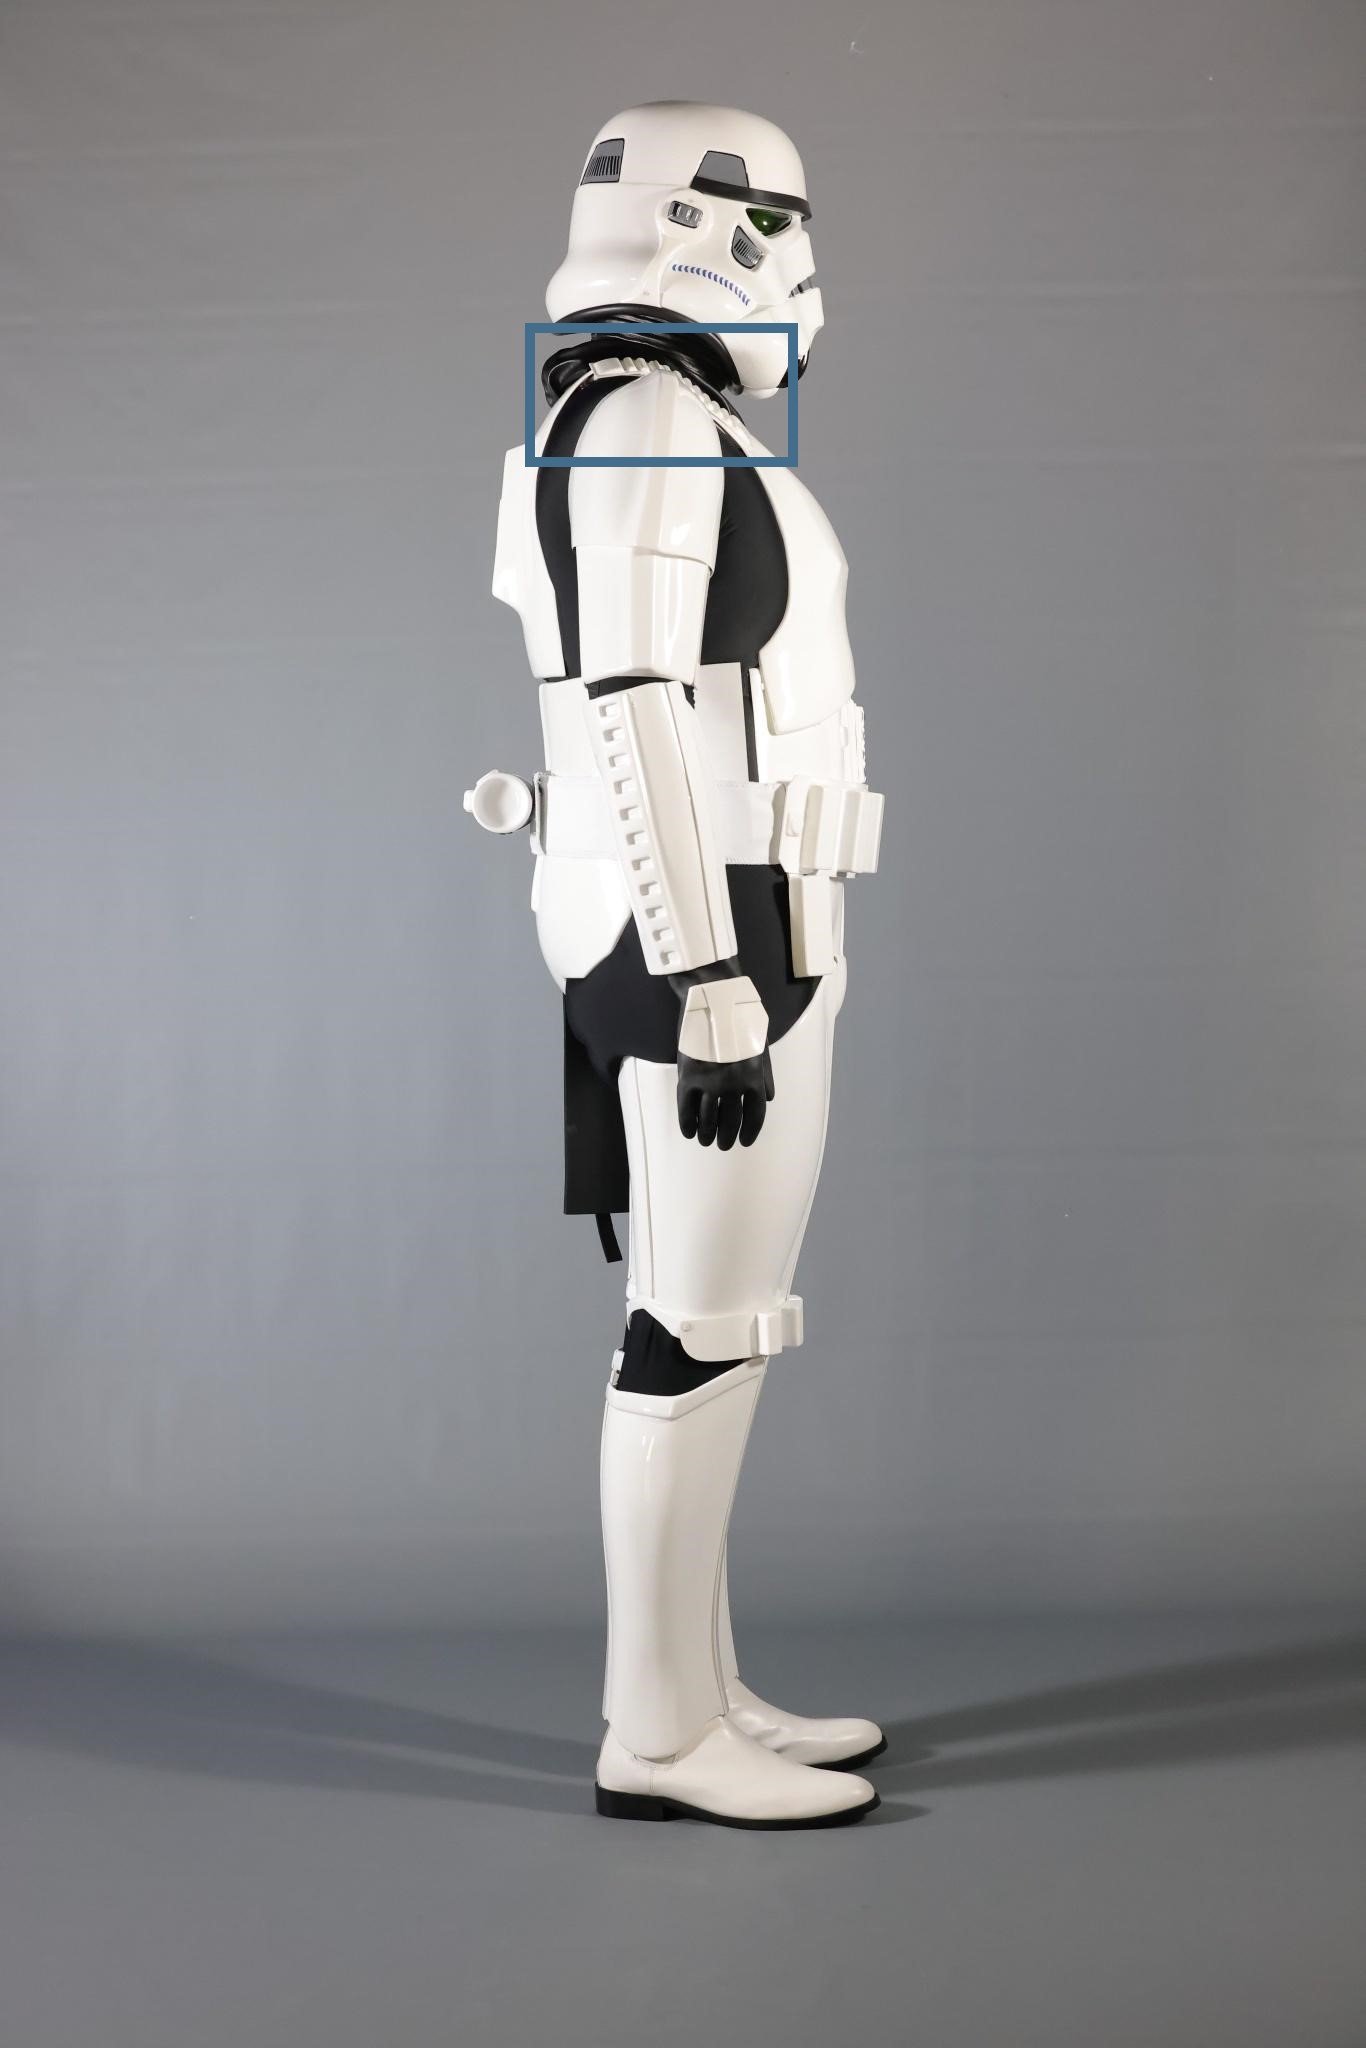
This... looks... GREAT, Mark! Super nice job the trimming, and it looks like you are getting quite proficient in working with ABS . Keep this up and your armor is gonna' turn out spectacular! I'm probably jumping the gun here as you have probably figured it out, but if I could make 2 quick suggestions they would be: 1. Not really a huge thing for the biceps, but if you have scrap ABS I would consider adding interior cover strips. This adds extra strength on the seams, and it doesn't need to look pretty, lol, as no one sees the inside. It doesn't need to be actual ABS... any thick (preferably white) plastic will do nicely. Even if you choose not to do it on the forearms, biceps or thigh pieces, I HIGHLY suggest doing it on the inside fronts of the calf pieces. The reason being is that those get a lot of wear and tear from being opened up over and over when putting them on, and any additional support will help. Trust me. 2. Again, I'm sure you have realized it but using some (200 grit or above) sandpaper on the edges (yellow arrow) will prevent them from snagging on or wearing a hole in your undersuit. Excellent start on this build, sir, and with this level of dedication I hope to see an application for Expert infantry in your future!