troopermaster
-
Posts
3,638 -
Joined
-
Last visited
-
Days Won
12
Content Type
Profiles
Forums
Gallery
Articles
Everything posted by troopermaster
-
A Scouse TM ANH stunt WIP[*TM]
troopermaster replied to TK9477's topic in Build Threads Requireing Maintenance
Everything is looking good so far Grant. I wouldn't worry if some of the parts are a big 'baggy'. Better lose than tight I would get the biceps to be snug when you tense your muscle so they don't restrict your movement and I would totally trim away all the return edge on the wrist and inner elbow curve. As you are a slim guy, you can get the wrist pretty tight and try and flare out the forearm towards the elbow to give it that nice flared ANH look! I would get the shins assembled first and test walking around before you start hacking them. If you feel you need to trim them down then take a bit off the bottom and test, then a bit more if you need to. -
TM 1,5mm ANH(stunt) [*TM]
troopermaster replied to Arnie_DK's topic in Build Threads Requireing Maintenance
Yes, that's the right way -
TM 1,5mm ANH(stunt) [*TM]
troopermaster replied to Arnie_DK's topic in Build Threads Requireing Maintenance
I would make it a bit narrower as long as you don't need the extra width so the thigh fits you properly. -
TM 1,5mm ANH(stunt) [*TM]
troopermaster replied to Arnie_DK's topic in Build Threads Requireing Maintenance
My preference is to mark the outside of the armour and not try to be so precise. I think having some of the flat edge showing behind your joining strip looks better than covering the whole thing. Real ANH strips were kind of wonky and I like that. Also, depending on your body size, you might want to use wider strips. 22mm up to 25mm are fine and there are no set measurements for these, so go with what is best for you. Test fit the parts first then see which is better, but make the front strips slightly wider first and you can trim down if the thighs are too big on you. -
Don't the eyes matter?
troopermaster replied to Darth Hilarious's topic in Build Threads Requireing Maintenance
To be honest I don't think they had a choice on what helmets they used for ESB. Judging by the condition of the armour all taped together and no original gloves left they used what they had. I think the helmets just got a paint job and decals added, probably because a lot of the original paint had come off and they tried to spruce them up for filming. I think most ANH replica helmets would benefit from eyes trimmed out more. But like most things on the forums, people have a way of thinking that I don't agree with and usually don't listen when you tell them how it was done originally or they prefer it their way, so I really keep my nose out of most of the threads these days. It's a shame really because people are building their suits like other replicas which are wrong and everyone is like "awesome!" or "great job!" when really it isn't. But not everyone wants to be screen accurate and they do their thing, so good luck to them. Sorry if I have gone off the track a bit..... -
TM 1,5mm ANH(stunt) [*TM]
troopermaster replied to Arnie_DK's topic in Build Threads Requireing Maintenance
Good one Steve! The other helmet is an AA recast I believe and, in my opinion, is revolting (sorry Morten). -
Don't the eyes matter?
troopermaster replied to Darth Hilarious's topic in Build Threads Requireing Maintenance
Also, take a look at the helmets outside AA's workshop. See how large the eyes are? -
Don't the eyes matter?
troopermaster replied to Darth Hilarious's topic in Build Threads Requireing Maintenance
All I am saying is that I don't believe any helmets in ESB had their eyes trimmed out when they were refurbished for filming. I totally agree that the majority of ESB helmets have big eyes and I think it is just a coincedence the helmets that were used were trimmed this way. The helmet on the right trooper looks to be the same as the ESB patch helmet to me. I realise the brow trim is not identicle but you must realise that there is a gap between the face and forehead so the brow can move freely. The assembly looks to be indenticle to me and that is why I think they are the same helmet. Just to be clear, I am refering to the trooper on the right as we are looking at the image. -
Don't the eyes matter?
troopermaster replied to Darth Hilarious's topic in Build Threads Requireing Maintenance
I believe the ESB helmet with the patch on the back is this trooper on the right. Watch ANH to see it better and also note most of the troopers eyes are trimmed out quite a lot.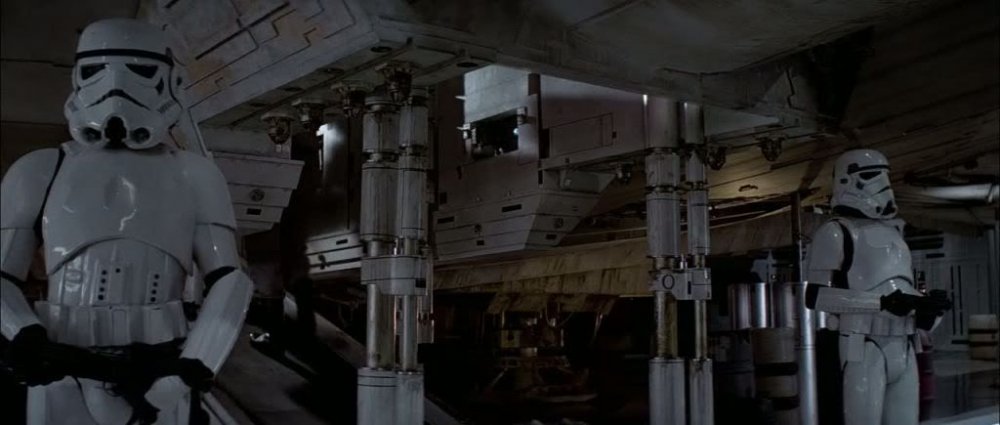
-
Looking forward to seeing a prototype Karin. Been pouring latex myself this past week. Finally got some pulls from new hand plate moulds and will update my thread soon
-
Don't the eyes matter?
troopermaster replied to Darth Hilarious's topic in Build Threads Requireing Maintenance
What is an ESB eye cut? Maybe you are thinking that they were cut out more in ESB? Well, that is untrue. ESB helmets are reused from ANH and to think they had the eyes cut out more is just an old wifes tale. -
Awesome work Jens! Especially as it is your first build. Way to go mate
-
Thank you
-
Great job on the assembly Karin. You wear the armour very well and look awesome I love this photo. It made me laugh as I thought of the great comedian Tommy Cooper - "just like that" :laugh1: :laugh1:
-
Looking pretty cool there Simon! Mr.H has done a grand job on the assembly. Nice work mate
-
snap covers on ammo belt--how are you gluing?
troopermaster replied to gazmosis's topic in Assembly, Mods, and Painting
If you need belt rivet covers that glue easily onto your belt, I have lots available. Give me a PM if you need some -
My shins look like crap!
troopermaster replied to TK-4510's topic in Build Threads Requireing Maintenance
It looks like your formed pieces are not very defined and your joining strip goes all the way to the top which is wrong and could be preventing the two halves closing properly. How close do they fit with nothing there? The hook method is very effective and screen accutrate too. That said, I have only ever used it on 1.5mm and thinner gauge ABS, but I can't see it being a problem on thicker gauge ABS. Don't give up Mike! Velcro sucks!!!! -
Yes, but the old style is still an option. The acrylic capped ABS is not glossy on the reverse side so the negative formed pieces may not be what some people want.
-
SW1's RS 1mm - 1.5 PVC Build
troopermaster replied to SW1's topic in Build Threads Requireing Maintenance
Both points really mate. You can see on the original belt (and on other originals) that the snap is at least half way into the ammo box on each end where niether of your snaps are which leaves you hardly any room for the elastic on the drop boxes. You can still fit the drop boxes but you will have to almost cut the elastic all the way across in order to slip it between the rivet and snap. For future reference with the ab snaps it would be best to offer your plastic ammo belt to your ab plate and mark the middle of each end ammo block on your ab plate so you know where to fit them. Fitting them by eye (which I think you have done) has not left you with hardly any room for the drop box elastic. If you had gone any wider then I don't think you would have a chance with the drop box elastic. The other nitpick is not putting the snaps in the midddle of the belt. I see this all the time and personally I don't like to see it (especially on more accuate suits). There just is no reason not to put them in the middle of your belt. Last nitpick is your tube stripes. You have put them on the wrong side. Hopefully now you don't have any more nits to pick -
SW1's RS 1mm - 1.5 PVC Build
troopermaster replied to SW1's topic in Build Threads Requireing Maintenance
Looks like dropped a boo-boo with the belt snaps mate. -
My 1:3 scale SFS stormtrooper helmet, painted and detailed
troopermaster replied to ObiHahn's topic in Off Topic
Love it -
My 1:3 scale SFS stormtrooper helmet, painted and detailed
troopermaster replied to ObiHahn's topic in Off Topic
Good job on the mini helmet Dennis! Hard to tell it is 3rd scale until you see it next to your RS helmet. The painting looks better than some full sized helmets I have seen on here and I like the lens too -
TM 2mm abs Hero build[*TM]
troopermaster replied to crafty's topic in Build Threads Requireing Maintenance
Tape both halves of the biceps together and trim accordingly. Now glue the joining strips onto one half and leave to dry. Next, offer the other half of the bice and glue one side only. You will probably have a big gap now on the opposide side but do not worry, this will pull together when you glue them shut. Use tape and magnets to hold everything together. Do this with all the limbs and you should have no problems. -
Here we go. Hope you like the parts!
-
I have a few spares