
DocDan
-
Posts
231 -
Joined
-
Last visited
-
Days Won
3
Content Type
Profiles
Forums
Gallery
Articles
Everything posted by DocDan
-
Here we go!
-
Welcome @Teach-. I'm in VT so we are neighbors. Have you checked out the NE Garrison forums yet? https://www.501neg.com/?_fromLogin=1 The Granite State Squad is starting up in NH as well so that will help you be more in tune with the member in your state.
-

Doggydoc’s Jimmiroquai TFA FO stormtrooper build thread.
DocDan replied to Doggydoc's topic in TFA Build Threads
Oh the things we do to play with these kits! . I love that the FOTK forearms and thighs are one piece in this kit! -
Nice! I usually trace the cut lines with pencil before I start trimming. This kit looks so much easier to put together than mine with the numbers and all.
-
Looking good @Shiri! Nice to see more builds-keep up the good work. I found I was gung ho for like 4 months, then lost steam, then picked it up again after a month long build break. I got mine done in 6 months. Depending on your head/noggin size, most of us are unable to get through the provided neck opening. You will want to trim the neckline as close as you can then sand those edges to allow for more max clearance. You may even have to cut away some of the "front chest interior" for your head to fit through. Its hard to explain but I usually put my head through in the front chest, then pull my neck back into the opening, then attach the chest plate to cover that opening. (My pics below) Mine is still very tight and I brush my nose each time I don and doff it!
-
Thanks Glen for all your support through my build! It meant a lot knowing people were looking at it and there guiding. Did not know there was that option for more access so thanks for the link. I have my request in.
-
Hi there. I'd like to request more forum access: https://www.501st.com/members/displaymemberdetails.php?userID=33460 Thank you.
-
Hi team. I’m in! There are a few things I want to take care of to make it better. I’m adding white felt to the back of the belt boxes so they don’t rub off the paint on my right thigh. Same with the insides of my shoulder bells on my biceps. I also want to get a better spat set up. Also currently working on the heavy F11D, pistol and shield.
-
Thanks Andrew! @Sly11
-
Hey thanks Glen @gmrhodes13 and Mario @TKSpartan for the feedback and encouragement. Yeah the biceps have to be adjusted for sure. Will make sure I make sure they are in line next time I push them up and attach them to the Velcro on the bells (my wife helped attach those for me) The TD, yes, I had forgotten to place the double thickness Velcro after painting on there to keep it attached to the ab section. I have since added it and it will keep it down now. The right chest plate side wing, I agree and will make sure I get that straight next time.
-
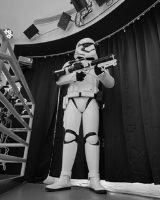
Hey all. I finally got some time to take my submission photos yesterday! The day has arrived...Sent them to my GML team last night. Fingers crossed!
-
Decided to powder coat my thigh holster bracket. It will hold up better than paint and clear coat Missing some screws but working on that
-
I'm on the home stretch! Getting the final clips on the shins and thighs.
-
The shin decals were really bothering me! I took some time and made a small template and used some gaffers tape in place of black vinyl. Hopefully they look a bit better as they now fill that recessed area a lot better! Left Shin=after Right Shin=before
-
Yep-totally do not like that either! They are Anovos decals and my kit is BSP which they obviously made the recessed oval too large on the armor. I could always use some gaffer tape and cut to size but don't want the black oval to be too large. I'll go with this for now and see what happens.
-
More decal fun! Box 5 box 2 Shins
-
Finishing the details on the biceps. Q-tip worked great to push the decals into the pulls…
-
Glen, I was unable to make the rounded part where the clip is "open" without ruining the whole spat. It was the way the BSP armor was designed and if it were cut on the rounded part there would not be enough ABS to work/have the clasp to close. I have spoken with my GML about this and he was fine with my fix. I do have that "noticeable seam" where you see it as it states in the CRL. I hope to use these for now then get another kit from Dino or WTF
-
I chose to tape off areas I was going to glue after paint was applied. Note the dots so I know the orientation of these greeblie strips Decals, more difficult and more of them than I thought! I ordered these from Trooperbay and got the Anovos version. They seems to be fitting the BSP armor for the most part.
-
Glue time for the clips! Started with spats.
-
Ok, more final detail work. Got the mesh and gaffer tape on the pills and the chest vent finished. I added some decals to the vent to make it look a bit better with more depth…
-
Glueing the belt boxes now that the paint is applied.
-
Clear coat application… Transporting home from the spray booth. I let it set up for about 24 hours. …all laid out in the garage to finish curing. I did purchase some Novus polish to perhaps make the sheen more uniform.
-
I’m very excited to share this post! Applied the final paint and clear coat on Star Wars day…
-
Sanded everything down to knock the high spots off of the primer. Washed everything down with a damp microfiber. All ready to apply paint. I am hoping to do that on Star Wars day-how fitting!!
