
DocDan
-
Posts
231 -
Joined
-
Last visited
-
Days Won
3
Content Type
Profiles
Forums
Gallery
Articles
Everything posted by DocDan
-
Rigged up the rest of the vest for the thighs Test fit for strap length…
-
Needed to close up the back so used a spare piece and cut down to act as an attachment point for some Velcro Trimmed it down a bit… Then glued it in place on one side. I’m amazed at how it shrugged things up so much so I don’t think I need strapping in the back. Pardon the an impolite person shot- It really feels good to actually wear something finally! and the front…
-
I started the process of rigging. We bought tactical vests for this project. I was not going to use it at first and go with a simple suspender type system however, I wore the vest around the house for a day (looked like John McClain for the day) and it reall is not that bad! I installed two straps up high to suspend the ab section from. Filed out a groove to accommodate the strapping E6000
-
It was 53 degrees here the other day so I was able to sand outside and get a quick coat of black paint on my belt boxes. I used 60 grit, 220 and 800
-
Hey thanks! I’m truly enjoying it so far!
-
Backstage place a nice indent as to where the blaster base mounts… I used CA glue to attach it. I believe there are screws that will go through this part and the metal base and bolt on the inside of the thigh.
-
I started on the seven boxes and installing the nylon bolts. I marked the boxes on the inside while they were taped to the ab, through the holes I drilled. This allowed me to know where to glue the bolts. I hope this stuff holds as I have never used this before. These will set up overnight then may attach them tomorrow. Mixed some poly flex up to fill the side seams Letting this set overnight then will sand out and see how it looks tomorrow.
-
It’s amazing how much gets done when you put a day into building! I got some good work done today on the ab section. I was able to mark and drill holes, cut and install the nylon bolts and fill the sides with poly flex. Making pilot holes for the seven boxes Used a 11/32 bit for the nylon bolts to go through. Really freaked me out drilling through this!
-
Did some more of the belt boxes These seem to be the two front belt boxes. I really wish they had a curve to them
-
The ab boxes are coming together. Tedious work but calming and gratifying making them fit the slight curve of the ab section. I notice this kit keeps the vertical ridges running straight down below the boxes. The belt needs to go here. I will be cutting those ridges out and placing some small tabs in place there to make that area flush so the belt will fit under the boxes. Next, I’ll start filling the side seams with poly flex to make that seamless. Start drilling holes through the ab section, glue nylon bolts to the boxes and mount those.
-
Got sidetracked installing the lid. On to working on the abs section! I had to glue the sides first. Trimming and shaping the 7 boxes..
-
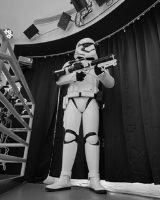
Everything seems to be installed now. My wife said it sounds good so I am going with that for now. Added some tactical helmet padding not really for fir but more for sound deadening. (plus it just looks cool! ) The bucket should be done other than adding more padding but I want to see what I need after I do some troops. I customize I'm sure after some wearing time. Planning on working on the AB section next, gluing it together and cutting out the 7 small boxes (ammo?) around the front and sides. I got some good work done on it already! Thanks for looking.
-
Cutting the Plasti-dip away to make sure the adhesive adheres: The power pack I am using had this rubbery, non-slip coating on it. Sanded it off a bit to make the velcro adhere. I also cut away where the fans will be mounted.
-
 Love the effort on those detailed clips! I need some better ones for my kit so I’ll keep on eye on your progress with them
 -
I next went “ahead” and worked on the bucket as I had finally attained all the electronics from Tony and Henry I cut away the plasti dip anywhere I needed to apply padding or Velcro. I installed some of the black fabric over the vent holes. Installed the foam blocks from Tony (Hope I did this correctly!) installed the speakers next… Foam insulation on top I’ll install the usb power, amp and fans next…
-
Well, it’s been longer than I thought it would be being back here posting progress. I did get sidetracked dealing with pandemic related things at work and has taken a lot of time lately. I was able to work on my helmet, coating the inside with plasti-dip last fall. It really deadened the echo, plus it looks cool from below. Masked up Very shiny as it was being coated.
-
Tried on the girdle for the first time! Finding center on the back and making a cut line. First going to glue the front and back together and work on the 7 boxes. Have to trim those and start contouring them. I have my nylon bolts.
-
Started on these shin pieces. Are these considered ammo packs? Test fit Quite a chore getting them to match the contour (both ways) of the shin! Finished piece:
-
Taped up and fit the thighs. They seemed to fit fairly good without much trimming down. I can lift my leg up with not much binding. I made some markings where the armor overlapped when fitted to my leg (leaving a bit of room for gaskets and under suit. Right thigh Left thigh Once the seems are glued, I always like to run a bead down the inside seem using gravity to get into any gaps. Then I like to hit it with accelerator and use my compressor to blow some air over it to fix it instantly. In essence, it creates a plastic bead-weld down the whole seam These look normal? I did not glue the insides. Do these get Velcro installed on the inside?
-
The right shin is glued up! Next up is working on the thighs…
-
ShadyP's FOTK built thread (Backstage Props - preorder FOTK)
DocDan replied to ShadyP's topic in TLJ Build Threads
-
I worked on the shins today. I got the left unit all glued up.
-
Glued the forearms
-
Sanded all the edges on the shins. Mocked them up for a test fit. I still have to do something with the spats as they are one piece right now. I plan to cut them on the inside of the ankle where a "visible seam" is required. I want to get the shin glued up first then I'll know better how to size the spats. I will add velcro to my inside cut and add another piece of ABS and make that the point of adjustment. They seem really big on my tiny legs!
-
Worked on the hand plates Should the indent above the index fingers be cut out or leave “as is” and use a decal? These gloves have no velcro on top so I'll have to sew some patches on each glove.
