

OddViking327
-
Posts
138 -
Joined
-
Last visited
-
Days Won
1
Content Type
Profiles
Forums
Gallery
Articles
Everything posted by OddViking327
-

Oddviking's ANH Stunt build - AM 4.5 (Centurion)
OddViking327 replied to OddViking327's topic in ANH Build Threads
Body work: Another fix to get to Centurion was my back gap. As is an issue on many AM kits, those back corners need a little nudging to look right. I also needed to raise my belt, especially after trimming it, the snaps would need to be taken out and new ones added higher: I started by trimming a bit of the return off... and then realized I needed to trim more in order to get it to move. I then used a heat gun on low, and slowly caressed those corners up and in, as well as some of the lower return to be more flat so it would fit better. In addition, I created a few longer elastic internal straps that would allow it the slack it needed. I only ended up using them on the sides, the central one was fine at the original length. I will need to try this on, but it looks like it will fit more like the originals now. Snaps were drilled out by kissing the center with a 1/4" drill bit. After measuring, new ones were placed just under 1/2" higher, and now the belt sits where it just covers the lower edges of the blue buttons. Not shown, but I also moved my sewn-on shoulder bell snap mounts on the strap a bit which will get my shoulder bells even closer to the shoulder bridges. All that is left is re-attaching my belt boxes into place, and trying it all on, and getting new photos taken. I feel like I am getting really close to Centurion submission! -
Oddviking's ANH Stunt build - AM 4.5 (Centurion)
OddViking327 replied to OddViking327's topic in ANH Build Threads
Painting retouches: In my EIB notes, they asked that I fix some of the borders on the tears and traps, as well as some minor shapes on the vocoder. These were decals that came with the kit, and the die cut them a little off-center, leaving a thicker black border in some places. I had used a template from Trooper Bay to paint the lines in (my armor came with two sets of decals, one with lines, one blank, and I used the blank ones so that I could paint in the lines). So the trick was, I was going to need to paint gray over the black borders, but because the paint gray was not the exact same shade as the printed gray, I needed to paint all of the gray over, including between the fine lines. Challenging, but I have a lot of fine painting experience, so it was doable. First I wanted to make sure the decal would not react to paint on top in any way, so I took a scrap from the decal sheet, put it on a scrap of ABS, and did a test paint a week ago. It seemed to be fine with paint on top, so I was set to start painting in. I realized that if I painted only the tears, that the traps would not quite match, so rather than doing the bare minimum, I just went ahead and fixed all of the decals, including the back traps that each have 12 lines to paint around. The borders would look better though, and they would now all be completely hand-painted, and all the same gray as the frown, ab buttons, and ear buttons (Testors 1138). Here is a pic of the color difference. On the left is an un-painted decal, which is a little bit greener of a gray, and the right is painted: Sometimes I even surprise myself. With a good brush and a steady hand, I finished them all this morning without incident: -
Oddviking's ANH Stunt build - AM 4.5 (Centurion)
OddViking327 replied to OddViking327's topic in ANH Build Threads
Journey to Centurion: So I spent a week of early mornings updating the blaster, and that was the hard part of my list for Centurion. So on to the other improvements. Here is the blaster, with the new rail, and Hengstler counter in the right spot, and keyhole filled (see my E-11 build thread linked above for process shots): Now on to the thermal detonator. My end caps were a bit on the wide side. In addition, the clips were too long (easy trim), and the screws were fairly large (easy swap, and the clips would move over, covering the old larger holes): Unfortunately, they were firmly glued on, so that meant trimming them in place. So I measured in 2mm, and made a line, and then taped it off with blue tape. Then I took my No. 11 Exacto blade and started slowly scoring down. The idea is that if I cut just through the plastic, I can pop it off and clean up the E6000 underneath. So I scored... and scored... and scored. More than 30 times around, changing blades every so often, and I hit the point where it wasn't really cutting any deeper. Then I took a very thin Japanese saw, and carefully cut just on the inside of my score mark, deeper and ever deeper, until it was very close to the tube. Then a few more passes with the blade, and it popped free. A cut from the side allowed me to pull it all off, and it looks great. Belt edges: I also needed to trim down the AM belt's initial height: This was easier, I detached my boxes (because I used screws, this was easy, and I will also be able to raise them once the new height is done). I drew my line, and then scored and broke the strips off. Sanded to finish them, and they now look more accurate. Just a few more minor fixes over this week, and I should be ready to get some new photos. -
Imperial Arms 3D E-11 (version 3) kit
OddViking327 replied to OddViking327's topic in ANH BlasTech E11
Modification complete: I finally got the remaining pieces finished. The repair on the rear of the tube was done, and I aligned the scope based on the reference (rear foot lines up with the folding stock swivel point). Then, after a bit of measuring, I created my Hengstler mount (after looking at more reference, I ended up trimming it where I drew the line. I had guessed at 25mm away from the rail, but 13mm was more correct, so I altered it before bending it: Once I got it all mounted to the rail through the scope, then I got the Counter aligned, and marked the location. I drilled holes and screwed in some threaded inserts (with CA glue to help it stay solid inside the infill of the 3D print). Now all that was left was to put it all together! All done! I assembled it all together, and now the scope, rail, and counter are in the right place, and it looks way more accurate with the aluminum rail. And the good part is, with all of my threaded inserts, it can be disassembled if needed, without having to break any glue. That keyhole is filled, so now I can honestly say, it really feels great to have it up to a higher level of accuracy. Thanks @justjoseph63 , @T-Jay , and @gmrhodes13 for keeping me on the path of striving for a better blaster! -
Oddviking's ANH Stunt build - AM 4.5 (Centurion)
OddViking327 replied to OddViking327's topic in ANH Build Threads
One of the modifications for Centurion is to move my back plate up a little bit: So does anyone have a suggestion for the best way to do that? I figured I can move the shoulder snaps back-plate-mounts down? Shorten the shoulder straps? Or lengthen the ab to back plate straps? What will work best here? -
Here is my build of this kit. It has ended up being a fairly accurate kit, but I have done a lot of mods to make it look that way, and in the middle of another to get it up to Centurion accuracy. The good news is that ImperialArms3D is doing some modifications to get it to be more accurate on future prints, but I am not certain he can do every part. So read through my build and decide if it is worth it for you.
-
Oddviking's ANH Stunt build - AM 4.5 (Centurion)
OddViking327 replied to OddViking327's topic in ANH Build Threads
As an update, I had a few things to change for Centurion, and while a majority were going to be simple enough to adjust, one was not. The blaster had a fairly major change that would be fairly difficult to do and keep its integrity, but I found a solution, and it is actually going to work fine. I won't post the blaster modification here, but it is ongoing on that thread: UPDATE May 2021: Imperial Arms 3D just released their V4 blaster today, which, based on this feedback on my build, has addressed all of the placement and accuracy issues (keyhole, knurled sights, some missing screw spots, and most notably, the scope and hengstler counter locations). Imperial Arms V4 E-11 blaster The only thing people might consider modding is to make an aluminum rail like I did, but his kit is now much easier to build "off the rack" now. Just be sure to do the work, and finish those print lines! -
Imperial Arms 3D E-11 (version 3) kit
OddViking327 replied to OddViking327's topic in ANH BlasTech E11
Modification continued: I used the Bondo "Glazing and spot putty" to patch the spot from removing the mounts, and to fill the holes on the counter. I also used it on the "keyhole" repair, which will be shown below. At the hardware store, I purchased a few different varieties of 6/32" bolts and threaded inserts. On the scope, I drilled out the holes larger, put in some CA glue, and then used an allen wrench to screw in the threaded inserts. For the rear sight, because the pieces were tighter fitting, I used a different type that just gets glued in (CA glue again). These inserts (if they hold well) should keep the new rail strongly mounted, as well as allowing it all to be removable: Finally, the "keyhole" slot that was incorrectly placed on the side of the muzzle. It should be just a standard hole, and I figured now was the time to fix that too. Because it is just a small rectangle of plastic with a curved edge, I first drilled a large hole in the plastic, and then cut the rectangle off of the edge of that hole. It is difficult to lower a piece that small into place with glue, so I took a scrap of white ABS and bent it into a small hook, and glued the piece on to it with a small dot of CA glue, and dried it with accelerator spray. Then applied glue to the black piece, and held it in place with the hook, while I sprayed with accelerator. Then (after holding my breath), broke the white piece off of its weaker glue spot, leaving the square in place. Two coats of Bondo glazing and spot putty, and it now is looking as it should: So now I will just need to drill some holes in the rail, hopefully in the precise locations, and then create the Hengstler mount bracket to get it all completed. I have the reference thread, and with it I plan to just eye the location for the scope and counter, but if anyone has a precise left side view of the blaster with measurements, I would welcome the reference. -
Request your EIB Certificate here:
OddViking327 replied to justjoseph63's topic in Request Expert Infantry Status
Colin Adams TK 25622 Letter size Justjoseph63 Thanks! My pleasure, and congrats! http://www.whitearmor.net/eib/certificates/25622-eib.png -
Imperial Arms 3D E-11 (version 3) kit
OddViking327 replied to OddViking327's topic in ANH BlasTech E11
Scope rail modification: Okay, in the interest of moving forward toward Centurion, I decided to go past the point of no return, and modify the blaster. My reservations before were about weakening the blaster, breaking glue, and re-threading bolts a third time into 3D printed plastic holes. To do this, based on @gmrhodes13 guidance, replacing the printed rail (which I now see was too narrow) with a 2 cm wide aluminum one will allow me to disassemble my scope and counter mounts by destroying the original rail. Because it was glued in place, this is the only way to get to those bolts, but it will end up making a stronger and more accurate blaster in the end. In addition, I will be gluing threaded inserts into the mounts on the counter and the scope, so it will be removable and strong. Here is where the rail needed to be cut, in four places, to remove everything. For my resin clone helmet, I made a simple tool using a coping saw blade mounted in a handle, and this proved handy to cut some of the very tight spots on the rail: The next step was to saw off and file down the [inaccurate] Hengstler counter mounts that fixed that location: And finally, I couldn't find the correct 2cm wide aluminum rail at any hardware store near me, but I had a scrap of angle channeling that was the right width and thickness, so I cut off one side, ground it smooth, and cut the front shape that fits into the barrel. This looks like it should work perfectly: I am also planning on filling the keyhole notch that is on one side of the barrel, which should be the last inaccurate thing to fix on this. Update on that once I start filling. -
Imperial Arms 3D E-11 (version 3) kit
OddViking327 replied to OddViking327's topic in ANH BlasTech E11
Okay, I stewed on this a bit, @gmrhodes13. If I don’t save the 3D printed rail, and cut it apart to remove the scope, then make a new (more accurate) wider 2cm aluminum rail, and an aluminum angled mount for the counter, I think I may be able to do the modification. I will probably glue in some threaded inserts for the scope and counter, which will help keep it strong. I may be able to do this after all, without making it weaker. -
Imperial Arms 3D E-11 (version 3) kit
OddViking327 replied to OddViking327's topic in ANH BlasTech E11
@gmrhodes13 That makes sense now. The scope and the counter are mounted through the same bolts. Maybe I could do something similar if I do end up stripping it apart. Mine is mounted by brackets to the counter back section, not the front section, so perhaps I could re-mount it more like that. -
Imperial Arms 3D E-11 (version 3) kit
OddViking327 replied to OddViking327's topic in ANH BlasTech E11
So I was just approved as an EIB with this blaster. Centurion may be an issue though: "Last up, I gotta' say that is one impressive blaster... you did a magnificent job getting rid of the 3D print lines! Also, GREAT job on the weathering... not too much, not too little. However, we are requesting that you move the Hengstler counter forward. The rear of the counter should line up with the rear bolt of the folding stock." (my blaster is on the left, the other two images are references). The trouble with mine is that there are mounts on the barrel frame itself that would make moving it down a couple of centimeters very difficult, more so with the scope now glued onto the bolts. Doing that modification risks a lot on this blaster, so I think I may not risk that modification if it might make it more fragile to troop with. -
Oddviking's ANH Stunt build - AM 4.5 (Centurion)
OddViking327 replied to OddViking327's topic in ANH Build Threads
I am officially approved EIB now, so on to some adjustments for Centurion! Also, I took one of my EIB submission photos and illustrated a vector version of it, so I could make a shirt for trooping (just using one of the custom digital print places, so anyone can order it now, PM if you are curious, but not here to sell shirts). I will probably make stickers with the design but with my TKID, to give to kids, like I have with some of my other costumes. -
Thanks everyone! I had kept refreshing this for a bit, but started a new job yesterday, and so completely missed the comments yesterday! Many of the suggested fixes are very doable. The thermal detonator is trickier, the caps are glued on, but I may be able to slowly, slowly cut the caps shorter with an exacto blade and then move the clips over and replace the screws. The Hengstler counter is also a tricky fix, as the mounts are fairly fixed in their location, but I can look at them and see what can be done. The rest all feels attainable. Thanks again!
-
Here is the front and back of the belt:
-
@justjoseph63 back and front of just the main body armor?
-
Oddviking's ANH Stunt build - AM 4.5 (Centurion)
OddViking327 replied to OddViking327's topic in ANH Build Threads
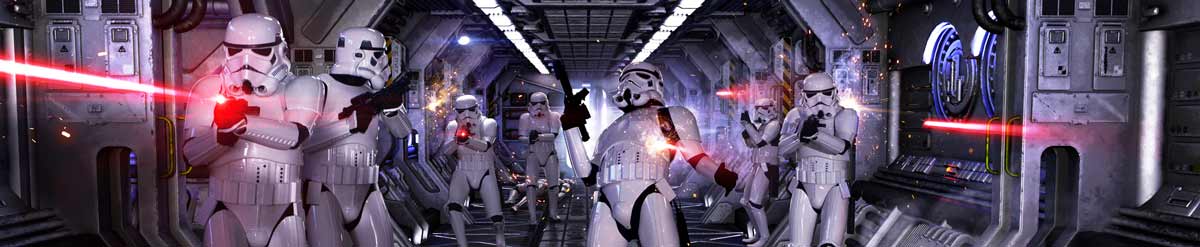
I have submitted for EIB, and while taking those photos, I set up some lights and got an action shot with a red rim light. This is what the armor looks like edited into an appropriate setting: -
Thanks @gmrhodes13 for some things to look out for. I am not sure about why the hand/forearm gaps were different, just how they were tucked in at that moment (no mirror as I put on the gloves before the shoot). They usually are fine, but the rubber cuffs sometimes hold the forearm up a little I guess. Here is just a few shots later doing action poses, and they are back in line: The Thermal Detonator will be trickier. I am guessing the end caps are maybe too wide, which might fix that spacing? The screws and clips came with the AM kit, but I can swap the screws and trim the aluminum down. Let me know if the end caps are what need fixing. Here are some of those other pics you said might be needed:
-
Name: Colin Adams TKID: TK-25622 Forum Name: OddViking327 Garrison: Golden Gate Garrison Height: 72.5” Weight: 198 lbs Armor Maker: AM 4.5 - Dave’s Darkside Depot Helmet Maker: AM 4.5 - Dave’s Darkside Depot Blaster Type: Imperial Arms 3D - E-11 V3 (with modifications and improvements) Boots Maker: Imperial Boots Canvas Belt: Rob Kittell Hand Plates Type: Flexible Silicone by Just Joseph Electronics: Speakers and SHA by Ukswrath, fans by me Neck Seal Type: Imperial Boots Holster Maker: Darman’s Props Armor Build Thread: https://www.whitearmor.net/forum/topic/49991-oddvikings-anh-stunt-build-am-45/ Blaster Build Thread: https://www.whitearmor.net/forum/topic/50223-imperial-arms-3d-e-11-version-3-kit/ Photos - Body: Details: Interior: Blaster: Helmet:
-
Imperial Arms 3D E-11 (version 3) kit
OddViking327 replied to OddViking327's topic in ANH BlasTech E11
So I moved the scope. The final straw was that when holstered in my Darman's Props holster, the scope prevented blaster from seating down where the magazine would be in the notch. So broke the glued front piece, and removed the rail and counter: Because I would now be able to glue the scope down onto the bolts, I could glue the front piece to the main scope and keep it all as one unit. I added a third bolt, threaded into the rail, that would help secure the front part of the scope, so that all three "pieces" would have a bolt mount to help keep it all attached. I drilled new rail holes for the new scope location, threaded the bolts in, and then mounted the whole rail and Hengstler bracket mounts back on to the blaster. For the three holes in the scope, I widened them to 1/8", so that it could slide down onto the bolts. I filled the holes with glue (using a small nail to push it in, and add more), and the scope just slid on to the ribbed bolts with some pressure, a snug fit: So it looks great, and it is now secure in the more accurate scope location, with the rear lens just peeking out beyond the Hengstler counter: Fits the holster like a dream now: All told, it was only about a 30 minute fix. Thanks for keeping me striving for accuracy! -
Oddviking's ANH Stunt build - AM 4.5 (Centurion)
OddViking327 replied to OddViking327's topic in ANH Build Threads
In my other version of this blaster build, in the ANH E-11 section, someone pointed out that on this model, the scope is a bit too far forward. Part of the order of construction on this seemed that moving it was impossible, but I figured out a solution: Moving the scope is possible, but tricky. As it is built, all of the bolts thread into the parts, securing them really well together. As it is assembled, you bolt the back two scope parts (glued to each other and I Bondo-filled and smoothed the gaps) to the scope rail, then you bolt the rail down, and then glue the front piece of the scope in to cover that rail bolt so it is hidden by the scope. To move the scope, I would need to break the glue on the front piece (not easy, but probably doable), in order to remove that bolt on the rail, the two bolts that go through that rail and the L-brackets to hold on the counter, and the one at the back that holds it to the rear sight. Then I can remove the scope bolts, and drill new holes for them, and touch up the glued area with spray paint. The problem arises when I move it, if the scope were re-mounted, there would be no way to bolt the Hengstler counter bolts that are under the scope. I figured, I can instead, thread the bolt into the rail from below, but drill the scope bolt holes bigger than the bolt's total diameter, and not put the scope on those bolts at first. Then, bolt the rail down, the Hengstler counter brackets, and then, use CA glue to fill the bolt holes in the scope, and slide it down onto the bolts, and glue the front scope piece down again which should secure it in place. This would be fairly permanent. -
Imperial Arms 3D E-11 (version 3) kit
OddViking327 replied to OddViking327's topic in ANH BlasTech E11
Okay, @T-Jay, I think I figured it out. Moving the scope is possible, but tricky. As it is built, all of the bolts thread into the parts, securing them really well together. As it is assembled, you bolt the back two scope parts (glued to each other and I Bondo-filled and smoothed the gaps) to the scope rail, then you bolt the rail down, and then glue the front piece of the scope in to cover that rail bolt so it is hidden by the scope. To move the scope, I would need to break the glue on the front piece (not easy, but probably doable), in order to remove that bolt on the rail, the two bolts that go through that rail and the L-brackets to hold on the counter, and the one at the back that holds it to the rear sight. Then I can remove the scope bolts, and drill new holes for them, and touch up the glued area with spray paint. The problem arises when I move it, if the scope were re-mounted, there would be no way to bolt the Hengstler counter bolts that are under the scope. I figured, I can instead, thread the bolt into the rail from below, but drill the scope bolt holes bigger than the bolt's total diameter, and not put the scope on those bolts at first. Then, bolt the rail down, the Hengstler counter brackets, and then, use CA glue to fill the bolt holes in the scope, and slide it down onto the bolts, and glue the front scope piece down again which should secure it in place. This would be fairly permanent. -
Imperial Arms 3D E-11 (version 3) kit
OddViking327 replied to OddViking327's topic in ANH BlasTech E11
@T-Jay Thanks. I am not able to move it, as it had pre-set holes, and then the front of the scope gets glued on to cover another bolt mount, so it can no longer be moved without some collateral damage. I just looked at a bunch of original E-11s, and you are totally right about the location, I will pass that fix on to the maker as well. What do people think about that scope location, as far as Centurion approval (which is my goal with the armor)? What about the keyhole on the side?
