

TheDecisiveRaindrop
-
Posts
144 -
Joined
-
Last visited
Content Type
Profiles
Forums
Gallery
Articles
Everything posted by TheDecisiveRaindrop
-

Raindrop’s 4.5 AM ANH Stunt Build
TheDecisiveRaindrop replied to TheDecisiveRaindrop's topic in ANH Build Threads
So I haven’t actually started yet. One of the guys in Flagstaff offered to let me work on the armor at their place since they have a dedicated work area for tk armor with all the tools I need. Communication has been hazy with the whole pandemic, but they messaged me today saying I’d be welcomed to their home. Just need to schedule a time. -
Raindrop’s 4.5 AM ANH Stunt Build
TheDecisiveRaindrop replied to TheDecisiveRaindrop's topic in ANH Build Threads
Sorry, I got carried away and was too excited to post the pictures on here yet. I’m just using Tapatalk for my picture needs. Here are some pictures -
Raindrop’s Doopydoo Build
TheDecisiveRaindrop replied to TheDecisiveRaindrop's topic in ANH BlasTech E11
Bit of a status update with my blaster. The magazine has been added to the reciever and glued to the pipe. I painted the blaster a silver color, giving it 2-3 good coats before I put on a solid first coat of black paint, then a lighter coat later on. All was going well so far. After I put on a black coat, tragedy struck and the magazine assembly broke off. I was using E6000 which I now understand why from experience it is the recommended glue, but it wasn’t quite strong enough for my liking. I then sanded down and removed the paint where the ammo counter was gonna be mounted. Next came the part where I added some wood to the magazine assembly to give it more surface area to cling on to. I used a 3900 psi epoxy, and this was my first time using an adhesive that strong. I wore a respirator and gloves while working with it. Got the scope and the rest of the greeblies attached, except for the end cap. That’s just resting there. I had the shell ejection port masked along with the T rings. The ejection port is still the silver color that I put on before the black paint, and the T strips I intend on going over those with Flex Seal to give it a rubbery feel. As time went on, I realized I made a horrible, terrible mistake that seemed so obvious. The black paint I used was glossy, and it stuck to every surface I sat it on, as well as catch all the dirt and dust from outside where I was working on it. Something had to be done. And by the power of acetone, I was going to try to remove as much of the gloss paint as I could and leave as much of the silver paint underneath it. I ended up calling this as “good enough” and I saw that because of how sticky the gloss paint was, it created all these unique textures that I actually really liked. So I decided to keep then and basically start painting all over again. I used a much nicer silver paint and tried to find the closest to brass color for the scope. Hopefully you can see the texturing on the blaster, reminded me of cast iron surfaces. As a tank nerd, this really pleased me. Painted the blaster with a flat black this time. I decided I wanted to try a trick I saw with other weapons where you put graphite on the surface to give it a sort of dark sheen to it, so I gave it a go. To be continued shorty. (I realized I haven’t taken pictures of the weathering yet) -
After waiting for what felt like eternity with everything going on, I finally received my BBB, and with the help of my local garrison mates, I’ll be inducted into the legion in no time! (Hopefully)
-
Raindrop’s Doopydoo Build
TheDecisiveRaindrop replied to TheDecisiveRaindrop's topic in ANH BlasTech E11
I was originally going to use an aluminum rail, but last night I decided to go for a less conventional route that may sacrifice accuracy. I’m already in the process of 3d printing an M38 hollowed scope and keep the resin scope for another project I have planned. Regardless, I’ve reinforced the rail and supported the ammo counter bracket and it is surprisingly solid. Granted this is not a trooping blaster with the soul intent is just something for me to play around with. I have no doubt will break with prolonged use, but for the time being, I’m happy with this stop gap measure of putting a wooden piece under the ammo bracket. The rail isn’t flexing, and I’ve made more surface area for the ammo counter to be securely glued and fastened. Thinking I may use an epoxy weld to make sure everything is solid just as a further precaution. I am really glad you provided that link however, because now I have a backup plan for when mine eventually fails, although I still want to give this a shot. Quick question though, what height should the ammo counter be? I tried looking at the gallery section but couldn’t really find any detailed pictures for the E-11. I looked through the high res ANH blu-ray pictures and it seemed that the blasters with the counters had them lower, basically resting on the stock. I don’t really trust any of the google image results.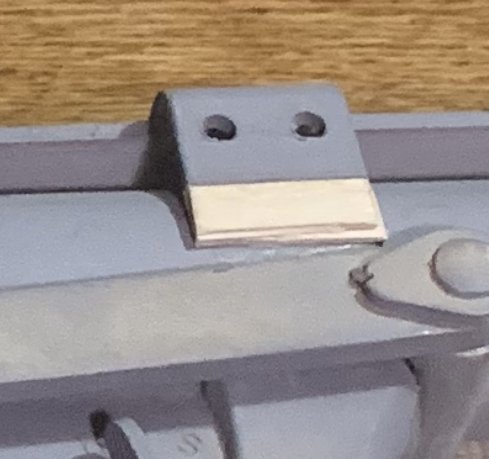
-
Raindrop’s Doopydoo Build
TheDecisiveRaindrop replied to TheDecisiveRaindrop's topic in ANH BlasTech E11
Decided before I put my last coat of primer, I’d start gluing together the pieces. Between the months of me opening the box and painting the pieces, I ended up loosing the rear crosshair and the D-ring, but thankfully for me I can 3d print replacements. Oh, I also printed out a rail. The rail will be further sanded, as well as a few more coats of paint. It wasn’t my best print, but it is certainly useable. -
So after almost 5 months of waiting for BBB day, it still hasn’t arrived yet. My vendor says it should be another week or so until is ships. Decided to bust out a project I meant to have done months ago, which is a Doopydoo kit. I’ll get pictures posted as soon as I can figure out how on Tapatalk. I keep getting errors. I have most of the parts primed, and will begin gluing the parts together before I add one last primer coat (My coats aren’t exactly thorough) Edit: Pictures are working now.
-
Gonna take the plunge soon
TheDecisiveRaindrop replied to TheDecisiveRaindrop's topic in New Member Introductions
Hi Eric! The kit is taking quite a bit longer to get, but with everything going on right now it's understandable. . I have most of the supplies needed, just need the plastic to really begin working. I do have some other 501st projects to work on in the meantime, so I'm just taking it slow. I do need to finish my doopydoo blaster, and I'll try to get a thread for that going later. -
Juno's R1TK: 850 armorworks and more.
TheDecisiveRaindrop replied to Junos's topic in Rogue One Build Threads
This is where the fun begins. -
That's a black Rubies Stormtrooper costume. From what I've heard, it requires serious rework and modifications to get it to spec and lots of folks here would say that the modification process isn't worth it for the price. I'll let people with more knowledge on the matter give you a more definitive answer though. Edit: I just looked at the link here And a brief blurb here sums up what I mentioned earlier: "Even though the Rubies TK armor is licensed by Lucas Films, it is not acceptable for Legion membership without a LOT of work and putting a LOT more money and time into it. The average price for a Rubies Supreme Stormtrooper Costume is $400USD (305 Euros) to $700USD (535 Euros). But, after you factor in that you will have to purchase a replacement helmet, buy supplies to modify the armor, all this, just to get the Rubies TK armor up to Legion standards. It would be cheaper and easier for you to start with a new armor kit.There have been a few members that have done Rubies with all the upgrades, but afterwards said they spent a lot of time and money and will be looking into a different suit of armor next."
-
Ah, ok fair enough then. Thanks!
-
Been mewling over ideas for a design, but I must ask, is there a place where all the official FISD pictures are at? I did not see anything in the gallery. Sorry in advance if it was obvious and I missed it. Edit: Oh, and can we design our patches with digitally painted badges in mind, or just normal embroidered style ones?
-
chiefbonan's TK ANH Stunt Build (Centurion)
TheDecisiveRaindrop replied to chiefbonan's topic in ANH Build Threads
Looking good! I am amazed at how well the hovi tips and the painted vents turned out! -
Bravely Casual's ANH Stunt Build
TheDecisiveRaindrop replied to Bravely Casual's topic in ANH Build Threads
Watching your thread is making me anxious for when I start working on my kit... -
Bravely Casual's ANH Stunt Build
TheDecisiveRaindrop replied to Bravely Casual's topic in ANH Build Threads
Sounds like a good plan, I've been wanting to do the same. -
Bravely Casual's ANH Stunt Build
TheDecisiveRaindrop replied to Bravely Casual's topic in ANH Build Threads
I bought similar helmet padding for use in my helmet, they are pretty cheap on amazon. Like 14 bucks or so. -
Bravely Casual's ANH Stunt Build
TheDecisiveRaindrop replied to Bravely Casual's topic in ANH Build Threads
I got a special putty glue sort of deal that Joseph here on the forums recommends. I'll also need to find myself some gray paint for the teeth when the time comes. Any plans for getting electronics in that bucket? -
Bravely Casual's ANH Stunt Build
TheDecisiveRaindrop replied to Bravely Casual's topic in ANH Build Threads
Probably the former, judging by the timestamps -
Bravely Casual's ANH Stunt Build
TheDecisiveRaindrop replied to Bravely Casual's topic in ANH Build Threads
He has an ATA build according to the OP. And man... With everything going on, I just want to get started on my armor already. I just have to wait a few more days (hopefully) before I start my own thread on here. Anyways, I hope to see a lot more progress from you in the future, Brave! I feel like you are more prepared than I am at this point. -
Episode 9 Stormtrooper research (Caution Spoilers Ahead)
TheDecisiveRaindrop replied to Alay's topic in TROS Stormtrooper
I'm getting some serious tank driver vibes from some of those helmets, and while I love the tank troopers, I am not sure how I feel about a guard wearing similar helmets to them. The other designs however, I love. They remind me of Revan's helmet. -
I’ve read that they are the sturdiest blasters that money can buy. I believe that they are hard rubber. Hopefully I can get the funds to get my hands on one soon enough. They are also more detailed/accurate than Hyperfirm blasters (One of the founders of Hyperfirm made Praetorian). It’s something you ought to look up if you are interested, cuz’ I sure know I am!
-
I don’t believe I have seen any DIY kits available, but IIRC, Praetorian sells rubber DLTs. I’m going to be buying one of their rubber E-11s since I’ve heard that is one of the best weapons to troop with due to their durability and excellent details. I’ve seen people use those blasters to go Centurion. When working on your helmet, be aware that for Centurion status you need proper screws. Joseph on here sells them for about 8 bucks or so, he also has the proper gloves and hand armor. Extremely convenient! Another thing to note is the hovi tips, the speakers near the chin. Centurion requires the insides to be white. What I did recently is order Ukswrath’s helmet electronic kit that includes centurion level hovi speakers (that are functional speakers mind you), voice changer, hearing assist and so forth for when I put together my helmet. The price for that kit is about $270+ PP fee (He has cheaper options as well). I should be receiving my own kit within the next few days. To find everything, just look in the For Sale section for it. All of it should be stickied. An important thing to remember is that my experience is very limited on here, and that everything I say is something that should be taken with a grain of salt. I’m just bringing up ideas to warrant your own research in the matter to decide if that is the route you want to go.
-
Some day I’ll be able to afford one of your aluminum kits
-
Something that I want to ask is if you have your soft parts picked out yet, and what kind of blaster you want to go for
-
I technically do not qualify for the comp since I haven’t started my build thread yet. Although technically I have been getting soft parts since the beginning of last month. I’m still waiting for BBB day Although I plan on going straight for Centurion right off the bat and have been collecting the needed parts piece-meal.
