
Helotech
-
Posts
427 -
Joined
-
Last visited
-
Days Won
3
Content Type
Profiles
Forums
Gallery
Articles
Everything posted by Helotech
-

TK-98695 Requesting ANH Hero Centurion Status (SDS) [473]
Helotech replied to Helotech's topic in Request Centurion Status
Sha sha. Thank you for taking the time to review my file. Some pics as requested. I will have to wait for the belt / ab button plate shot as I was working on some belt fixes Eagle Eye Glen picked up.... I do have velcro under the belt, but the belt was not put on properly when I dressed. I'll make sure my beautiful handler checks it during our next photo shoot in a day or two. Until then, please let me know if these will suffice. Various pics rotating around the forearm wrist area. Both arms. Blaster pics. Hengstler counter moved forward about an inch: Cocking handle, you cocky devil you... Left belt button centered. Other fixes: Cocking handle for E11 and moving the counter. DONE The right thigh back cover strip: The cover strip is centered over the split opening. The raised ridge area (seen at extreme right of your red box) is only prominent to the right of the cover strip. On the left it is actually fairly smooth with no step. If I trimmed off this raised area, I would lose about 1" material, which is HUGE. It would then be much skinnier than the left thigh armor, and may be difficult to put on. Not sure if I will address this. Sniper plate can be fixed to a certain degree, but as many know it can be a beast to fit exactly. Trimming it should be easy, but changing placement will be hard due to the contours of the plate and shin. Will work on it if required Thigh ammo and belt strip return edge Next to no return edge on both. Just rounded top edge of the armor. Not sure if I will address. Easy fixes: Belt fabric trimming, DONE Belt button plates DONE vocoder paint Will wait and see butt armor sticking out Working on it placement of belt higher near ab button plates Dressing issue. Will fix it during photo shoot. dressing issues (rotation of arms and shims) Dressing issue. Will fix during photo shoot. Cheers! -
TK-98695 Requesting ANH Hero Centurion Status (SDS) [473]
Helotech replied to Helotech's topic in Request Centurion Status
Giggling with anticipation, or is it (trepidation?) -
TK-98695 Requesting ANH Hero Centurion Status (SDS) [473]
Helotech replied to Helotech's topic in Request Centurion Status
Thanks Jonas! When are you applying? The bells were a complete pain and still not perfect, but best I can do for now. To anyone reading, I'm hoping I didn't come off as a pain in my response above for the fixes. Just want to make sure I don't go overboard when it isn't required and to clarify points. Cheers to all. Stay safe. -
TK-98695 Requesting ANH Hero Centurion Status (SDS) [473]
Helotech replied to Helotech's topic in Request Centurion Status
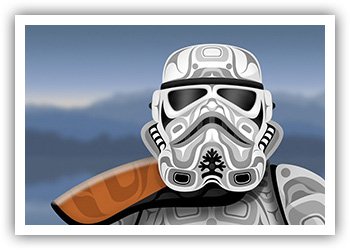
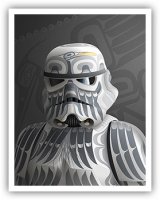
Man you are picky! Totally LOL I guess I didn't provide some of my updated build and completed pics. Thought they were present in my EI build. That seems so long ago.... I don't want to be a "CRL Lawyer", but I want to make sure I am not carrying out or overdoing unnecessary fixes with the possible chance of damaging/ruining something just to make it absolutely perfect. Yes, building perfect armor is desirable, but if something is not mentioned in the CRL, do we have to fix it for Centurion? I just want to do the best I can and also help those who follow. Examples: Belt and thigh ammo pack return edge: The belt just has a very slight rounded top leading to a very minor (about less than 1/8mm) return edge along some of the back. The entire bottom does not have an edge. the return is not mentioned in the CRL for the belt. Only the forearms. Same for the thigh ammo strip return edge. Allot of the thigh ammo belt has no edge, only parts. My belt has cracked in one area, and I think a slight return edge may help prevent further cracking due to thicker material on the edges. Does it need to be fixed? "Minimal overlap" is allowed between the back and kidney. This may have been me not standing properly for the pose. I'll have my handy assistant make sure things are hanging properly for next pics, but is there anything that states what "minimal" is? Belt return edge and crappy repair Minimal return edge HELMET For the vocoder, original ANH helmet shots attached : Does the entire "vertical bumpy" area need painting? My vocoder matches the hero one in pic 1 fairly well, and is even closer to to the one in pic 4, including the slight downturn of the black edge between the outside two stripes and the middle three strips. Maybe my 2nd outside stripe can be slightly taller. Notice distinct differences between vocoders in Pic 3. The one on the right (stunt) seems like a big black blob and yet if you look closely the paint does not reach all the way to the top of the bumps. If I painted the entire vocoder bumpy area then I'll also have a big black blob. Then it wouldn't match the left helmet in pic 3 which is a hero helmet. The helmet pic in the HERO CRL is not great and is only a 1/4 view. It does not show the vocoder well. If this is a picky area, a better example should be added. My helmet Pic 1 Pic 2 Pic 3 Pic 4 Elastic pics added. Right one adjusted with hair dryer... The pic you have of the top of the both calf armor being misaligned (wood flooring in the pic) was a simple dressing error for my EI application and corrected later on. If you look at my back new picture with the carpet floor, both are aligned. Single male snap is pictured and commented in OP. Left elastic Back edge of right shoulder strap is floating about 6mm off the back armor. It's very stiff due to me having to put a reinforcing strip on the whole bottom. The shoulder strap has snapped twice on me... Other fixes: Cocking handle for E11. The right thigh back cover strip: The cover strip is centered over the split opening. The raised ridge area (seen at extreme right of your red box) is only prominent to the right of the cover strip. On the left it is actually fairly smooth with no step. If I trimmed off this raised area, I would lose about 1" material, which is HUGE. It would then be much skinnier than the left thigh armor, and may be difficult to put on. Sniper plate can be fixed to a certain degree, but as many know it can be a beast to fit exactly. Trimming it should be easy, but changing placement will be hard due to the contours of the plate and shin. Easy fixes: Belt fabric trimming, Belt button plates, vocoder paint, butt armor sticking out, placement of belt higher near ab button plates, dressing issues (rotation of arms and shims) And yes, it is tight in the helmet, but doable. LOL Some adjusting to be done to make it sit better on my head and give me more mic room. As always, you are awesome Glen. Thanks for looking and commenting. -
Name : Dave Galant 501st ID : 98695 FISD forum name : Helotech Garrison : Outer Rim Garrison, Canada Armor : SDS Helmet :SDS Blaster : SDS Height : 5' 10" + Weight : 180 lbs Boots : SDS Canvas Belt : Imperial Issue Hand Plates : Silicone, Joseph Neck Seal : Geeky Pink's Fantastic Gaskets Holster : SDS Audio system: TK Products EI Application Link: Front action Front Back Right Side Left Side Helmet Bonus Helmet Details Single Male snap, right side 6 Left Side rivets
-
Hey! I know this is an old thread, but I'm starting the build on my 3D-Props DLT-19 and am gathering info How did you do your weathering? Not sure if I missed it in the threads. Paint everything straight flat black Paint butt appropriate bakelite color Paint certain parts, like the ring forward of butt an aluminum color Paint grips glossier black Spray gloss on the butt Highlight with a metal pigment for wear? I've seen other threads using graphite powder. Seal everything (except butt and pistol grip) with a clear flat overcoat Something like this? Thanks for any help
-
LOL. Hey Jonas!!!! Great to hear from you. Hope things are well. Quite a year to start your trooping. Along with this blaster I will soon be......drum roll please...... starting my application for Centurion!!! This would have happened sooner as I had lots of time during Covid, but I had to complete my military move right across Canada this summer. Big trip. I've finally settled in, set up the workshop again so I can restart my projects. I've picked up some starter paints to get the butt painted. Still lots more sanding on the other parts to go. This DLT-19 will also have a Blast FX system installed. Pew Pew muthers! I also had a friend who graciously 3D printed not one, but TWO E-11's for me!!!! I have a Blast FX system for one of those as well. Let the good times roll. I'll have to find a good forum page to put the builds on.
-
More searching on real MG34’s yielded pics of light to medium brown wooden stained butts and very dark reddish brown, almost black Bakelite ones. Kind of like looking through a pint of Guinness. I think I’ll go the Bakelite route. Seems to fit the Empire them more. Just have to find a good tutorial on painting it. So begins another long term project...
-
Glen to the rescue again! Thanks! I googled all sorts of DLT references and never thought to look at that screen grab. It may be the lighting, but they even look like different shades of brown. Cheers!
-
Not sure if this is right forum for original movie used DLT. Does anyone know if the MG34’s that were used had simple stained wood butts or were they painted black/black plastic? Can’t find clear photos anywhere of the prop guns used by Han and Chewie. Just getting ready to paint mine. Thanks
-
TK-30173 Reporting for Duty
Helotech replied to Chemi's topic in Newly Approved Members - Sound Off!
Congrats and welcome from Canada! -
TK-77731 Reporting for duty
Helotech replied to Sebastian chava6's topic in Newly Approved Members - Sound Off!
Congrats! Welcome to the Legion. -
My absolute pleasure. I've been busy with some work, but also lazy at home, so my armor has been put on hold. Hmmm, maybe a race to Centurion?
-
Hey! You made EI as well!!!! That is great. Good job Jonas.
-
LEGOeatPokemon requesting pre-approval (SDS)
Helotech replied to LEGOeatPokemon's topic in Request TK Pre-Approval
WOW! Congrats!!!! I have been offline due to work, and finally had time to check on your progress. You did an outstanding job. Welcome to the TK ranks. Hopefully when the world calms down your first troop will be amazing. -
Holy cow! You’ve come a long way. I don’t check back for a couple weeks and you’re almost done. Everything looks amazing. You’re doing a great job of following everyone’s advice, and taking it nice and slow. Many people don’t do that. Keep up the good work. Ive started on V2 of my interior helmet costume bits. Hopefully will be done soon.
-
Awesome work so far. You can basically use any belt. Just try and find a good black one. Mine is a 2 1/2 “ wide black nylon “tactical” belt. Works great.
-
Thanks Jonas! How’s your build?
-
I contacted Eelco at 3D-Props and he sent me assembly diagrams! I just have to marry up the parts in my pics to the diagrams. So, big thank you to him. I have done some minor sanding but had to stop. I'm in the RCAF and was just notified that I am being posted (moved) from Ontario to BC. I leave in a month, wife and household goods to follow this summer. I'll manage to squeeze in 2 more troops before I go, but this build will have to be put on hold for about a month. I won't be bringing my armour with me as I will be busy there. I WILL bring the DLT to work on during my down time in the military barracks.
-
My 3D Printed DLT-19 build and customization
Helotech replied to SithThundercracker's topic in BlasTech DLT-19
Peter, Finally got my 3d-Prop DLT a few days ago and started a build thread. Did you receive any assembly instructions with yours? I'm a handy and smart guy, but this has way more parts than I thought it did. I think your thread is absolutely fantastic, and you did some very good upgrades with your gun, but do you have anymore detailed shots or tips? I'm just going to start sanding for now to make some process. I will be using this thread as a very good resource. Thanks, Dave -
Info from another DLT thread that I didn't want to hijack. From Joseph: I found that this product really helped. Some serious sanding with 100 grit, then a few light coats, then more sanding, more coats until I got down to 320 grit. Came out smooth as silk. One thing that will come in VERY handy is silicone sanding sheets. You can bend, twist and do what you like to it and it will not tear. It's a bit pricier than regular sandpaper, but well worth it. To find it just Google 3M Sandblaster Ultra Flexible Sanding Sheets. I used just one sheet to do an entire TK build and a blaster build and it's still good. https://www.walmart.com/ip/Rust-oleum-Gray-Filler-Primer/33616414?wmlspartner=wlpa&selectedSellerId=0&wl13=4384&adid=22222222227022202608&wl0=&wl1=g&wl2=c&wl3=80421617929&wl4=pla-177653161249&wl5=9010526&wl6=&wl7=&wl8=&wl9=pla&wl10=8175035&wl11=local&wl12=33616414&veh=sem&gclid=EAIaIQobChMI97vfyvWM5wIVh5WzCh2q8wkmEAQYAyABEgJ7JfD_BwE Sanding sheets: https://www.walmart.ca/en/ip/3m-pro-grade-precision-ultra-flexible-sanding-sheets/6000195545072 Thanks Joseph. Appreciate the info. I have a similar paint product in the garage (I think). If not I will pick some up. I was wondering what the best way to tackle the initial sanding would be. Because there are allot of flat surfaces and 90 degree edges. I may wrap the sheets around regular sponge sanding blocks or wood. This should help to prevent me sanding more in one area than another because of uneven finger pressure, thereby creating a "wavy" effect. Did you use an electric palm sander on anything? Would it be overkill? I think it would speed up the process, reduce sanding fatigue, and it has a flat surface to prevent pressure points. I haven't touched the plastic yet so I don't know how hard it is to sand. Gotta check my paint spraying mask to make sure the filters are good (safety first!). Also, if anyone one has experience with this build, and a step by step for assembly, that would be awesome! I'm not sure if I should contact Eelco to see if he has anything like this. It's funny. There are a ton of How To guides for armor out there, but I haven't found anything for blasters... Could this be the first....?
-
I'm bumping this info to my thread so I don't hijack poor Jakes thread. Thanks Joseph!
-
Mario and Glen! Always good to hear from you. We’re having a snowstorm here this weekend, so will start on the sanding. Waiting to hear what some of the parts are so I can label and plan the build. Once again, will install the Blast FX system. Once this blaster is done, then I can rip apart my SDS E-11 and install the Blast FX in it.
-
And here is the thread!!
-
Hello everyone! After a grueling wait I received my 3D-Props DLT-19! I'll be starting with some photo's of everything you get, and will then go onto the build. Along with the basic build of the gun I will be adding the Blast-FX system that I purchase a few months ago. So, this should get interesting. Before I begin I do have to put in one disclaimer, and a review on this build. I am a military Flight Engineer Instructor and when we instruct new students, we have ways of providing new students what we call Constructive Criticism, or Points to Improve Upon. It is a way of pointing out errors to students in hopes that they improve on future flying lessons. It is not meant to bash students, but it is an honest way to try and help them. I will use the same technique to address some issues I had with 3D-Props in hopes that they (Eelco Sanders) can improve their customer service. I write this fully knowing this is a one man operation, and that we should expect some delays in a garage business. At some points in the last 7 months I was truly frustrated with 3D-Props, and held off writing a nasty review, in case Eelco decided to cancel my order and keep my money: POLICY:I DO NOT ACCEPT RETURNS OR CANCELLATION I will be going onto Etsy and his website to provide an honest review of my experience with 3D-Props so that other potential customers know what they are getting into. I then cooled down and went back to my training. I decided to wait until I got my package and then write this review. I placed my order for a DLT-19, paying IN FULL, through his website on 11 June of 2019. The disclaimer on his page stated: MADE ON ORDER - CHECK CURRENT WAITING / SHIPPING TIME Shipping time is determined by the number of orders in queue. 8-9 weeks1 1 Applies to shipping within Netherlands. Information about shipping policies for other countries can be found here: General shipping information Thank you for buying our product, if the product was out of stock it means it will be made on order. This takes around 8-9 weeks due to the amount of pending orders. https://www.3d-props.com/about-1/ After placing my order and waiting 3 months (Sept 2019) I emailed Eelco. It took a couple tries (with an automated email response) and he finally got back to me, stating he was busy but would get to my order. I emailed once again on 04 Nov, and he stated he was in the middle of a DLT print run and would mine done in a week. By 03 Jan 2020 I had still not received my DLT and emailed Eelco explaining that I understood he was busy, but it had been 7 months and I had not received my order after . He got back to me right away and my DLT shipped within 2 days. I received it on16 Jan 2020. So, start to finish it took almost exactly 7 months to get my order. I did read on FB he was having issues with production due to volume of orders and he was a one man operation. My simple solution for this: Change the disclaimer on your website and state an order can take 6 months or longer to fill. So my overall impressions don't get lost at the end of this post and a ton of photo's, here is score: Quality of 3D printing: 4.5 / 5 My first experience with 3D printed items. I'm not sure if some of the raised ridges could be improved upon. Minor flash and excess material on some parts. I have seen posts of what can be made of this kit and it is outstanding. Quality of material: 5/5 Looks sturdy and will hopefully stand up to lots of Trooping Ease of assembly: 0 / 5 There are NO instructions for something detailed and consisting of 84 parts. Thankfully, I have very good knowledge of GPMG's (but not MG-34's) and due to my model building / aircraft maintenance technical skills I can figure stuff out, but the exclusion of basic assembly instructions or diagrams is puzzling and dis-heartening. I understand there is this fantastic Forum and awesome Trooper help out there, but I personally think this is unacceptable Customer service: 1 / 5 I gave him a token 1 because he is a one man shop, doing the best he can, and others state he is a good person. It's just my personal dealings with him that bring down his score. I honestly hope he improves and continues to put out good products. I would even order from him again, IF (Big if!!!!) he could deliver in a timely manner. Okay. enough preaching. Onto the pics!!! Sorry for some grainy shots. My crappy point and shoot... MBB (medium brown box) All the stuff. Charlie is waiting for a box fort... Included 2 posters. would have preferred instructions... Strike off pack sheets for shipment? Nice customs explanation form All the parts. 62 parts Plastic and metal. 22 parts Hardware Parts broken down for reference by colour. For future help from Troopers (Joseph ….) I posted on my TK build page about not knowing what half these parts were, and Joseph got back stating to post pics and he could help ID them for the build. I took a page from my modelbuilding expertise and will label everything as follow: "O" = Orange "W" = White "B" = Black "H" = Hardware Two main assemblies, Upper / lower receiver with butt, and barrel assembly. This is how it is when shipped: Upper receiver feed cover (the long grey piece behind the orange rectangle) is removeable. Butt can be removed, as well as one or two other pieces. They all slip onto a grey PVC pipe that is used for main structural support: Barrel assembly includes a length of aluminum tube, and 5 pieces that slip on: Top of upper receiver: Bipod and pistol grip parts. Bipod can be pivot opened or closed: Grip has a "working" trigger mechanism with reset spring, Comes assembled: Bipod printing ridge details. Not really that bad: Feed cover ridges. Rearward portion of cover: Forward portion of cover, near where the removal pin would be and where it pivots upward: Puppy break: Flash hider: Gas plug(maybe....?) detail: Upper receiver barrel attachment point: Trigger details: Ahhhhh man...….: "O" Parts: Some O part detail shots. Not sure what some are, or how smooth all these will have to be sanded: Bipod leg ridges. Very minor: "B" Parts: Grip details: Cool! Rear graduated sight out to 2000 Meters LOL WTf is this? is this And this? "W" Parts: Are the steps supposed to be there? Reference pics of finished and painted parts would be nice...: "H" Parts: That's it for now. Overall I'm happy with the product.
