
Helotech
-
Posts
427 -
Joined
-
Last visited
-
Days Won
3
Content Type
Profiles
Forums
Gallery
Articles
Everything posted by Helotech
-

TK- 98695 Requesting ANH Hero EIB Status (SDS) [935]
Helotech replied to Helotech's topic in Request Expert Infantry Status
Thanks. Just waiting to hear. -
TK- 98695 Requesting ANH Hero EIB Status (SDS) [935]
Helotech replied to Helotech's topic in Request Expert Infantry Status
Thanks! -
Holy crap on a pancake! I've been staring at that helmet for months and never noticed. Damn your eagle eyes. Delete this thread and hopefully no-one will notice... Kidding...sort of... I did a quick measure of the teeth and gaps. The center tooth is slightly lopsided to the right (as you wear the helmet), with more material there. The gap to the right of the center tooth is about 2mm narrower than the left gap. It would be much easier to sand off 2 mm on the right side of center tooth than add material to the left. Do you think the larger gap would be too much? The left gap doesn't look too large. On a better note, I submitted for EI. Let's see what the Imperial Inspection God's say...
-
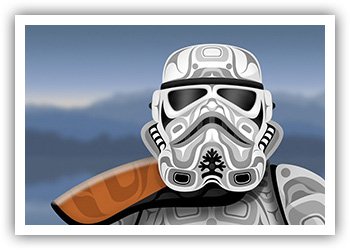
Dave Galant TK-98695 Helotech Canadian Garrison Armor Maker: SDS Helmet Maker: SDS Blaster Type: SDS E-11 Height: 5' 10" + Weight: 185 Boots Maker: SDS Canvas Belt: Imperial Issue Hand Plate Type: Silicone, Joseph Electronics: TK Products Neck Seal: SDS, modified Holster Maker: SDS, modified Right side snap Right shoulder snap Left strap and bell snap. The Hovi tips originally had white rims, but I painted them black as per a forum post that I can no longer find... I understand they are supposed to be painted white, but I was going to see if I could leave them black as seen in many online studio shots of helmets, such as what Han Solo wore on the Death Star. Close up of forearm edge Right thigh ammo belt Thigh ammo attatchment Paint is still fresh on the ring and cap....
-
I've taken all my photos for my EI badge. The post should be up soon. The only thing I'm waiting on is the paint to dry on my E-11. I grooved out the rear sling attachment point and installed the ring from Trooperbay. Pics coming soon. In the meantime, here are the shots of my newly painted helmet. Sorry for the quality / color on some pics. I am anti- iPhone and use a simple point and shoot camera. I still have to reinstall all the electronics. I drilled very tiny holes around the edges of the black ear bump. I then touched up the holes with black paint. This will be in preparation for the installation of microphones (hearing Assist) system. You can't see the holes until you are SUPER close to the helmet. Before someone comments on me painting the wrong ear bump. I am using the hypothetical stormtrooper rank chart you can find on the web and on these forums. I am in the RCAF, and will be getting promoted to WO within the next few months, so what better way to display my rank then on my armor?
-
Thanks again Mario. I'll follow your suggestion with the D.O. I'll plead my case and throw myself on the mercy of the Imperial Court....
-
Thanks Mario. I'm searching for that darn post where I SWEAR I read the person was told to paint the tips black. LOL I actually prefer the black look, and from what I can tell, Han's helmet has the Hovi's painted black. I know we have to go by a generic "basic" reference to keep uniformity, but I wish something like this could be an either / or situation in the CRL, considering I am building a Hero armor.
-
I'm back after a few days vacation with the family. I have completed the painting of helmet details and will submit photos in a bit. One question: Are the Hovi tips to have a white stripe and interior as per the CRL? I swear I saw one Centurion build thread where the approver stated the Hovi tips should be painted black and provided a photo reference. But darned if I can find that thread again. I have seen several pics of screen helmets that have the Hovi tips painted black, with some minor wearing around the edges. I was going to submit for EI approval last week but was too busy. Should be done in a day or two. Thanks!
-
Congrats and welcome!
-
LOL. Thanks. Trimming left ear and watching s sci-fi flick right now.
-
Here is the right ear installed. Still needs painting. Thoughts? I may tweak the gaps if I can, but I don't want to screw it up too bad. I'll try and do better on the left ear which is being trimmed now.
-
TK- 98695 Reporting for Duty
Helotech replied to Helotech's topic in Newly Approved Members - Sound Off!
I', in Trenton. 1st will be Kitchener. Breslau Aviation Fun day. 1st was originally going to be Toronto Fanexpo, but I thought this would be a better smaller venue to get used to being in public. -
Hey all. Sorry for the pestering. Anyone have insight about the right ear ATA placement seen in the photos above? Particular info needed about the amount of space from top of ear to the helmet ridge line, and the fact there is an increased amount of front / rear panel line showing. I need to start carving up the left ear. I have looked at many helmet references, and some pics show various heights of ear. Some show even more space to the ridge line than I have. I just want to know if this will be red flagged. Thanks.
-
I did some comparison of the ears installed. Of course, since helmets are not symmetrical, the original ears sit at different heights. The original SDS right ear is held in place in the proper position. It actually sits much lower than the left ear. The ATA ear in what would be close to it's final position. You end up seeing more of the face plate / back plate seam, and it actually sits quite a bit lower than the SDS. Is this acceptable?
-
Well....who knew.... I thought it was the other way around. I thought the ears were supposed to be touching the or above the cap line. Too much forum reading. I am mixing up info. I'll try reshaping what I have then before doing surgery. Thanks guys. You rock!
-
So.....another small issue has arisen now that I've moved onto updating the ears to Centurion. I ordered a set of ears from ATA, and they are good quality, but they won't fit my helmet. The ears are to short, and they have a more "humped" curve than my current SDS ears. Current SDS ear on helmet. Pretty minimal gaps that I could reduce further. They fit very well. One thing I discovered as I was looking at the SDS ears: The black edging and stripe on the bumps are LITTLE STRIPS OF TAPE!!!! Ok SDS, most of the armor is good, but you cheap out on painting stripes and use tape?! The ATA ears are about 1/2" too short, top to bottom. They barely reach the S seal along the bottom edge of helmet. The hump that fits over helmet cheek tubes is too pronounced on ATA ears. ATA at back of photo. I won't be able to bend the ears due to the return edge which acts like a stiffener. SO, two options: Make Hero ear bumps out of Milliput putty, cut off the 4 bumps on SDS ears and put the Milliput bumps in their place. I saw this on the forums here, but for the life of me can't find it now. Carefully cut out the ATA Hero 3 bumps and glue them onto the SDS ears. I currently have a lego sized piece of milliput curing for the night. I will attempt to sand it to shape in the morning. My gut feeling is to go with option 2
-
Thanks for the link Dan. I saw that somewhere before, but now I got it in my thread
-
Ok. I read the quote as they had to be hand painted, but I could make nice neat straight lines... My OCD kicking in. I like straight lines better than the wavy ones.
-
TK- 98695 Reporting for Duty
Helotech replied to Helotech's topic in Newly Approved Members - Sound Off!
Thanks all Only a few easy things to do before applying for Expert. Will hopefully do so in a few days. -
TK- 98695 Reporting for Duty
Helotech replied to Helotech's topic in Newly Approved Members - Sound Off!
Thanks all. Working on the EI upgrades now. -
Just got approved and will go on my first troop with the Canadian Garrison in a weeks time. Now to go for Expert Infantry
-
I also purchased more fabric to extend the neck seal. The neck seal fabric on my back is only about 4" wide and would always come untucked.
-
Well, back at it... I switched out the "S" popper snaps for standard snaps, and low-and-behold, the belt held up!!! I'm going to keep the little strips of Velcro for now to see how things go during my first troop in 1 week. I received my order from Trooperbay. Helmet bag. I ordered it with no Velcro as I have enough of it here and can sew. Best thing I ever learned in the military was how to run a sewing machine peek-a-boo Patches and the sling ring for my blaster. Sticker was an added bonus. Best thing like about the whole ordering from troopers...they all include neat stickers. Now onto something that I may have an issue with. I ordered stencils to paint my helmet details. They include 2 sets of everything in case you foul something up. One of the tube stripe stencils was actually attached to a cardboard backing plate (not pictured) when I removed it from the envelope. I had to peel the stencil off the cardboard. It is now close to useless as it has carboard fibers on the back. The next issue I have is I think I received the wrong stencils. When ordering you have an option of "hand painted look" or "standard". I took standard to mean smooth edges. If you look at the trap stencil in the above picture it definitely looks like the hand painted option because of squiggly edges. The CRL is not too clear (in my mind) about what is acceptable for Centurion. It states: Tears/traps are hand painted or use decals that emulate hand painted (with correct ANH TK details) So, if I hand paint them using a smooth edged stencil, is that acceptable for centurion, or do the details HAVE to have the squiggly lines? I really prefer the smooth edges, like the tube stripes, for a cleaner look. I just want to know before I engage Trooperbay about a possible wrong order.
-
Good work. Keep it up
-
Thanks Tony. I never thought of that. I’ll give it a go.
