


TKModder421
-
Posts
252 -
Joined
-
Last visited
-
Days Won
2
Content Type
Profiles
Forums
Gallery
Articles
Everything posted by TKModder421
-

My first build!! ANOVOS ANH stunt TK
TKModder421 replied to TKModder421's topic in ANH Build Threads
Inventory of all my uncut pieces and helmet (as it came pre-assembled) Here's some closer images of my bucket... I want to file down the teeth and paint them in. I also want to reduce the flare on the ears and carve out the eyes a little more I also want to replace the rubber brow trim. I want it to go all the way to the end of the trap and have the same angle. I also want to adjust the angle of the ears so the screws angle to the direction of the trap as well. -
Alright, so I actually received my BBB several months ago and I've been documenting my slow progress as I started the process. I haven't gotten too far yet, so I thought I probably should start my build thread before I get any further. So far I've done rough cuts on my armor and have taken apart my bucket to make some mods for personal preference. I'm gonna go ahead and post some of my documentation that I've taken so far and get caught up to date on my build, then I'll continue to slowly update my thread as I progress. I'm aiming to get as high level of approval as possible. My armor is slightly large for me so I'm going to need advice on modifying to get it to fit right. Anyway, so here we go...
-
Thanks Joseph! Really?? That's good to know. I know they've made progress on improving accuracy, but I don't think I was aware that the bottom ear screws needed to be the flat V head style as well. I'll see if I can find some locally since I'm on the other side of the country. If I can't I'm sure I'll be ordering some from you! Thanks for the heads up!!
-
Thanks for the awesome tutorial!! I was starting to work on this (had just rotated my ANOVOS ears) and was having a hell of a time! This really helped! I didn't get them perfectly flush but am much happier with them than what they were before! The left ear turned out the best. Unfortunately I forgot to take 'before' pics, but they weren't even close.
-
So I went and bought a new bottle of the Testors thinner and it worked great. Wiped right off. I decided to pick up a new bottle because I had been calling local hobby stores today trying to find the Humbrol thinner and I ended up talking to an employee who clued me in asking how long I'd had my thinner, saying sometimes if it sits on a shelf for a long time it could lose its potency but I told him it worked great just 6 weeks before. He said the stripping chemical (diluted acetone maybe?) that's in the thinner can evaporate over time in a sealed jar, but not in 6 weeks. So I'm thinking I must have left the jar open overnight or didn't tighten the lid or something because apparently my original bottle has lost its potency. Thanks for your input Brien and Chris, I really appreciate it!!
-
That's how they acted the first time the Testors thinner touched it, but now it has no effect. I'm baffled! Maybe I'll see if I can get a hold of some Humbrol thinner and give that a try. Thank you!
-
I have not. I'll definitely give that a try
-
So I've got an ANOVOS bucket I've been modding and I was doing a little clean up on my frown paint job. Of course I didn't take the necessary precautions of taping things off and unfortunately I got a small drop of testors paint thinner on the tube strip decal, it immediately smudged like it was fresh paint. So I cleaned up my mess and removed the stripes that had been smudged. I continued working on the frown with the intent of fixing the tube stripes later. So I finally decided to buy new decals and now that it's been over a month I decided to finish the job. But now for some reason, the paint thinner doesn't have any effect on the remaining section of the decal. I've been searching for 2 weeks now for any ideas on how to get the decal off without using a caustic chemical that might damage the plastic or sanding (I'm trying to avoid doing so). So far I've tried Testors enamel thinner, rubbing alcohol and Purple Power and none of them has had any effect on it! I don't understand. I've seen threads that showed modifications to buckets where all the paint and decals have been stripped, I've asked in responses what they've used but I have yet to get a response. Does anyone have any suggestions?
-
Helmet Decal Clear Coat protection - Tube 'Gills'
TKModder421 replied to ocmano's topic in Assembly, Mods, and Painting
Can I ask what you used to remove the first set of tube stripe decals? -
This is an amazing post! I love all the detail! I know it's a few years old but I was wondering if you could give me some insight into what you used to strip the decals? Specifically the tube stripes on the cheek tubes. TIA
-
Can I ask what you used to strip the paint and decals?
-
Oh ok! Haha, it still look amazing! Thanks for the response
-
Yours looks amazing as well!! good job man! I really wanna do the same to my bucket! Where did you find all those components? So this is just tubing that's cut and (essentially) unrolled?
-
I know this is an old post but I just wanted to say your armor looks amazing!! So clean and so much attention to detail!
-
I'd love to hear about the procedures and what you used for the removal process!
-
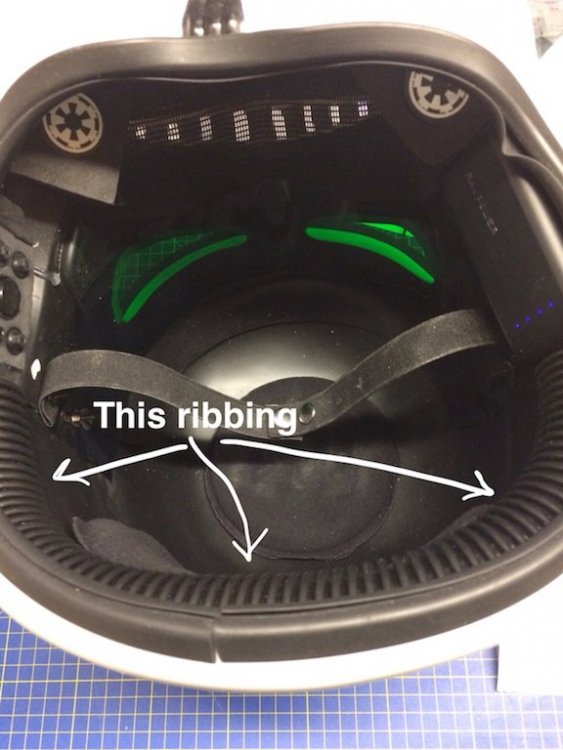
I love the interior!! Where did you get the ribbed padding that runs along the back side of the opening of the bucket?
-
Such great info for this newb!! Thank you!!

