
fishgoh0nk
-
Posts
360 -
Joined
-
Last visited
Content Type
Profiles
Forums
Gallery
Articles
Everything posted by fishgoh0nk
-
Fish's ANOVOS Build Thread - Aspiring for L3
fishgoh0nk replied to fishgoh0nk's topic in ANH (Stunt and Hero)
Sniper knee - would the foam press against your actual knee cap? Thighs - Shouldn't be too hard - just need to let out my shims a bit more - I guess years back my left quad was maybe smaller - either way, I think i need roughly .5-.75" on the circumference. Good tip on the shins, I just lazily put the shins on, I haven't tacked on the velcro yet. Would you recommend velcro given that these shins are shimmed? Would it be too thick? The shim was for an extension of the coverstrip. -
Fish's ANOVOS Build Thread - Aspiring for L3
fishgoh0nk replied to fishgoh0nk's topic in ANH (Stunt and Hero)
Good idea - tough work trying to put this on by myself, so please excuse my left shoulder bell, I couldn't reach over to strap it. I think I could get the belt a bit tighter to cinch up the ab plate with the kidney... I may have put on weight in the past 2 years... LOL Also - any advice on getting the butt plate to sit closer to my body (I have Hugh Jazz) would be much appreciated! -
Fish's ANOVOS Build Thread - Aspiring for L3
fishgoh0nk replied to fishgoh0nk's topic in ANH (Stunt and Hero)
I'm thinking I need to widen up my thighs a bit more - the clearance between the left thigh and the sniper knee is a bit low, they'll actually touch when i lock my knees. The reason for the widening is because I can't pull the thighs up any higher due to the funneling of my thighs into them. What do you guys think? -
Fish's ANOVOS Build Thread - Aspiring for L3
fishgoh0nk replied to fishgoh0nk's topic in ANH (Stunt and Hero)
Shark has a broken tail. Actually, only thing around the house I could use to brace the inside of the greaves. The shims I added were pretty rigid and the closure left a gap that I don't believe velcro nor elastic + strap would be able to bridge, so I segmented the shim, added a second layer for rounded reinforcement. Hopefully the curve will be tight by tomorrow. -
Fish's ANOVOS Build Thread - Aspiring for L3
fishgoh0nk replied to fishgoh0nk's topic in ANH (Stunt and Hero)
Anyone able to chime in? Latest update - Calves. I added the shim as you guys had advised. I had to redo the the left one today after finding out my cover strip sat a bit crooked, and had a bit too much room at the ankles. But here's how i'm shimming. Also removed the overspray from the frown - I don't think I need to repaint, kind of like it this way, and it's pretty screen accurate for Stunt TK, what do y'all think? -
Fish's ANOVOS Build Thread - Aspiring for L3
fishgoh0nk replied to fishgoh0nk's topic in ANH (Stunt and Hero)
I got vmusicstore's E-11 M38 tank scope today and it's solid! Now I'm just looking for mounting options. I also got started on changing the existing t-tracks on the blaster for accuracy - the ones stock, as pointed by you good souls, were too short. I ordered Super6Props' t-tracks and had a few learning experiences. I had trouble getting the tension of the bend just right, often it was too long, or too short, causing it to bow, or not hold in place. After some trial and error, I found that 1cm was enough to give a proper bend and tension, combined with the distance between the closest edges of the two vent holes. It took a while trying to maintain a nice hot boiling cup of water on my desk - (had to refill several times per track), when the water was too cool, the tracks were not easy to work with. I also ended up peeling off the included tape on the t-tracks, those tracks were no were near close to hugging the barrel shroud - my only guess are that the vent holes on other blasters were larger in diameter than the ones on this airsoft gun's. Overall, I'm quite happy how it turned out. I think upon completion, I'll add some glue to the end holes to prevent the t-tracks from coming loose. According to this guide - they mention securing the t-tracks with wire? Anyone have an instructional of how this is done? -
Fish's ANOVOS Build Thread - Aspiring for L3
fishgoh0nk replied to fishgoh0nk's topic in ANH (Stunt and Hero)
I'm currently rebuilding the helmet - and I have a couple of questions for you guys. Anything is much appreciated! Helmet to face gap - I'd personally like to close up the gap a bit; would some heat treatment be wise or dumb? Screen references as well as many other posts appear that a gap is present, I'm having an internal debate between conventional (if real word helmets had gaps, that wouldn't be great) and screen accuracy. I'll be trimming the ears as well to sit more flush with the edges as well. Polish - If I decide to polish the helmet at this time, I'm guessing I would need to polish the entire suit to match the sheen for approvals? Brow height - Dan's post about brow height indicates it's acceptable to have a low brow, which I like better (looks more aggressive), :: But after reviewing some of the approval requests, it appears stunt brows (high-med) are the preferred look even for EIB - is this just a matter of garrison leader's preference or is there an approval standard in this regard? :: EDIT :: I guess I'm building an ANH stunt, so high brow is more conventional, but is it required? -
Fish's ANOVOS Build Thread - Aspiring for L3
fishgoh0nk replied to fishgoh0nk's topic in ANH (Stunt and Hero)
I think I did - I have 2 sets of cover strips remaining, Parts #37 and 39; 39 is a 25mm strip x 15"3/4 and 37 is a 20mm strip x 13"3/8. My brain thought because it was longer/thicker it was meant for thighs. ::doh:: Yea, I think i'll do the shimming on both sides of the calves to give me an extra inch for circumference, then do some fitting and covering with the provided cover strip. As long as the cover strip is on the "outer" half/portion of the leg piece, and the inner folds under, I'm good to go right? Any tips such as maintain extra material in the case my legs start to grow, or should I trim off as much material as possible to reduce the amount of poking/material inside of the calve (to avoid chaffing)? Also any tips for how much room should be inside the calve? Example - enough to fit 1 finger in or something like that? I'm thinking that as long as it's not too tight to walk or too tight that the strapping/velcro would break, I should be good? -
Fish's ANOVOS Build Thread - Aspiring for L3
fishgoh0nk replied to fishgoh0nk's topic in ANH (Stunt and Hero)
The ANOVOS comes with pre-cut cover strips @20mm - but since i ordered some replacement parts from ATA, they had provided some material, unfortunately they're bicep strips and not long enough (short by 10mm) for calves. Could you recommend a good place to acquire some, or should I try and visit a hobby shop/hardware store in search of ABS? -
Fish's ANOVOS Build Thread - Aspiring for L3
fishgoh0nk replied to fishgoh0nk's topic in ANH (Stunt and Hero)
Eyes clean up - right eye's brow is a bit droopy, should i use my heating iron to give it a lift? -
Fish's ANOVOS Build Thread - Aspiring for L3
fishgoh0nk replied to fishgoh0nk's topic in ANH (Stunt and Hero)
Would it be best to add extra material to normalize the thickness (one behind, one adjacent)?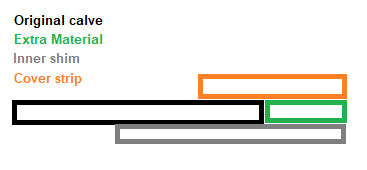
-
Fish's ANOVOS Build Thread - Aspiring for L3
fishgoh0nk replied to fishgoh0nk's topic in ANH (Stunt and Hero)
Gents, I have a question about calves - I have fairly large calves, and I believe with the cover strip, I shouldn't have a problem closing them. My main concern is whether I should trim to straighten the closing edges before attaching the strapping (primarily the bottom of the left calve), and the best way to align the height of the right calf. I did swap the calve pieces per Anovo's builders recommendations and wanted to check with you guys if things look right. Here's my proposed changes (bend/mold in green, cuts in red). I'm using my hands to grip the front to give some closure (also makes my legs more bowed than normal) Below are the calves loosely fit. -
Fish's ANOVOS Build Thread - Aspiring for L3
fishgoh0nk replied to fishgoh0nk's topic in ANH (Stunt and Hero)
Yikes at the button! Ouch ouch ouch! I did buy a sack of Chicago screws from a post you had advised me about earlier... i should probably go through the thread history before beginning again... it's been so long since i've worked on this, all my tools and materials are kind of scattered (2 moves and a marriage haha). I have a feeling my 1/8 pop rivets aren't going to last very long, maybe after a first troop and the rivets fail, i'll have a bigger hole for Chicago screws -
Fish's ANOVOS Build Thread - Aspiring for L3
fishgoh0nk replied to fishgoh0nk's topic in ANH (Stunt and Hero)
Thanks!! Perfect, glad I don't have to shift anything - those pop rivets are annoying to undo - Just have to repair my dented button now... -
Fish's ANOVOS Build Thread - Aspiring for L3
fishgoh0nk replied to fishgoh0nk's topic in ANH (Stunt and Hero)
@ukswrathOn your Anovos build, your holster only had 1 set of holes, the version I got has 2, should I only bolt one set and let the top half stay loose, against my body? It wears well as is, just wondering what the appropriate steps should be: -
Fish's ANOVOS Build Thread - Aspiring for L3
fishgoh0nk replied to fishgoh0nk's topic in ANH (Stunt and Hero)
Back from hiatus everyone! Found some time and inspiration and now back in full swing. Pausing on the blaster now, working on the belt instead. I think my elastic is a little too high for the ammo pouches, any imperial decree as to how low/high they should be? I can use some heat + stretching if they're too high... -
Fish's ANOVOS Build Thread - Aspiring for L3
fishgoh0nk replied to fishgoh0nk's topic in ANH (Stunt and Hero)
Ok, getting one -
Fish's ANOVOS Build Thread - Aspiring for L3
fishgoh0nk replied to fishgoh0nk's topic in ANH (Stunt and Hero)
Thanks for all the recommendations! I am considering them, but I'm kind of a "material" person and choosing between resin, plastic or metal, I would almost always choose the metal. I don't mind the weight, as far as right now, so I'd like something that provides the real steel feel. Besides weight, screen accuracy, cost and support for good vendors, is there any reason I wouldn't want to choose the eBay aluminum replicas? They look pretty good, but I can't seem to find any review of them, positive or negative, only people that have purchased some M38A2s here on the forum. I guess a polymer/resin scope would also be easier to mod due to soft material. Not trying to stir any pots, just want to have some cake and eat it too. -
Fish's ANOVOS Build Thread - Aspiring for L3
fishgoh0nk replied to fishgoh0nk's topic in ANH (Stunt and Hero)
All I saw were the electronics for the display, I was wondering about the entire scope so I would just detach my current one. I was thinking about something like this: https://www.ebay.com/itm/E11-blaster-M38-Tank-Telescope-1942-Scope-Replica-KIT/122795049049?epid=881057613&hash=item1c9727c059:g:TYcAAOSwIVhaAHe3 -
Fish's ANOVOS Build Thread - Aspiring for L3
fishgoh0nk replied to fishgoh0nk's topic in ANH (Stunt and Hero)
Anyone know of any good m38 scope replicas? Just got done here at SWC2019 and I'm going to "double our efforts" in preparation for 2020! I was thinking about the kit from eBay for 100-150, but I haven't seen many reviews about it. I do want something functioning -
Fish's ANOVOS Build Thread - Aspiring for L3
fishgoh0nk replied to fishgoh0nk's topic in ANH (Stunt and Hero)
Do you guys know if the approvers will care that the scope opening is at the 12'oclock position rather than the 6'oclock position? I believe the reason for this inaccuracy was done because this replica comes with a working 3.5x magnification scope, and in order to maintain a level plane for the scope housing, they had to shift the relief upwards. I can make the modification by dissecting the front of the scope and re-affixing it with a 180 degree rotation; however, it'd ruin the sight picture -
Fish's ANOVOS Build Thread - Aspiring for L3
fishgoh0nk replied to fishgoh0nk's topic in ANH (Stunt and Hero)
@justjoseph63 as always! Much appreciated solid post joseph! Unless someone knows another place, it looks like i'll be ordering a pack from the seller you linked. I think the 2 details in addition to the T-tracks are the extractor on bolt detail and serrations on the rear sight. It doesn't seem to be listed as a requirement, but seems easy enough to do for better accuracy. -
Fish's ANOVOS Build Thread - Aspiring for L3
fishgoh0nk replied to fishgoh0nk's topic in ANH (Stunt and Hero)
Charging handle removed with 3 screws! I'll just sand and repaint the correct color, easy-peezey! Keep throwing suggestions my way boys (and girls)! -
Fish's ANOVOS Build Thread - Aspiring for L3
fishgoh0nk replied to fishgoh0nk's topic in ANH (Stunt and Hero)
Yea, i'm already experimenting with concepts to move it forward. Good thing there's already a screw hole drilled, just need to add the stabilizer hole, extend some screws and I should be good with that. Definitely need to un-silver the charging handle/bolt. -
Fish's ANOVOS Build Thread - Aspiring for L3
fishgoh0nk replied to fishgoh0nk's topic in ANH (Stunt and Hero)
welp! good thing we have the experts here I don't think the counter is anything passable, it's just printed on. Would you happen to have a link to centurion requirements for the blaster?
