

Gwithian
-
Posts
453 -
Joined
-
Last visited
-
Days Won
1
Content Type
Profiles
Forums
Gallery
Articles
Everything posted by Gwithian
-

Stephen's RS ANH stunt build WIP (for small people)
Gwithian replied to Gwithian's topic in ANH Build Threads
Following on from yesterday I tried all my armour on again today.... the chest is currently not attached to the ab..... I wanted to see how it fits and now it’s not sticking out so I must have made the elastic too tight? Anyway I think I’m almost there with the thighs .... I managed to walk up and down stairs no problem.... the drop boxes were clanking about though Oh and the new TK boots ..... they are amazing .... soft, comfy and a lot narrower around the ankle which means that the greaves fit better around the ankle... Anyway here are the pics .... let me know what you think..... I think the right greave needs to be moved up a tad .... perhaps half an inch.... also the left greave was a bit twisted....I just needed to move it around a bit Thoughts appreciated I need to replace the button plate... sort out the ab / chest fastenings and I think the butt needs trimming.... oh and fit the outer cover strips to the thighs..... Other than that I think I’m almost there Hopefully Sent from my iPhone using Tapatalk -
Stephen's RS ANH stunt build WIP (for small people)
Gwithian replied to Gwithian's topic in ANH Build Threads
It has been a very good day today.... I popped over to RS Prop Masters to get some very nice new white leather TK boots.... the size 7 were too big, size 6 a tad snug..., but I know from my bike leathers that leather does stretch so I plumped for the 6 The guys at RS we’re great, I spent almost all morning talking to Rob about my build... this is Rob And the guys working hard on imperial business I told rob about my button mishap Yes I over trimmed it, but Rob very kindly provided me with a replacement set ... for free I also told Rob about a few problems I’m having ... in the chest and right thigh.... he suggested I realign the right thigh.... which I’ve now done.. I pulled it apart Realigned it and stuck it back together I told rob that my chest piece was sticking out I do have a broad chest and narrow waist.... Rob suggested that the elastic could be pulling it out of shape....?he suggested I remove the brackets and see how it sits when hanging free..... I’ve removed the brackets and will check it’s fit tomorrow I also fitted the holster today As I say... it’s been a good day today, Rob at RS has been so helpful and encouraging today, the guys even made me a brew.... well I was a tad cold as I went on the bike and it was only 3 degrees this morning.... still I had a good ride..... I’m so pleased I went with the RS armour.... it’s amazing and Rob, Si and the guys really do have a limitless amount of pride in the costumes that make.... amazing Sent from my iPhone using Tapatalk -
Let the build begin.. Stormtrooper RS ANH WIP
Gwithian replied to Steftroop's topic in ANH Build Threads
Im popping over to RS this week to get some, I know what you mean about the painted boots..... As my granddad used to say “why spoil the ship fir an a-peth of tar” I’ve spent so much on the costume I don’t want to spoil it with duff boots Sent from my iPhone using Tapatalk -
Matt, I had the same problem as you, I got a new set of brackets from the Imperial Supply Depot , they cost £5, contact Clive aka Ninjabiscuit on the UKG Stephen Sent from my iPhone using Tapatalk
-
Stephen's RS ANH stunt build WIP (for small people)
Gwithian replied to Gwithian's topic in ANH Build Threads
Shashachu .... no need to apologise about your advice on the cod placement , my armourer on the UKG gave me the same advice as you I will look at the chest and bells , the bells do seem a tad big and I know what you mean with the chest sticking out, the thing is I’ve already messed so much up with the heat gun in this build , based on past performance, I think I would have a good chance of completely messing the chest up..... Frank, thanks for your detailed reply, that’s just what I needed , I will try lowering the thighs slightly to see how that looks... I will tighten the elastic between butt and kidney and take it from there.... I will also be checking your build thread and Christine’s again Sent from my iPhone using Tapatalk -
Stephen's RS ANH stunt build WIP (for small people)
Gwithian replied to Gwithian's topic in ANH Build Threads
Ok I’ve done some bits n bobs today..... I made the bracket to fit on the right side of the torso And glued in place..... you can’t actually see it Oh and I stuck on the buttons... again you can’t really see it.... I used the microfibre cloths to protect the paint And I did another test fit..... now I really need constructive criticism on this.... I need to know what bits need improving..... I know I need to sort out the thighs and the butt ..... but I don’t know where to start...... I can’t take the cod up any more So what needs work? Are the arms ok? Shoulder bells ok? Chest, ab, kidney, back , COD ok? Any advice on trimming thighs ..... front.... rear.... or both? Trim butt instead of rear thighs? Sorry.... I know it’s a big ask ..... but I’m in need of help.... Life, being a small trooper, has its drawbacks ...... not only do we have to answer questions like “aren’t you a bit small to be a stormtrooper “..... to which we reply “aren’t you a bit big to be an Ewok” ..... But we have to trim our armour to fit our small limbs ...... Unfortunately I’m now a bit stuck..... so please any advice is gratefully received Ivan lift my legs up this much Although I couldn’t actually stand on the stool today..... Oh and that’s my confused / pondering face Oh and I’m going to pop around to RS Prop Masters next week..... I’m going to get some new white leather TK boots As I have said.... please tell me what’s wrong with my armour so I can put it right..... thanks Sent from my iPhone using Tapatalk -
Stephen's RS ANH stunt build WIP (for small people)
Gwithian replied to Gwithian's topic in ANH Build Threads
Hi Frank, thanks They are called Chicago screws over here as well . The UKG has confirmed that I should do what you have done and use the cap rivets... the same ones used to hold the ammo to the canvas belt I’ve done another trial fit today, I will post the pics later.... I would value your opinion on where to start re trimming the thighs and butt.... I can’t reduce the cod any more as I’ve cut an inch off it and can’t get it any higher.... though I could reduce the return edge around the cod.... would that help? As I said... will post the pics later Sent from my iPhone using Tapatalk -
Stephen's RS ANH stunt build WIP (for small people)
Gwithian replied to Gwithian's topic in ANH Build Threads
Thanks Jedha Sent from my iPhone using Tapatalk -
Stephen's RS ANH stunt build WIP (for small people)
Gwithian replied to Gwithian's topic in ANH Build Threads
A bit more progress today .... I’ve refitted the left shoulder bridge It wasn’t quite lining up at the back, I know it doesn’t look level but I haven’t cut the chest bit right so on it’s looking ok .... if you follow my logic I also glued the snaps on the chest And stitched the elastic fasteners.... they were fraying so I thought this would stop it fraying .... I will do the other elastic to stop that fraying also..... it’s a tiresome job but needs doing A bit of sewing done Also I’ve started to make a bracket to fit on the inside of the right side of the ab/kidney... to keep it in line Then stuck on the inside of the ab Once I’ve sorted the torso out I will do another test fit to check the thighs / butt : cod area..... I did do a test fit this morning.... sorry no photos.... but I was able to negotiate the stairs in our house.... both up and down..... but there is some rubbing between the thighs and cod / butt..... I think it’s slowly slowly catch the monkey as far as sorting all of this out Also I was going to fit the holster today.... but on the holster there were these fasteners I’m not too sure what they are for as I thought these were used to fit the holster to the belt I appreciate your advice on this Sent from my iPhone using Tapatalk -
Stephen's RS ANH stunt build WIP (for small people)
Gwithian replied to Gwithian's topic in ANH Build Threads
Opps Sent from my iPhone using Tapatalk -
Stephen's RS ANH stunt build WIP (for small people)
Gwithian replied to Gwithian's topic in ANH Build Threads
A bit more progress today Fitted the cod rivet, about 1 1/4 inches from the end Tried on the thighs, greaves and torso, managed to step up onto a stool but the tops of the thighs dug in.... so I decided to take 1/4 of an inch off the top of the thighs.... used the heat sealing iron...yes they look a mess but I will trim them and fill them with abs paste and sand them down .... so this is what it looks like.... warts and all I also fitted the rear cover strips to the thighs And glued the cod in place having cut it down by a further 1/4 of an inch .... so that makes a total reduction on the cod of 1 inch I’m getting there ...... Sent from my iPhone using Tapatalk -
Stephen's RS ANH stunt build WIP (for small people)
Gwithian replied to Gwithian's topic in ANH Build Threads
Ok... I’ve been gluing the snaps in place..... this is after they have been glued I also glued the shoulder elastics to the back armour Fitted the split rivets to the ab / kidney piece.... various pics I think it took longer to take the photos lol Also glued the shoulder bridges to the chest One question if I may..... Are there any special measurements to place the split rivet on the cod piece? .... just not too sure where to place it The next few days will be gluing and riveting ..... getting there Sent from my iPhone using Tapatalk -
Stephen's RS ANH stunt build WIP (for small people)
Gwithian replied to Gwithian's topic in ANH Build Threads
A little more progress today.... I’ve started to glue the snaps on the arm in place Oh the glued buttons on the belt And started to polish the armour, with auto glym high resign polish, don’t the tight thigh and right greave.... will give it all an initial polish with this and finish off with a final polish with the stormtrooper polish I got from the Imperial Supply Depot [emoji3] Pleased with the results so far Sent from my iPhone using Tapatalk -
Let the build begin.. Stormtrooper RS ANH WIP
Gwithian replied to Steftroop's topic in ANH Build Threads
I’m really going to have to get some.... how are they for size.... I’m a uk 61/2 so sometimes a 6 is too small and a 7 too big .... but other times I can get away with a 6 or a 7.... depending if the boot is a tight fit or not .... I could skyways pop over to RS, they are only 18 miles away [emoji3] Sent from my iPhone using Tapatalk -
Stephen's RS ANH stunt build WIP (for small people)
Gwithian replied to Gwithian's topic in ANH Build Threads
Thanks Stefan , I’ve tried my best, the way you have painted your lid is 10 out of 10 in my book... my lid is probably a 5 or 6 if I’m lucky ... still chuffed with it Sent from my iPhone using Tapatalk -
Stephen's RS ANH stunt build WIP (for small people)
Gwithian replied to Gwithian's topic in ANH Build Threads
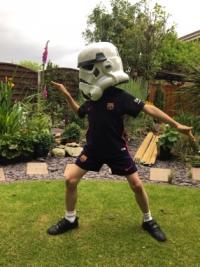
Some more progress today.... I’ve fitted the knee ammo pack, marked the curves with the TD pipe Outline marked Then cut, sanded and centralised on the thigh and riveted didn’t take pic... doh Anyway job done..... hope it’s ok I also fitted the covers for the rivets on the amp belt Oh and made the buttons a bit bigger than yesterday .... I think they look better Before And now Do they need to be any bigger? Anyway.... before I did the last two jobs I had another test fit..... I can now attach the shoulder bells myself.... well chuffed..... and actually getting the kit in and off is getting easier every time So the pics.... oh the stirrups work really well , they kept the greaves in place as good as if they had been nailed to my legs ... lol I have cut the cod down 3/4 of an inch not too sure if it needs another 1/4 of an inch? The thighs.... well left thigh is up as high as it will go without cutting me in half .... actually I think it’s a tad too high and could be lowered a tad...... The tight thigh was as high as the left initially, but the snaps are only taped in place at the moment and it came undone .... it dropped a bit, probably a bit too much .... so I’m guessing they should not be as high as the left but not as low as the right.... saying that though the right actually felt better? I would appreciate your advice on how it all looks... are the arms ok? Shoulder bells? Is the torso ok? I know the ab and kidney are not properly aligned on the right.... I think I need something to make that fastening better Oh and is the chest ok? Is it ready for me to fit the shoulder bridges ? Anyway here I am ...... And some action shots Oh and one of a stormtrooper thinking.... I appreciate all your help, advice and support Finally I’m so so glad I decided to build the armour myself..... I was initially thinking of getting a commission .... I’m glad I didn’t.... I have learnt so much and enjoyed the journey to boot...... I can now see the light at the end of the tunnel...... I’ve still got a lot to do so I guess I’m looking through the channel tunnel lol Sent from my iPhone using Tapatalk -
Let the build begin.. Stormtrooper RS ANH WIP
Gwithian replied to Steftroop's topic in ANH Build Threads
They look much better than mine [emoji3] Sent from my iPhone using Tapatalk -
Let the build begin.. Stormtrooper RS ANH WIP
Gwithian replied to Steftroop's topic in ANH Build Threads
Humm..... will have to get some of them.... must admit your boots look much better than mine [emoji3] Sent from my iPhone using Tapatalk -
Let the build begin.. Stormtrooper RS ANH WIP
Gwithian replied to Steftroop's topic in ANH Build Threads
Yes mine are painted.... I didn’t realise RS did white leather ones .... I think I will have to get in touch with them. Were they a special order? Sent from my iPhone using Tapatalk -
Let the build begin.. Stormtrooper RS ANH WIP
Gwithian replied to Steftroop's topic in ANH Build Threads
Looking good Stefan [emoji3]... I have the RS boots, they scratch quite easily when the greaves are fitted, so be careful.... see mine... doh Sent from my iPhone using Tapatalk -
Stephen's RS ANH stunt build WIP (for small people)
Gwithian replied to Gwithian's topic in ANH Build Threads
A bit more progress today..... I was prompted by Christine aka cricket on FISD to make some stirrups for the greaves..... I’ve followed the instructions she gave me and hopefully they will keep them in place And In the boot The Velcro will be attached to the soft part inside the greave.... it needs sewing onto the elastic before I use them The soft bit inside the greave I’ve also cut out the rivet covers fir the belt, 1” square They just need gluing on the belt now Also I’ve painted the buttons for the ab,... I did a dry run on some scrap abs before I started hopefully they are ok... are they big enough? Sent from my iPhone using Tapatalk -
Let the build begin.. Stormtrooper RS ANH WIP
Gwithian replied to Steftroop's topic in ANH Build Threads
Lid and boots looking good mate [emoji3] Sent from my iPhone using Tapatalk -
Let the build begin.. Stormtrooper RS ANH WIP
Gwithian replied to Steftroop's topic in ANH Build Threads
I’m so so sorry to hear of your sad news Stef, may your mother rest in peace and live on in your heart . You are in our thoughts and prayers Sent from my iPhone using Tapatalk -
Stephen's RS ANH stunt build WIP (for small people)
Gwithian replied to Gwithian's topic in ANH Build Threads
Well I’ve finally bit the bullet and cut the cod.... measured 1inch in (bottom line) then half an inch in (top line) And decided to go fir three quarters of an inch (middle line) Started to cut... no going back now.... oops I’ve been well and truly snipped now And taped in place.... Had a quick try and it seems ok.... will do another fitting in the next few days .... This is something that I was hoping I didn’t need to do but sadly it’s been necessary..... Next job may well be to trim the butt.... does the butt need a return edge in the side / bottom edge? Sent from my iPhone using Tapatalk -
Stephen's RS ANH stunt build WIP (for small people)
Gwithian replied to Gwithian's topic in ANH Build Threads
Thanks Frank, I appreciate your help Sent from my iPhone using Tapatalk
