

pewpewpew
-
Posts
188 -
Joined
-
Last visited
-
Days Won
2
Content Type
Profiles
Forums
Gallery
Articles
Everything posted by pewpewpew
-
I just showed Mrs. Pewpewpew the pics from Crickets post above and she said, "Those are nice! They shouldn't just be giving those away!" <br> Shhhh, dear...<br> That is a nice looking piece of hardware. I will be sure to post when mine arrives.
-
Protecting boots from the elements?
pewpewpew replied to pewpewpew's topic in Boots, Soft Parts, and other Accessories
Scotchguard! That's the name I was looking for. Thanks! So these things shrink? We need to keep them stretched? That's weird I didn't know such a thing happened. -
I just used the paint I used for my frown. If you have that already just use that. You can probably pick up Humbrol or Testor brand paints at any crafts or hobby place. I followed Ukswrath's tutorial so I didn't end up with paint on the ends of the pipe. The caps slip on and off well enough that I haven't bothered to glue them in place. Maybe this pic with help:
-
Congrats Jim. That's awesome. it looks great!
-
TK-Tom's Not So Excellent Adventure - ANH Stunt TK Build
pewpewpew replied to TK-Tom's topic in ANH (Stunt and Hero)
I'm impressed that there's no visible seam on that cover strip. Good work! -
Can anybody recommend a good treatment to protect my new super sexy imperial boots from the elements? I would like something that makes the process of cleaning up dirt, salt, grass stains and blood stains a bit easier. Maybe even a little water proofing as well. I imagine there must be a spray of some sort, but I'm not 100% sure what it is that I'm looking for. Thanks!
-
Perhaps you can tell us how you earned that name while in the marines? I'm thinking in real life you're actually a dog sent to serve in the marines by Satan himself. I mean... I might be wrong... but I don't think so.
-
Happy Eid to you as well. Your armor is looking very nice. Now get going on that belt before your pants fall down!
-
TK-Tom's Not So Excellent Adventure - ANH Stunt TK Build
pewpewpew replied to TK-Tom's topic in ANH (Stunt and Hero)
Have you considered the possibility of getting your limbs surgically shortened? Yuk-yuk-yuk.... Sorry, I will show myself out now. -
TK-Tom's Not So Excellent Adventure - ANH Stunt TK Build
pewpewpew replied to TK-Tom's topic in ANH (Stunt and Hero)
Nahhh.... I'm sure another armor maker is willing to supply cover strips for you. The match might not be 100% perfect, but I think it should still look good. Check with Mark from AP. I think he goes by ABS80 here on the forums. He's been known to sell replacement parts. Great guy to deal with too. http://www.whitearmor.net/forum/topic/36140-ap-replacement-parts/#entry475432 Even if the AP stuff doesn't match the Anovos 100% perfect, it still might be better than something that looks pieced together at the end with paste. Though, I've seen people work magic with the paste before. One suggestion might be to move the patched up piece further away from where somebody might see it. For example, bottom of shin instead of top. Top of forearm instead of wrist. Hope that helps a bit. Good luck. You're still looking pretty good though. -
I chose the heat gun mainly out of frustration and it's close proximity to me at the time. It was plugged in already and just looking for a victim. The problem I was having was just having enough flat surface area that made contact to which I could apply some glue. I made some heat shields with some folded cardboard to protect everything else such as the shin and just focused a bit of heat on the one corner of the sniper plate I was struggling to attach. As soon as the desired temperature was reached it just went flat on the cardboard and I then had the surface area I needed to attach it. I have to strongly echo what so many others have said though, be careful with the heat gun!!! It can go from okay to very bad in an instant.
-
Quick thermal det measurment question.
pewpewpew replied to johnnyshotfirst's topic in Build Threads Requireing Maintenance
Perhaps this might have the details you seek? http://www.whitearmor.net/forum/topic/31920-ukswraths-am-10-ata-bucket-build/?p=415450 -
Vexus's AP Build Thread. Road to the 501st
pewpewpew replied to Pretzel's topic in Build Threads Requireing Maintenance
Congrats Preston on obtaining your Expert Infantry Badge. To celebrate I've modified the traditional leg lamp for you. Now on to Centurion! -
LOL! Easy now chief. I'm still just a lowly civilian.
-
TK-Tom's Not So Excellent Adventure - ANH Stunt TK Build
pewpewpew replied to TK-Tom's topic in ANH (Stunt and Hero)
This is very good to know. I'm terrified of handing some kid my blaster and it coming back in a dozen pieces. What was the price tag like on that if I might ask? -
You're getting a bit close on some of them, but you might want to check this link for some really good reference material. In short, there's no wrong way being that these were all hand done. http://www.whitearmor.net/forum/topic/16270-anh-frown-reference-pix/
-
Look at you with your nice shiny EIB badge! Congrats!
-
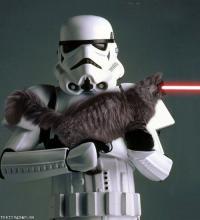
Alright, I can't be the only one that's slapped themselves in the face while trying to attach the knee ammo belt. I know there are others. I would just like to see the look of stunned surprise on my face though. Okay, update time! Somewhere under all those clamps and tape should be a shin with a sniper plate. It was one of my first attempts at using a heat gun so I may have done more harm than good. I will find out later when the clamps come off. I'm hoping she holds and looks presentable, or at the very least is salvageable for a second attempt. Also found out that the thighs were just too long and needed to be trimmed. They were poking into some mighty uncomfortable places. I marked them for cutting by putting painters tape at the top and using the top edge to guide my makeshift compass with pencil along the contours of the thigh. See below. Yup. That's a pencil lead taped to a caliper, using scrap abs as a splint to hold it in place. It allows me to maintain my measurement and mark things at the same time. Like I said, if it looks stupid and it works, then it's not really stupid. Ab plates below with decals. I gave the decals a tiny bit of loving with the heat gun and sure enough, they just formed perfectly to the buttons. Borrowed the tab system I saw somebody else use to help line everything up. It seems to work pretty good. My poor workbench has never known such chaos. I'm a bad painter so I used a little bit of tape. Finally the cat tax. Blaster was from Brett Fulford. Great job Brett! You wrapped this baby with enough bubble wrap to cover the Death Star. The wife seemed disappointed that it didn't make any "pewpewpew" noises, or really do anything. When I pointed out that the lasers they fired were really film effects, I knew from the look she gave me that it was time to shut my mouth and just go back to working on my armor. Well, not much of an update, or tutorial, but it does log a bit of my progress. I hope one day if I get a chance to build another set of armor I can learn from what I've done and create a real build that has properly detailed documentation. On the bright side, if everything goes well, I should be ready to submit my application for basic approval this weekend. Yeah, I'm kind of excited. I'm tempted to wait until Friday evening and mow the lawn in full gear to mess with the neighbors a bit. I really don't want to subject my nice white boots to any grass stains though. Does anybody know how we can protect our boots from such things? Perhaps there's a spray of some sort? Also, who am I kidding, I'm lazy and hate mowing the lawn, so I'm not too sure if it'll happen at all.
-
What about the retainer elastic that you still need to put on? Won't that straighten things up a bit for you? <a data-ipb='nomediaparse' href='http://www.whitearmor.net/forum/topic/31920-ukswraths-am-10-ata-bucket-build/?p=418985'>http://www.whitearmor.net/forum/topic/31920-ukswraths-am-10-ata-bucket-build/?p=418985</a>
-
Good call. Whenever you're stuck or unsure, move on to something else while you research and gather information. This serves a few purposes. One, it distracts you from what's keeping you in a particular area until you can sort it out. It keeps you busy and maintains progress on the build rather than sitting there scratching your head. And finally, it helps prevent avoidable and costly mistakes that can be prevented if you just take your time. It took me a while to realize this needed to be more of a marathon and less of a sprint. When I got my BBB I actually thought I'd have my kit built in a week. LOL! Boy, was I waaaaaayyyy off.
-
Thermal Detonator Clips and Measurements
pewpewpew replied to kennethmterry's topic in ANH (Stunt and Hero)
Excellent details on building a TD right here: <a data-ipb='nomediaparse' href='http://www.whitearmor.net/forum/topic/31920-ukswraths-am-10-ata-bucket-build/page-3'>http://www.whitearmor.net/forum/topic/31920-ukswraths-am-10-ata-bucket-build/page-3</a><br> Measurements of the TD can be found here: <a data-ipb='nomediaparse' href='http://databank.501st.com/databank/Costuming:TK_anh_stunt'>http://databank.501st.com/databank/Costuming:TK_anh_stunt</a><br> TD length is approx 7.5" clips are approx. 1" wide. I hope that helps. -
lol, thanks! You're 501st already, so you wouldn't have qualified unfortunately. When I receive it I will be sure to post. Perhaps even in your build thread in order to rub it in a little.
-
I think all the buckets are tight. I was actually surprised yesterday when Mrs. Pewpewpew managed to put on my bucket. She's got the biggest noggin of anybody I know. It's pretty normal to put these on sideways an the rotate them in to place.
-
Don't stress Emma. You're in the right place for some of the best advice on the Internet. It will all work out. Ask for clarification if you need it.
-
SpiceCredits ANH Stunt Build Thread [AP]
pewpewpew replied to SpiceCredits's topic in Build Threads Requireing Maintenance
Great trooping pics and awesome job on the fan setup. It looks pretty slick!
