


BDWC
-
Posts
300 -
Joined
-
Last visited
Content Type
Profiles
Forums
Gallery
Articles
Everything posted by BDWC
-
Yes, I 100 grit scuffed the kidney plate, but as you can see from the picture, any sanding to the unfinished side of the shim backer would get make it smoother since it already looks like a topo map, LOL But today the goal was to find and flatten the true outer shim material. From all of the trimming scrap that I saved, there were only two pieces that were large enough. On the last picture, you can see how they are just enough “ not flat” to cause an issue. Sent from my iPhone using Tapatalk
-
First I made the backer plate from a small sheet of ABS. The color didn’t match so I will use some of the scrap pieces to layup over this to paste together with kidney plate I sanded the inside of the kidney plate to get a better bond. I also put the “good” side of the backer ABS plate inward so that the rough side would be against the kidney plate and for a better bonding surface for the thin scrap piece I will apply to match Sent from my iPhone using Tapatalk
-
Yep, not only did I fond that right after posting, but I am now waiting for my sealing iron to arrive ( no local RC shops [emoji20]) I was more afraid of cutting up my kidney plate than when I first disassembled my helmet! But it is done!!! Sent from my iPhone using Tapatalk
-
roger that! I found some youTube videos of this and looks pretty straight forward I will be checking my local hobby shops to see if I can just run down and pick one up Stand by for lots of photos later this week BTW: trooped about 4 hours in 90degree plus heat this weekend, and hard hat attachments and fan mounts held up!!!....so far anyway
-
no holes yet (because I KNEW I'd have to shim) but...because I "like" to add a little bit of a return edge, tell me, honestly, how hard is this modeling iron thing?....and who has done this for me to hit up for tips? Thanks for the input to you Tony and ABS80 !!! gotta love this online community of endless helpers
-
I know that's the simplest way to go, but then how do I make return edges so it doesn't look so weird being flat while the ab plate has a return (please do not say remove the ab plate return LOL)
-
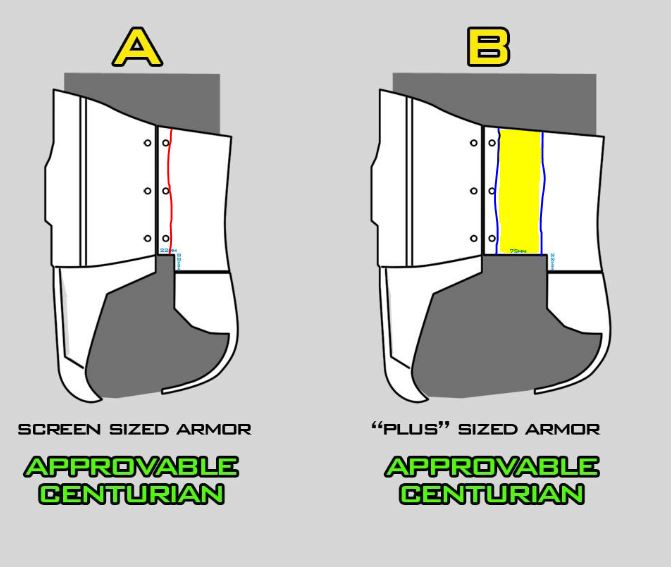
OK, to be honest , I have been trying to work on anything and everything else, in order to put off cutting up my back plate to add 'fatman shims' Sooooooo.....From my research here it looks like most folks simple 'add' material onto the end of the "too short" plate area. This looks great but I am looking for those subtle return edges on the ends that transition to the top and lower returns. That appears to be somewhat complicated to form from a new, flat piece, so I am proposing a new technique that I will be slowly undertaking in the next week or two. My proposed shimming process: Cut off the ends of the back plate approx 1"to 1.5" from edge; basically in the middle of the notch glue ABS backer to both support new pieces and to provide the measured extension needed Cut original scrap pieces to fit area between gaps;on top of backer plate Fill the gaps with ABS paste Sand...polish...REPEAT, Repeat, repeat Looking at the drawing, the RED line would be the cut line the YELLOW area will be the new material over the backer plate the BLUE LINES are the ABS paste filled areas Now I know a lot of troopers do not have return edges on this front side of the back plate, but my OCD wants it to mach the return as on the abdomen plate. Also, the goal here is that the 90 degree returns on the tops and bottoms will be much easier to form than trying to make a 'corner' return and/or blending it into the attachment building up ABS paste and forming. I'm totally new with this shimming process, and I know I am most likely over thinking this (as I often do)....but fellow whitearmor brothers, please let me know if this seems doable or just ridiculous...be honest Thanks everyone for any input you can give me!!
-
Good luck trooper!!!
-
...or maybe hot bath the tabs on either chest or back? I (and others) definitely has to round out the sharp curves of the Anovos back plate tabs just something to look at, especially if you are tall
-
I haven't personally tried it, but I read on a thread once that putting the armor in the freezer for a few hours or so will make the CA glue more brittle and easier to pry apart Sent from my iPhone using Tapatalk
-
Ok, a few days late from posting pics of he final install. Due to the foam" meltdown, I dressed up the airdry paper clay an used them. Very lightweight and a perfect flat spot, formed exactly where iI wanted the fans pointed. I did use a small piece of very heavy duty 3m plastic velcro to mount the control board. Sent from my iPhone using Tapatalk
-
The ONLY reason I have an Anovos kit is because I was able to get it at the Tier 1 level ( If I was buying another one right now, I'd go with RS or WTF for the customer service and spare parts factors as price no longer sets Anovos apart... and the unpredictable shipping dates are ridiculous. Sent from my iPhone using Tapatalk
-
Back to the original plan I trimned and sanded down my air-dry clay inserts, the glued Velcro onto them Sent from my iPhone using Tapatalk
-
So I tried to make fan mount inserts out of construction foam. I used the air-dry clay molds as templates and carved out perfect fits, then went to glue them in.... Then I found out that E6000 melts construction foam [emoji15] Sent from my iPhone using Tapatalk
-
I won't say that learning much more about Star Wars has ruined re-watching the movies for me. If anything it's now a game of trying to inspect all the armor for variations. But I will say that it has ruined it for my wife re-watching the movies with me, since I won't shut up about the armor [emoji23]. Sent from my iPhone using Tapatalk
-
Sad, but glad he made the best decision for himself and didn't feel forced (pun intended) to continue public appearances. Too many actors ( especially in the Star Trek series) continued to do appearances when it was hard to tell if they even knew where they were Sent from my iPhone using Tapatalk
-
Try hot water bath first, that's how I re-curved my back plate. Things can get out of hand and damage the armor very badly if you are not experienced with s heat gun on ABS ( or other plastic) Sent from my iPhone using Tapatalk
-
Oh, extra note, look at the back of my helmet liner. I took the forehead padding off the Anovos system and used it to cover the adjusting strap side for extra "comfy-ness" Sent from my iPhone using Tapatalk
-
Well, so far, the glued-in mounting clips seem to be working OK. Only time will tell how long they'll stay bonded, but at least, thanks to Tony, I have a back up plan and industrial Velcro waiting in the wings. I also E6000'd the foam ear screw cover on, as the stock double stick tape kept letting go. I was really happy about being able to line up the hard hat liner just right to cover my upper lens mounting screws too! This fits sooooooooooo much more comfortable than the Anovos liner I had been trooping in. I also now have much more control over my helmet movements, which helps in my mime skills (no voice/mic/amp system yet) Sent from my iPhone using Tapatalk
-
Wow great to see all the enthusiasm and community help here!!! Shasha, I truly respect you perseverance and wish you and your son nothing but the best for the future!!! And truly great words from everyone....best.community.ever. Going for Centurion level definitely shows dedication, but for some of us it's a marathon, not a sprint Like others, I have the parts; but as for me, I'm just waiting on having the time to add my 'big guy' kidney plate shims ( read as 'play with ABS paste') to make the leap into EI and Centurion, LOL
-
*runs out to buy industrial velcro strips*
-
I've read that some have good luck with 'magic eraser', but no personal experience with it. I had some bleed issues with my Anovos undersuit before I got it replaced, and I was able to get it out of my armor with Novus #3, then #2, and lots of patience
-
This definitely helps, but one question: Where are your fans mounted? I am wanting to mount them just outside the Hovi tip locations and with that deep recess for the tubes, I didn't have much luck with Velcro as it basically would only grab at two or three small contact points. Are yours mounted higher up in the helmet of more 'aft'?
-
....or if this really, really bugs you, then you could always run down to the hardware store and see if you could find a pristine piece of plastic pipe to replace it. It would take some time to cut and bevel for the caps (as you already know), but this might take less time than sanding out the old one just my .02
-
In more news.... The air dry clay inserts I was going to use for fan mounts might now be used for templates. I read in another thread yesterday, that someone mounted their fans onto foam. This would not only be much lighter in weight, but also more forgiving in shape. My only concern is whether or not E-6000 will hold foam to the helmet ?? This should cut down on fan noise by eliminating most of the vibrations, but would the foam mounts "wiggle" too much or eventually rip from the glued areas? For these reasons, I'm thinking of using EVA, aka floor mat, foam for this. It is much denser than 'padding' foam. I can use the clay forms as templates to get the shapes correct. I know EVA is a no-no in armor building, but for fan mounts, are there any downsides I should know about?

