ayen_s
-
Posts
213 -
Joined
-
Last visited
-
Days Won
2
Content Type
Profiles
Forums
Gallery
Articles
Everything posted by ayen_s
-
Good luck with your build. Post your progress with your build ok. Sent from my M631Y using Tapatalk
-
Continue to hollow scope: I use hole saw bit 25mm (1") diameter
-
Centurion accuracy update: Change hovi mic kitchen sieve to Ukswrath's Hovi Tip Screen (Link) Left: Kitchen sieve, Right: Ukswrath's mesh Reinstall back to bucket:
-

TK42911 requesting ANH Stunt Centurion status (RWA) [366]
ayen_s replied to CableGuy's topic in Request Centurion Status
Good luck Dan. Awesome armour and blaster. Sent from my M631Y using Tapatalk -
TK-92802 Requesting ANH Stunt Centurion Status [ANOVOS] [363]
ayen_s replied to Harbinger's topic in Request Centurion Status
Good luck Brien Sent from my M631Y using Tapatalk -
CableGuy's DoopyDoos (feat. T-Jay kit) ANH E-11 WIP
ayen_s replied to CableGuy's topic in ANH BlasTech E11
Congratulation on finishing the blaster Dan. Your meticulous research and talent show in the end product. -
Attached folding stock to body: Scope: Start hollowing work. Cut the front part with hack saw. I use drill from small to bigger diameter to make hole. Will continue with wood spade drill bit tomorrow.
-
Thank you Jesse. Do a review on BlastFX once you receive it.
-
Light and sound mod: Light and sound mod is non cannon. But I think it is fun and interactive to have it in a blaster. I was inspired from these topics: 1. First dedicated Arduino board for Blasters - welcome the Stardust "B" 2. arduino: a cheap board for E11 blaster effects Components: 1. DFPlayer 2. Micro SD Card (16GB) 3. 0.5W 8Ohm Speaker 4. Push button switch 5. 5V power bank 6. Wiring I am going for a simple DFPlayer MP3 board to play the sound. So far I able to play 2 file of sound. My testing setup: Sample play: https://www.youtube.com/embed/Vy6ijL7MldE
-
Doopydoos Full Resin Kit WIP + Tino,Chris + more, Additional Parts
ayen_s replied to Dracotrooper's topic in ANH BlasTech E11
Dropping by to see your progress. Amazing work. [emoji39] Sent from my M631Y using Tapatalk -
Scope Rail: Bent scope rail: Trial fit: I will drill screw hole for rear sight: Some height gaps. To fill it for uniform height and level scope rail:
-
Scope rail: Cut the aluminum strip. Tools: G-clamp, small hacksaw, files Cut shape for front: Cut shape for rear: File the cut edges:
-
Apply putty to seam line and bubble holes. Measuring holes to rear sight for scope rail measurement. I stick masking tape on my aluminum plate. Draw the measurement directly on it with pencil.
-
Build update: Bayonet lug: Installed Magazine slot: Hollowed out. Drill holes to bottom. Installed grip and magazine slot:
-
Centurion Submission todo list: 1. Shoulder bell: Redo the shoulder bell to bring it closer. Change from elastic to strap. (Done) 2. Abs decal: One off the decal peel off. To hand paint the button. 3. Hovi mic: To change the mesh to a more accurate type. 4. Abs to kidney: To change the strap. to reduce gap on right side. 5. E-11 blaster: To finish the Doopydoos resin kit. 6. Clean up the armor. 7. Take submission photos.
-
Received monocular for scope mod.
-
I borrowed a finished E-11 from my garrison member. Weigh comparison below: a ) completed E-11 with scope rail, muzzle and grip screw mod : 1168 g (2.57 lbs) b ) unfinished E-11 raw condition: 974 g (2.14 lbs)
-
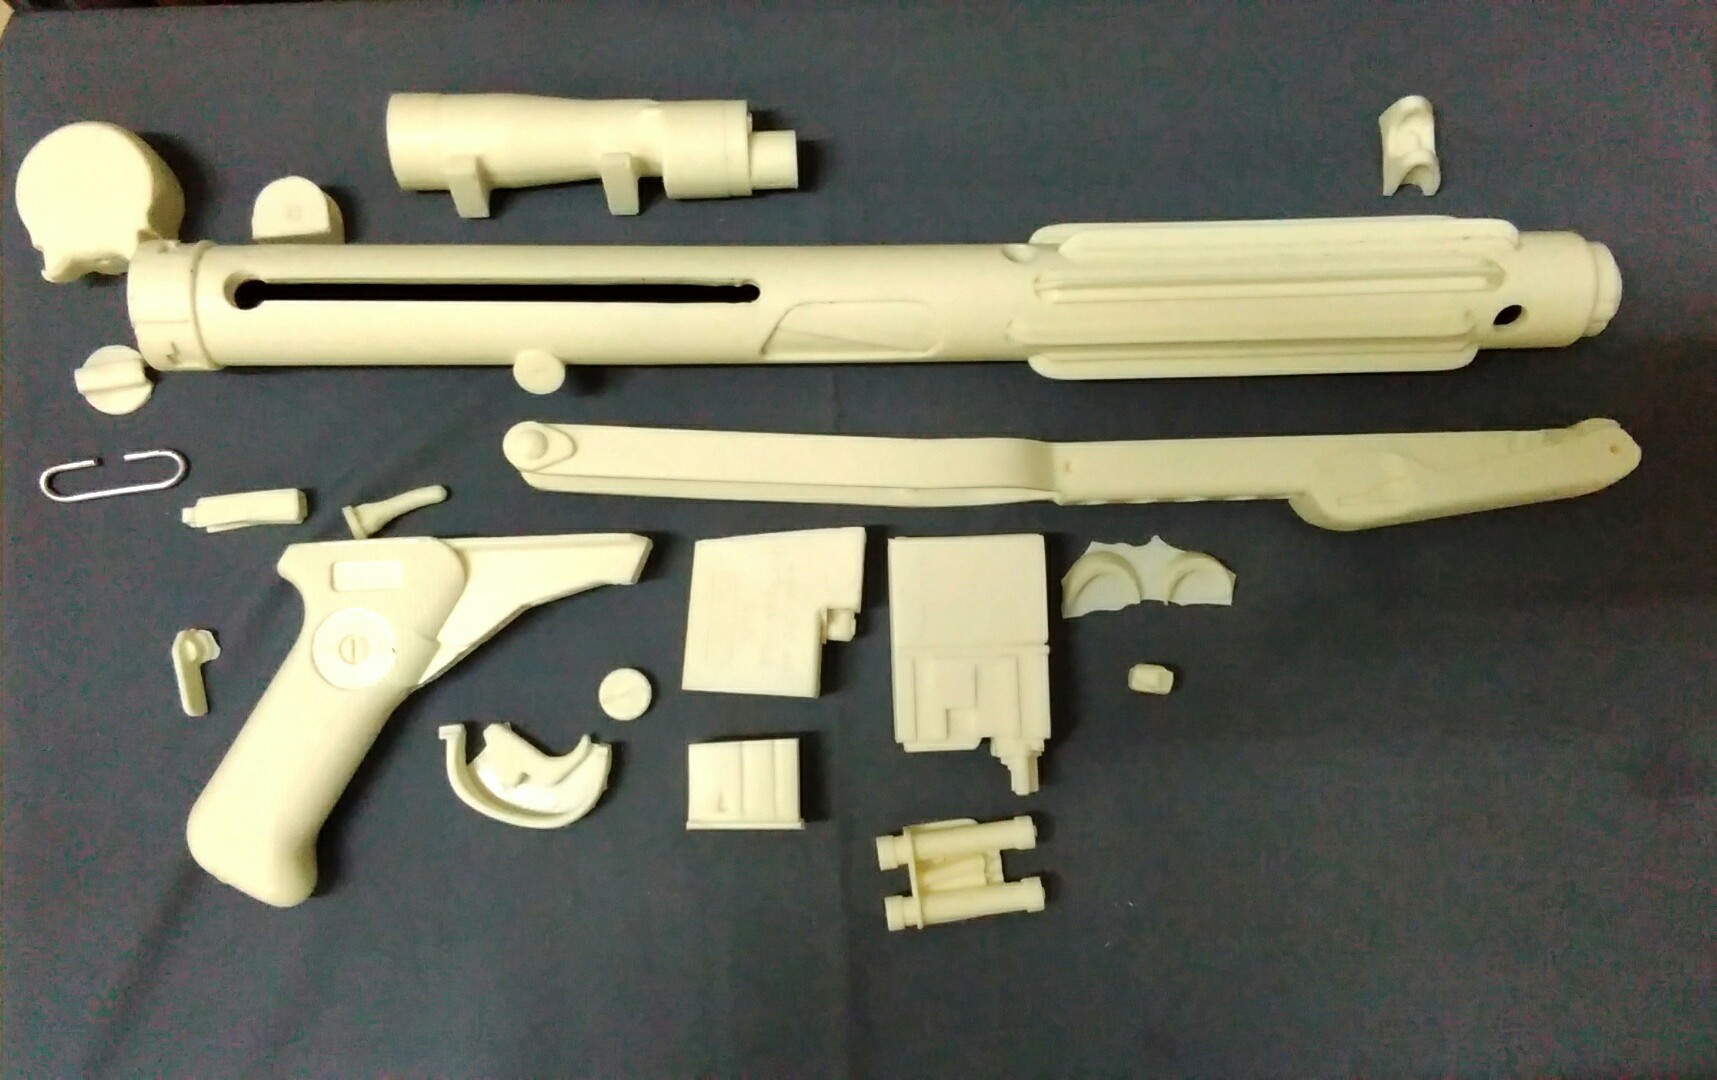
Wash the parts with soap and water. Take pictures of it for identification and check for defect. 1. DoopyDoos Resin kit c/w 1.1 Main barrel 1.2 Folding stock 1.3 Hengstler counter 1.4 Scope 1.5 Grip handle 1.6 Sling swivel keeper 1.7 Front sight 1.8 Trigger (with trigger guard) 1.9 Magazine 1.10 Magazine receiver 1.11 Power cell-fuse 1.12 Rear stock catch 1.13 Bayonet lug 1.14 Muzzle flash guard 1.15 Ejector guard (see muzzle flash guard) 1.16 Charging handle 1.17 Rear flip-up sight 1.18 Magazine release button 1.20 Selector switch 1.21 End cap 1.22 Trigger guard (see trigger)
-
Last month, on early July, I decided to give Doopy Doos another chance. Reorder with them together with another Malaysia Garrison member. After a month waiting, I received the E-11 blaster kit.

-
Yeah, I was hoping to submit Centurion application with my own blaster. Well, have to move on. Sent from my M631Y using Tapatalk
-
Putting this blaster build on hold. The E-11 blaster kit I ordered from Doopy Doos never arrived. Refund was requested and granted by Pay Pal. Case close.
-
Done. Good luck on the assignment.
-
Hello Sharizman, Selamat Petang. Welcome to FISD You can make your introduction here. I suggest you to read up below posts on how to join 501st: 1. HOW TO: Join the 501st Legion as an Imperial Stormtrooper (TK) 2. The various types of armor and where to find them Looking forward for any of your queries. .
-
The title said ESB helmet. But the certificate stated ANH Helmet.
-
Hi Barry, welcome to FISD. Your can find info for armour here. http://www.whitearmor.net/forum/index.php?/topic/11538-The-various-types-of-armor-and-where-to-find-them. Sent from my M631Y using Tapatalk