Pretzel
-
Posts
1,765 -
Joined
-
Last visited
-
Days Won
18
Content Type
Profiles
Forums
Gallery
Articles
Everything posted by Pretzel
-
Impressive. Most Impressive. Not bad for $11
-

Doopy's E-11 Blaster Kit Build Thread
Pretzel replied to Pretzel's topic in Build Threads Requireing Maintenance
Great Question. I wish I can give you a better answer then the one I am about to give you. I received my spring from Carl (Dougal). He can answer where he received the spring. (I actually tried to find a replacement) -
Doopy's E-11 Blaster Kit Build Thread
Pretzel replied to Pretzel's topic in Build Threads Requireing Maintenance
Update. Just a few minor details and probably changing the coils to a thicker chord. Found an old phone charger (looks more natural in my opinion). I think these look a little more realistic. Thoughts? We also added some brass screws to the scope. Painting in the coming weeks after some more cleaning and minor detailing. Finally, we added a PVC pipe inside the barrel and will be adding a wooden piece inside to make it nice and strong. The "sliding bolt" actually slides. Sent from my LG-H810 using Tapatalk -
Doopy's E-11 Blaster Kit Build Thread
Pretzel replied to Pretzel's topic in Build Threads Requireing Maintenance
Yeah, bring it a long just in case. But I should be fine for right now Carl. Thanks man! -
Doopy's E-11 Blaster Kit Build Thread
Pretzel replied to Pretzel's topic in Build Threads Requireing Maintenance
Thanks for the information Bulldog. Much appreciated. -
Doopy's E-11 Blaster Kit Build Thread
Pretzel replied to Pretzel's topic in Build Threads Requireing Maintenance
I originally was going to hollow out the entire scope to have natural light flow through, but I decided against it. I ordered some decals from trooperbay and will be placing decals on the scope. I will still be putting plexy glass in front the decals to protect them though. Anyone know where I can find a real scope? Considering that also. -
Thrawn’s Guard E11 Blaster Stands
Pretzel replied to Thrawn's guard's topic in Build Threads Requireing Maintenance
This is awesome. I would want one! -
Doopy's E-11 Blaster Kit Build Thread
Pretzel replied to Pretzel's topic in Build Threads Requireing Maintenance
Here is some updates. Changed the gauge of the wires to a 14. LOVE IT. Thanks for the advice. Looks way better. Scope rail created from a 1/16'' thick aluminum sheet. More mounting. It's coming together. Suggestions, Criticism and Comments please. Plan on getting some brass screws for the scope, and will be sanding a lot of the parts soon for paint prep. -
Doopy's E-11 Blaster Kit Build Thread
Pretzel replied to Pretzel's topic in Build Threads Requireing Maintenance
Thanks for the crit. I believe I have a dfferent gauge about half of the current size. This is why I post photos. Thanks. I am not sure what you mean? The front half is the resin. I just cut off the static counter in its place of a real one. -
Doopy's E-11 Blaster Kit Build Thread
Pretzel replied to Pretzel's topic in Build Threads Requireing Maintenance
Correct Kevin! It will look like welds after I finish fine tuning it. Thanks! -
Doopy's E-11 Blaster Kit Build Thread
Pretzel replied to Pretzel's topic in Build Threads Requireing Maintenance
Here we go. Time for that "Green Stuff" and adding the coils to the power cylinder. Sent from my LG-H810 using Tapatalk -
Doopy's E-11 Blaster Kit Build Thread
Pretzel replied to Pretzel's topic in Build Threads Requireing Maintenance
That is going to be the real test. But I think from what I felt with just one... 3 are going to be super sturdy. I do not see this coming apart when in a Holster. But when that day comes, I will make sure to test and make changes accordingly. -
Doopy's E-11 Blaster Kit Build Thread
Pretzel replied to Pretzel's topic in Build Threads Requireing Maintenance
Thanks Carl, Figured it might give a little extra mounting power with a fridge magnet. -
Doopy's E-11 Blaster Kit Build Thread
Pretzel replied to Pretzel's topic in Build Threads Requireing Maintenance
Mods!!! Mods!!! Here is my counter magnet mod. I think this will work for a good mount. As you hopefully can see... I hollowed out a little bit of the resin and attached the counter. In the counter, I attached a simple refrigerator magnet and cut it to shape and applied apoxy on the side of the counter. I bought some super magnets (from the home depot) and applied them to the magnet and inside the resin and on the refrigerator magnet. You may notice small holes drilled inside the resin. They are little pockets for the magnets. The appoxy is strong enough to hold the magnets, and still make contact with the 3 magnets on the counter. I can simply slide off the cover or detach the counter itself to change the numbers manually if I wish at a later time. That's it for now! Sent from my LG-H810 using Tapatalk -
Doopy's E-11 Blaster Kit Build Thread
Pretzel replied to Pretzel's topic in Build Threads Requireing Maintenance
It's going to be interesting Sith Lord. I will keep you updated. But I glued a piece of magnet on the rear of the counter (that comes out) Bought some super magnets and will attempt to mount the counter with the resin block. I think I stated this earlier, but if I succeed at this mount, I plan on changing the numbers with my TK number (once approved). That way I can change the numbers manually again. -
Doopy's E-11 Blaster Kit Build Thread
Pretzel replied to Pretzel's topic in Build Threads Requireing Maintenance
Not sure why Bird is commenting with his stuff on my thread, lol.. but no, not related. The counter came with the kit I bought from a garrison buddy. -
Doopy's E-11 Blaster Kit Build Thread
Pretzel replied to Pretzel's topic in Build Threads Requireing Maintenance
Pictures... the right way. It was a browser issue. Here is everything top date: (my local "Cadet #" for Garrison Caridia) (REAL SCREWS) (The bolt inside is actually a plastic spool) That is it for now! -
Doopy's E-11 Blaster Kit Build Thread
Pretzel replied to Pretzel's topic in Build Threads Requireing Maintenance
I did try that. I am starting to think my browser is out of date. I will try to update this on my personal PC when I get home tonight. (work browser is very old) -
My Daughter's Blaster not a build, but NEW T-TRACK SUPPLIER?
Pretzel replied to gazmosis's topic in ANH BlasTech E11
That's amazing. What paint did you use for all of it? Making my own and need some paint references. -
Doopy's E-11 Blaster Kit Build Thread
Pretzel replied to Pretzel's topic in Build Threads Requireing Maintenance
Update #2 Today me and the old man met up and had some father and son bonding. This is my very 1st build, and the old man has a lot of experience in this department. Today we tackled the end cap, magazine, magazine well, & fine tuned the trigger and did some light mounting. The future? I plan to remove the static counter and replace it with a real counter. I do have a question or open to suggestions on how to mount it. I would like to use a thin piece of ply wood and place it over the opening of the real counter and use some sort of adhesive magnets to meet the counter with the resin. What type of magnets would I use here to guarantee a sturdy hold? I'd like to get in their one day when I receive my TK number down the road Photos on my photobucket for reference: http://s18photobucket.com/user/Razgriz1988/E-11%20Blaster%20Build (REALLY TRYING TO GET THE PHOTOBUCKET LINK TO WORK, BUT IT IS REALLY FRUSTRATING) -
Doopy's E-11 Blaster Kit Build Thread
Pretzel replied to Pretzel's topic in Build Threads Requireing Maintenance
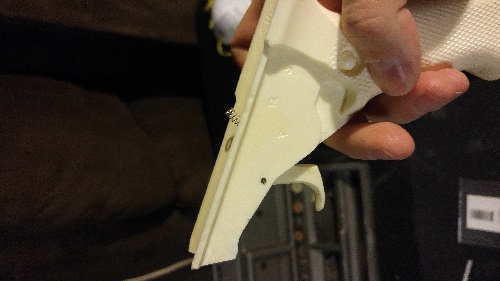
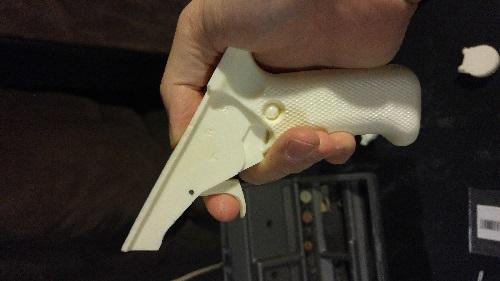
Photos! As you can see... (hopefully) I placed a spring at the top, and will be placing a screw to hold the spring in place. It feels like an actual trigger!
-
:blink: my god... he will probably sell it too.. lol that's the sad truth.
-
Doopy's E-11 Blaster Kit Build Thread
Pretzel replied to Pretzel's topic in Build Threads Requireing Maintenance
UPDATE: Began on the build, and have a working trigger with spring. I must say, it is nice, but I can't wait for the crit from you all ;P I'd post pics.. but my phone died on me. stay tuned for some pics when I get a replacement phone. -
Doopy's E-11 Blaster Kit Build Thread
Pretzel replied to Pretzel's topic in Build Threads Requireing Maintenance
Appreciate that! Wash and Drilling begins tomorrow! -
Doopy's E-11 Blaster Kit Build Thread
Pretzel replied to Pretzel's topic in Build Threads Requireing Maintenance
Thanks for the best wishes. Guessing this spring normally doesn't come with the kit... lol