

eqdizzle
-
Posts
342 -
Joined
-
Last visited
Content Type
Profiles
Forums
Gallery
Articles
Everything posted by eqdizzle
-
BTW...there is a CRL for this character...on the RL board. This version of Rex is not 501st eligible. Here's one that is approved for COR: http://www.forum.rebellegion.com/forum/costume.php?mode=view&c=11855&bu=coslist.php%3Fview%3Dmy&bl=Back+to+my+costumes Now that being said, he had to mod a lot of his parts. If you're doing an armor kit...color me excited! Looks like a great start thus far!
-
Sanding the sludge and applying the finish putty. And then more sanding!! Same thing on the left bicep Getting the ab ready to go. Trying to get this sized first since everything else lays on top of it. In looking at references, there is a notch line vertically where the segment ends, so I will be able to hide the connection and still be accurate.
-
Thighs with 1st application of sludge. Shims on greaves sludged bicep
-
Elastic will be grey matching references, while the soles will be flat (no heel) and black. We'll get a chance to review them before final shipping. If I could be involved in the CRL discussion, I'd love a chance to do so!
-
Hey all! I have been working with the guys from Imperialboots to get a Boot for the Rebels TK produced. I have sent them reference pics for the boot, showing the differences in the sole and elastic and they feel that this is a go. They will need at least 5 Troopers to commit to ordering to make this reasonable for them to produce. They're looking at making these for the same price as their Magma Trooper boots, $89.90 + shipping, and will combine shipping for group purchases. I do not work for Imperialboots and I am not taking any money!! I am simply trying to gather interest to make the creation of these boots a reality and help my fellow costumers along the way!! Post here and PM me if you're interested in pursuing this further!
-
A tiny bit of work today: Did some sludging of joints today. I like to start with Tape on either side of the joint so I can be messy, without being messy!! Apply the sludge into the crevice And peel away the evidence that you weren't careful!!! I also had to shim my biceps out a touch. This will need to be filled to be smooth. Cutting a small strip of shim material (about same thickness of the armor), overhanging edges to create return edges. Scratch and CA glue, clamp and dry! Stay tuned!!!
-

CptCasey's ANH Stunt Build Thread [MTK]
eqdizzle replied to CptCasey's topic in Build Threads Requireing Maintenance
70th Member stopping in to say hi and follow! Looks good! -
Exactly...cure time, strength of bond, a lot less noxious smell, ETC. I used Zap-A-Gap CA glue and Zip Kicker on my Clone, and this is a similar build method. I hope to have some more time to work on this over the weekend...!
-
Send Walt a PM! I got the flashing trimmed off the pieces this weekend using a Dremel with a sanding drum...just like butta! After sizing up a few of the pieces, I cut interior shims for a few of the pieces out of thin plastic sign material. Size up the shim to be the exact length to fit inside the edge of the armor piece. It should end just at the beginning of the return edge, otherwise you'll have issues getting a flat and tight fit. Scratch up the inside of the armor piece and the entire shim piece with 60 Grit (or other coarse grit) sandpaper to increase surface area for adhesion. Wipe all surfaces with rubbing alcohol and let dry for a few minutes. Test fit your shim again. If good, proceed, if not, trim accordingly until you have a clean fit. Spread CA glue liberally on one half of the shim. Slide it into place to spread out the glue a bit, and hold in place with clamps. Leave about half of the edge exposed to be used as the join for the other half of the armor. Let it cure for a while. Work on another piece of armor!! Once you're ready to do the other side, check your shims to make sure that the entire piece is securely held on the armor. If this is secure, proceed, otherwise spot glue and clamp until it is locked in place. Make sure the other side is sanded on the gluing surface and wiped with rubbing alcohol. Liberally glue the remaining shim surface and slide into place. Clamp the top and bottom near the ends and hold the pieces together with some pressure using your fingers. BE SURE TO MOVE YOUR HANDS OCCASIONALLY SO YOU DON'T GLUE YOURSELF TO THE ARMOR!!! Hold for a few minutes until this is set firmly. Let it cure for a while longer, and come back to it. Finally, test fit the other side. If you hear popping when you bend it shut, use a heat gun (from the inside!!!) to soften the already joined shim before bending into place. Repeat the steps above to finish gluing your shims. Once this is cured, you're ready for SLUDGE!!
-
Use the standard Bondo 2-part body filler if you're going Bondo. Better yet, save your trimmings and do Sludge instead. It does take longer, but it looks and lasts a LOT longer if done correctly. Since it's essentially the same material as the armor, it has similar flex, expansion, and contraction characteristics as the armor itself. Bondo will eventually crack and require a full cleanup/overhaul..!
-
It's definitely a thing! I have a plan of attack now...will be cleaning up edges, cutting shim strips, and getting sludge ready...!
-
I have a tracking number. This may be a thing...!
-
I'm in that dreaded "hurry up and wait" period now...
-
kind of like a pug, huh?
-
Still waiting on armor to arrive, but that has given me time to work on the E-11: cleaned up the rail ridge, filled screw holes etc, and added a 3v 5mm red LED in the barrel with a momentary microswitch in the trigger. The power cell area is removable to allow changing of batteries. Sorry for the extreme shadows in the pics, but I hope the images are able to come through!!
-
Stormtrooper Cadets?
eqdizzle replied to The Anonymous Egyptian's topic in Other Non-Approved Star Wars Costumes
We have Clones that are part of other Detachments as well. I think the reasoning has more to do with the costumes appearing to be more similar (in this case, mostly soft parts). I'm not saying I 100% agree with it, but I at least understand the logic. -
New armour build Star Wars Rebels TK
eqdizzle replied to Fem Kat Rebel TK's topic in Build Threads Requireing Maintenance
You're correct...the Rebels TK is every bit as canon as the ANH Stunt, but we'll need good 360* reference shots, and full CRL text with individual part pictures. I've helped create the CRLs for Commander Appo, the 501st grunt for CTN and the Death Watch Airborne for the BHG (new to Legion). Please let me know how I can help bring this one to life as well..! -
I don't think GZ is active at the moment, which is the primary reason that I picked up the 2nd hand one. Talon/TZA is doing a full kit run that includes his version of the bucket. Both buckets seem to have some advantages...! **edit** In other news, the payment was made for the armor kit...so this looks to be a thing. And I suppose if I got tan, shaved my dome, and got a white beard, I could go all Rex in TK disguise while I'm at it..!
-
Stormtrooper Cadets?
eqdizzle replied to The Anonymous Egyptian's topic in Other Non-Approved Star Wars Costumes
The Fierfek rig is very nice. I picked up one of those a bit back and am working on the Ezra scheme at the moment. VERY clean cast. -
Thanks again for the help, mate!
-
Padding and fans in the bucket...and the armor once it arrives!!
-
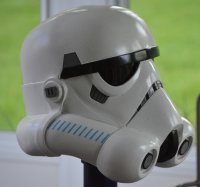
Stripes, mesh behind the teeth, lenses, weather stripping on the bottom..!
-
Messed up painting! Help!
eqdizzle replied to The Anonymous Egyptian's topic in Assembly, Mods, and Painting
don't use acetone..!! -
New armour build Star Wars Rebels TK
eqdizzle replied to Fem Kat Rebel TK's topic in Build Threads Requireing Maintenance
Great work! I agree with you on HIPS being a bit easier to work with. If I can give you any advice...reinforce it...! You WILL have cracking as you wear it. Fiberglass mesh tape with epoxy at the edges, especially at the big lines. I'd bug Darth Aloha about getting a CRL discussion started as well! I'll be joining you in Animated TK building soon!!! -
I have a Grand Zillo that I got second hand and am in the process of refurbishing. TZA (Talon) is also creating the full kit, including a helmet.
