

eqdizzle
-
Posts
342 -
Joined
-
Last visited
Content Type
Profiles
Forums
Gallery
Articles
Everything posted by eqdizzle
-
Typically you'll see the CRL being published once there is a tentative approval from the LMO and DL. It will require a full costume that is up to spec for front and back, and all individual parts.
-
Upper body strapping. Permanently attached on back, dual snaps on front. A "V" made from two 1" webbing straps from the shoulder bridge to the bells. 2" webbing from the inside of the bicep to inside of the bell, E6000 permanently attached. Cody for scale. Shoulder bell padding. Just enough to get the "float" visible in the animation. closeup of 2" webbing from bicep to bell. I tried snaps here first, but they kept failing. This also makes the indents line up better and much more easily.l
-
Some tweaking needs to happen, but I got my upper strapping figured out. Big thanks to Gary for help in figuring out some stuff..!
-
I'll call you this evening! Thank you, Sir!
-
Excellent! Let me know if/when you're ready to go through the pieces!!
-
Tape removed, black outline added, and "buttons" painted. I'll let this rest a bit before adding the weathering and sealant.
-
Negative, negative. Just impacted on the surface.
-
hit it with 60-grit sand paper until the excess is gone and you have a nice, sharp edge. Follow up with higher grit to sand away the scratch lines. Wash, let dry, tape the bolt threads, and prime. This time I'm going to do a gray underlayer using Satin Granite. I'll be able to recoat a touch faster than with the white gloss, and I'll have less to tape by making a negative stencil.
-
Decided to rebuild the TD, so I figure I might as well document it a bit better. 7" section (this time) of the 2.5" electrical PVC (found at Home Depot, Lowe's, etc) with 1" 1/4-20 flat head screws with 4-1/4" washers to space it. Dabs of epoxy between each washer, then all over the top on the inside. Allow to cure. Threaded end sticking through Trace the outside of each side on a thin piece of sign material. The thinner the better!! Cut OUTSIDE the lines. Sand the inside of the cutout disc to allow better adhesion. Apply a bead of CA glue to the rim of the PVC. Apply the disc with the sanded side (I used the printed side) to the rim. Flip and use the weight of the tube to create some pressure. Let cure. Repeat for the other side. You should have a tight connection. Next up we'll sand down the excess and prep for paint...!
-
adblock plus helps tremendously. Free to download
-
I spoke to Walt on the phone a few weeks back. He's wanting to set up a time to do a video chat to go over the parts and suggest changes. There are more than a few with the original kit...! It sounds like he is more than willing to make this kit easier for future builders and correct some of the alpha-stage issues, so I'm definitely excited about that. I told him my idea for crafting the TD and drop boxes. I'm thinking I'll be happier with self-built just to get the sharper lines.
-
I decided to make my own TD which I feel looks more like what's on the show. I used an 8" piece of 2.5" ID PVC electrical conduit, and used it to trace two circles on a piece of thin circles out of a piece of sign material. While the ends were still open, I drilled two holes and added two 1" 1/4-20 bolts with some washers on the inside and secured, threaded side sticking out. I cut the sign material slightly larger than the circle and glued one circle to each end. Once the glue has cured, I sanded down using a piece of 60-grit to get the nice sharp edges. Hit it again with some higher grit sandpaper to remove any lines. Rinse, prime and paint! Next up is the detail painting..! Edit....maybe too big?
-
Shins: Got about halfway done with these before I saw how yellow they were coming out again. I'll try to get individual parts pics in a more natural light so they don't look quite so cafe au lait.
-
Bucket: Hands and Gloves: Thighs:
-
Chest: Back: Ab/Kidney: Straps: Bells: Biceps: Hand backs and gloves:
-
Thanks, Brother!
-
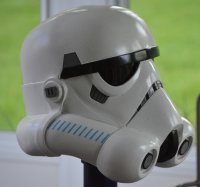
I have everything done with the exception of the TD and the Drop Boxes...which I'm STILL waiting for. The left thigh has the white gloss paint, which I want to let cure for a few more days before I do the weathering. The TZA helmet is also done and I'm getting ready to begin the strapping shortly. I filled in the indents and decided to paint rather than use the decals. I also thinned out the eyes to match the on screen references a bit better. Thanks for checking in! I haven't forgotten about it..!!
-
The opera gloves I got were about half the price of the Nomex gloves I use for my CT, so bear that in mind as well. They definitely look more like the show than the multi-textured Nomex ones. Search "AveryDance Wrist Length Lycra Spandex Golves Halloween Costumes " on that website that begins with A and you'll find what I am using.
-
shimming the left shin armor. I added a triangular piece to match visual references (sloped drop-off in side views) and did a bit of shaping to the top, as it scallops a bit at the sides. Sludge coming up soon!!
-
edited CRL post to move weathering to Level 2, along with a couple of other tweaks.
-
Lookie what I found..!!
-
I have to go back to what I wrote there, but I *think* I took it off the reference material without even looking at what I have on the actual armor piece. Perfect, thanks. That's what I was leaning towards so it's good that there is some reasonable accommodation that can be made. **edit** You're spot-on, ramey. Jim's kit only has the 11, so adding one to each side will work perfectly.
-
So TK experts, I need some help. Should I add one more belt segment per side or just continue the unsegmented part into the shim? If I add the segments, it will look better IMHO, but I'll have the incorrect number of segments vs. the TV show. Thoughts? DL?
-
Progress report. Still don't have the boots (stuck on the slowest boat from China. I've been tracking them every day for over 3 weeks!!), the drop boxes or the TD. Biceps and forearms before the gloss coat. How I'm tackling the TK butt. I am very strongly thinking I'm going to treat this much like my Clone...butt, cod, ab, kidney all go on as a single complex. I'm adding the upward swoop of the butt area and shimming out the belt slightly. I'll have to fiddle with where the segmented parts of the belt and and the smooth section begins...!
-
They do flap outward on the show. I'm thinking a 2" wide web or elastic strap?

