

eqdizzle
-
Posts
342 -
Joined
-
Last visited
Content Type
Profiles
Forums
Gallery
Articles
Everything posted by eqdizzle
-
Blown up these look a little blurry. I'll probably retake them again New shots added above.
-
Thigh Armor: Lower Leg Armor: Boots: E-11:
-
Back Armor: Stand by Abdomen/Kidney Armor: Posterior Armor/Belt Rear: Cod Armor/Belt Front Drop Boxes: Thermal Detonator:
-
Forearm Armor: Handplates: Gloves: Generic black gloves picture Chest Armor:
-
Shoulder Armor: Upper Arm Armor:
-
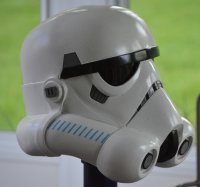
Helmet: Neck Seal/balaclava: Nothing specific, use generic balaclava pic Undersuit: Generic black compression Shoulder straps:
-
You won't be able to see it unless you're a GML or a DL/XO.
-
Roger that. Stand by
-
I'll take pics of the parts over the weekend with the DSLR over a neutral background. Do you have a box or something to which I can post them?
-
Dark CMF started the CRL discussion way back when on which I wrote a draft and we've had some discussions since. Having completed the suit, there are likely some tweaks that need to happen to the language, but I'm happy to help as much or as little as you see fit to help complete it. I'm waiting for one of our GMLs to post the request in the no crl thread on the big board. I can get some individual shots of parts together for you as well. More than anything else, I want to see this costume get acceptance and help others who wish to build it be successful.
-
I'll need to work on this pose as well, because, cannon.
-
This is the 2nd New-to-Legion costume I've worked on (first one being the Death Watch Airborne, Type B), so definitely happy to let the process play out at the Detachment and Legion Level. I'll look at getting a white beard in the meantime since I'm more the build of "Old Rex"
-
Pics just sent off to the GML. And now the fun begins!
-
weathering and pencil lines added. I may want to tweak the bell elastic in the left one a bit to get it more snug at the bottom. Attach the straps and should be ready for Freddy.
-
Legs were sliced in the back at the indent to hide the trap door. I used ~ 1.5" strip of very thin sign material. Flexibility is key. This was glued in on one side only. I don't think it matters too much which side you glue, but I chose the outside half of each leg (i.e., the right side on the right leg, left side on the left leg) on which to glue the floating shim. Once this is cured, I put a bead of E6000 down the outer edge of the floating shim for reinforcement. Let this dry as well. The top has a short piece of elastic CA glued to both sides to provide tension to hold the alignment properly. This should flex, but not much. The bulb area of the calf towards the top gets another piece of elastic, longer and with a bit more stretch. This will provide another bit of tension to hold the two halves together correctly, but still allow expansion enough to get your foot in an out. I highly recommend testing it without the elastic to visualize how much stretch you'll need before permanently gluing the elastic. Demonstration of the floating shim expanding to allow the foot through. This will prevent the need for a visible seam, and the easiest way to hide the trap door to match the on screen look. Hope this is helpful!!
-
This is the 2.5" OD electrical pipe I used. IIRC, this was 7.5" length. You could probably do 7 3/4" to 8" length and be ok
-
I think that's in the plans. I'm doing these based on time constraints and to give some alternative options for those with Jim's kit. Ideally you wouldn't have to craft quite so much in a ready to build kit, so I'm sure that's what Walt intends for future runs.
-
Test fitting the straps. I'll need to figure out exactly how I'm attaching these, as I'll need to disconnect at least one side to be able to get the armor on and off. Thinking of doing permanent attachment in the front and magnets or velcro in the back. I'll play around with this bit and see what looks and holds the best.
-
Legs! Paint is curing on these, since the gloss paint has some self-leveling conditioners added that make it dry much more slowly than the flat varieties. Weathering coming on the drop boxes and updated straps. More coming soon!
-
I think you're looking pretty good, Brother! Replacement legs just got the white gloss paint upon it, so I've got to let it cure for a bit before weathering.
-
lower legs are getting a thin bondo coat after a couple of layers of sludge and a lot of sanding. But in the meantime... Drop boxes and remade straps. Drop boxes are a piece of prime pine that was planed down to remove about 1/4" off the overall width. This delivers the right sharpness of corners that I was looking for. I hit the wood with a few layers of primer, followed by 0000 steel wool, followed by 2 more layers of primer, followed by more steel wool, followed by more primer until the wood grain all but disappears. straps are pieces of HIPS scrap that Walt sent with the legs. These were heated with a heat gun and bent around a gallon can of paint to get them in position. I also used some sandpaper to bevel the outside edges a bit to grab some detail shown on the references. IMHO, Jim's were too long and too thick against the references. On these, I'll be able to pencil in the details and get them to end and begin at the correct positions on the back and chest armors.
-
You could really do either. I felt the grooves would be harder to get the paint to land right than the flat surface, so I didn't attempt it. Plus the pencil is so darn easy and looks right...!
-
Nicely done, brother! You doing the pencil in the indents?
-
Received the updated calves from Walt the other day and wanted to show a side by side for anyone who has the original version of the armor. I was never able to get the original ones closed without pinching my legs. The new ones are definitely longer and wider, and are a much sharper pull in the details. These are in the prototype stage at the moment, so I'll be working out any kinks in building and report back to Walt to make the final versions as great as they can be. These fit my legs without shimming, albeit in a tight manner. I decided to add some shimming to give some "float" and make the rear trap stay closed even when moving. First layer of sludge down on the shims, but I'll be working on these over the weekend and should be able to begin painting within the week or so..!
-
Yes, I'm in contact with Walt, giving recommendations on updates. I need to expand the calves a second time so it will be a bit. I think we're all in agreement that we'd rather have it done right rather than quickly...!

