
.jpeg.ff3078cf696d324fa576c149490ede78.jpeg)
themaninthesuitcase
-
Posts
5,295 -
Joined
-
Last visited
-
Days Won
95
Content Type
Profiles
Forums
Gallery
Articles
Everything posted by themaninthesuitcase
-
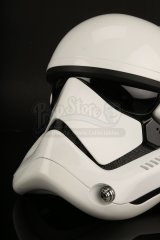
From the album: TLJ Helmet - Prop Store Auction
-
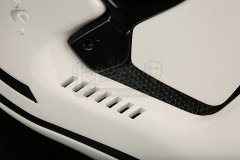
From the album: TLJ Helmet - Prop Store Auction
-
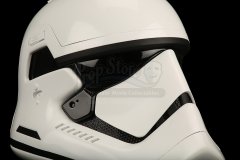
From the album: TLJ Helmet - Prop Store Auction
-
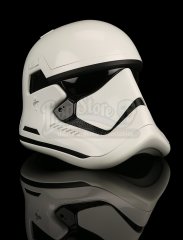
From the album: TLJ Helmet - Prop Store Auction
-
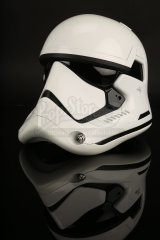
From the album: TLJ Helmet - Prop Store Auction
-

MintImperial’s Newbie WTF TK Build
themaninthesuitcase replied to MintImperial's topic in ANH Build Threads
Hemel, been here for a few years now but I still don't really know the area very well! -
MintImperial’s Newbie WTF TK Build
themaninthesuitcase replied to MintImperial's topic in ANH Build Threads
That belt will be over kill, I just use a belt I made with some 1” webbing. It sits on my hips and holds everything just fine. There isn’t much stress on the belt, the thighs aren’t heavy. -
Took the whole head assembly apart, it was a real mess. The heat block and sensors are done and need to be replaced. The heat break I was able to remove which is nice as it's a titanium one, needs some more cleaning the PETG out of the threads though. The heat sink was covered in thermal compound but cleaned up really nice with some IPA. I have a spare heat block I could use but I'll need to order sensors anyway so I'll get a nice new one. I have the steel heat break that came with the kit last year as well so I have choices. Once the new parts arrive I'll need to rebuild the printer with some new plastics I printed in Galaxy Black for added sparkle and get it all calibrated and running again.
-
Is there something you need assistance with? If so feel free to message one of us.
-
As far as I am aware the only real use of the SE-14R was the promo images so it never really had a chance to get knocked about. Then again you seem some E-11s that look like they've been dragged behind a speeder (which is not exactly my personal preference) so it's owners choice to a certain extent.
-
I have a few spare hot end parts, like a .4, .6 nozzle, the old heat block and a few others so may be able to get up and running with what I have, depends how caked in filament the sensors are really.
-
I was going to print the end cap tomorrow but instead I looked into why there was filament dripping from the hot end. Apparently the heat block has worked looks, or the nozzle, or maybe both. The end result is filament has been leaking through the top of the heat block and generally making a mess. I’ll need to strip, rebuild and maybe replace some components. This will be a rather time consuming job and I’m not exactly sure when I’ll fit this in.
-
Iteration #712 (actually v12 according to fusion but that's 12 saves for all the mods, but most are this) Top: last version Bottom: new version Not a huge amount of changes Moved the whole cocking slide down a fraction as it was a shade too close to the top/rear sight cut out. It is now about the same gap as the TFA source STL, +-"0.no one cares" mm. Extended the cocking slide so it's only 1mm from the Hengstler mount. There is a 45° chamfer at the end to help with printing, and also blend in the end a little so it's less abrupt. I added some more holes for my wiring setup. (there is a version with out all these) Pretty happy with this now. If anyone else wants them I will publish but for now I'll wait for a 2nd set of eyes to check my work.
-
Hot off the press: Seems good, though I'm going to extend the cocking slot to be around 1-2mm from the mount for the Hengstler, so around 1/2-1/4 of the current gap. Currently it's about flush with the end of the counter so it will probably be a little ugly, and extending it will hide that join. It's hard to see on the reference exactly how far this goes but "behind" the Hengstler seems a reasonable guess from what I can see. And roughly assembled for some context: Finally old (with primer) vs new (printer fresh) The sizes for the slot were all measured off the old print so are all the same +-0.5mm.
-
This update is based on this thread: I've spent some time this evening editing the @The5thHorseman files to update them to TLJ specs. I've used Fusion 360 to do this with the new mesh workspace updates. This wasn't too bad, having access to the source objects or STEP files would be better but the new space is pretty good. Previously I used Meshmixer for things like this but it's now discontinued and the features are being added to Fusion. This actually makes things a lot easier as I have access to the normal modelling tools to make the objects to amend the mesh's with in the same workspace. It also seems to crash less. Some edits are basically invisible and you won't notice any of them as edits, others required me "fudging" things a little so there are small flaws but I doubt they will even show on a print. Time will tell on that. First up 2 extra holes in the front barrel, I have already drilled mine out so I may or may not actually print this one out as I'll also need to reprint the fins. Next the end cap. The TLJ version has the recessed section top completely removed. There are a few flaws to this one but they don't seem to show up in the slicer. The end clip is squared off. I'm not sure I have this correct as this change has the worst visibility in the reference. The biggest change is the rear barrel. The cocking slide has moved from the left to the right, the handle is not needed anymore, the "ring" around the barrel is also removed. This was the most fiddly and required making a few shapes to fill the old slide and ring, and also cut out the new slide in the right place. I also removed the internal feature from the old cocking slide and added it to the right for the new one. There are also some, but not all, the holes needed for my electronics, 1 hole I'll need to drill still as lining it up is awkward. The flaws on this one also seem to not be showing in there slicer. I'll start printing tomorrow if time allows.
-
TLJ / TROS CRL Update Work Flow
themaninthesuitcase replied to ukswrath's topic in Hard Armor (General Discussion)
Just been through all the brilliant images Glen posted to try and break down to a "final" list of differences that need to be applied to a TFA Standard F-11D to make it closer to a TLJ/TROS(?). I've not looked at the Heavy variant, but there looks like less/no real changes there. Changes to be made to a TFA F-11D to make it TLJ. D ring mount painted white not silver (metal) Rectangular D ring ( TFA not present) No cocking lever Cocking lever channel has swapped sides, now on right (same side as Hengstler) End cap full cut out on top front edge, not just a recess. Additional holes on top of front barrel at front and rear ~11mm diameter Picatinny rail and mount bracket on front barrel right side approx. half way down. "Dipped" ring into rear barrel just behind Hengstler removed. End cap clip squared off at end cap end. Edit: front sight is painted black not silver I believe that is everything spotted above. Looking at the image with the title "TROS No holes in top of barrel" I wonder if these are TFA style blasters as the cocking lever is back on the left, and there are no additional barrel holes. The only other "easy" to see tell would be the D ring boss and that's not visible. I've started on updating the Standard variant Horseman files as needed for this already (will post in my WIP when done) -
Kind of surprised this ones flown under the radar so long here! I've been enjoying the videos and am about half way the the Enterprise D build as well now. I see you have a WIP in the UKG to, they will ensure you end up trooping fit.
-
TLJ / TROS CRL Update Work Flow
themaninthesuitcase replied to ukswrath's topic in Hard Armor (General Discussion)
FWIW the5thhorseman 3d file from here are TFA. to make it TLJ I drilled out the extra 2 holes and made a picatinny rail attachment. I hadn't noticed the lack of cocking handle but that will save me some painting. -
That is actually a good idea, I didn't even think of that. However there is only one screw so it would spin I'll remember that though, screws are cheaper than magnets!
-
Build log - the new JMC E-11 from TroopaCoola
themaninthesuitcase replied to CableGuy's topic in ANH BlasTech E11
Confidence and ability come from a big pile of mistakes in my experience. You should see my "failures" pile in my work room! -
One of the many things that I've been doing over the last 18 months, not this clearly, is electronics projects. So rather than messing about with strip board for the electronics on this I've designed a board. Nothing to complex, just a simple hub that makes connecting it all up easier and means I have something to put the LEDs on. I ran a quick test of the LEDS and battery I plan to use and its all very bright. I actually swapped from these clear LEDs to some red colour ones after this as they better diffuse the light so should light up more evenly, and are even brighter. The button will be behind the main trigger so I can easily use the torch for short periods of time and not worry about battery too much. The red LEDs are pretty bright, but hopefully the paint will stop them shining through the resin parts! I have been trying to paint some of the blaster parts over the summer but it seemed I was inept and managed to drop parts with wet paint into the mud, on the floor and scratch bits that are done. I'll get there eventually, I just hate painting.
-
Account deleted as requested.
-
The batteries are also powering the Pi? So when both fans are off you have no power at all. Current will be what it needs on the fan. If you apply 5v it will draw as much as it takes to spin up. I’m not exactly sure what the aim is here. If you describe what the goal is then maybe we can figure it out. If needed we can start drawing a proper schematic. Feel free to PM me if you want as well as I am about to heat to bed as it’s now tomorrow here.
-
Are the two lines next to the 14k the batteries? And the white lines switches? So when you switch the switch you apply current to the base and so the fan turns on? So seems okay ish. Not sure what the two potential dividers are doing for the 2.6v though. Could be that that’s the issue.
-
You really did a great job on this one Justin. Easily the smoothest merch group run I’ve done on my end. The packing was awesome and really made the local distribution easier. The stamp was also cool
