


ukswrath
-
Posts
14,622 -
Joined
-
Last visited
-
Days Won
180
Content Type
Profiles
Forums
Gallery
Articles
Everything posted by ukswrath
-
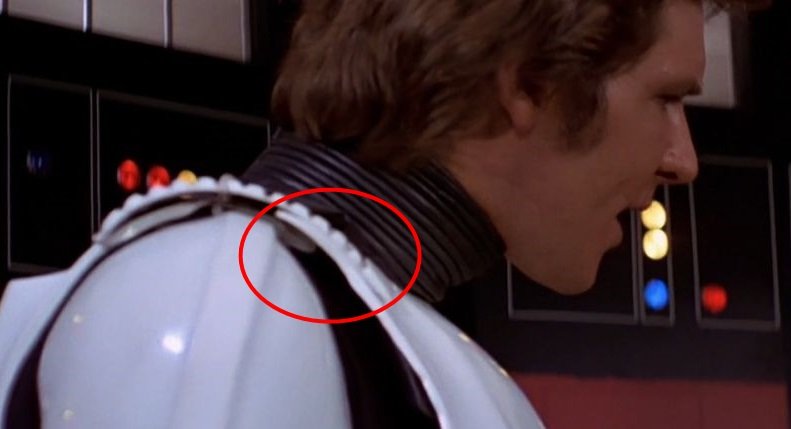
Hey Jim looking good brother. Let me make a suggestion, I know you have thick shoulder however, regarding the shoulder covers there should be 4-5 ribs on the chest plate. In one image (left shoulder) you appear to have plenty of room to pull this off, on the right side not so much. If you have the room I suggest re positioning the covers as seen in this reference photo.
-
No worries Paul, and shall do After considering if having to add shims the rivet placement could be a factor here however, at the time of approval the applicant would need to have all his ducks in a row., including rivet alignment. That said, let's first establish a reason for the four rivets. Are they securing the waist belt to the kidney and possibly the posterior, are they giving the waist belt some strength, both, or are they merely cosmetic? Since we really don't know, to simplify to situation why don't we just state "There are to be four rivets or rivet like buttons with roughly 4mm heads, painted the same color as the belt, and positioned in a rectangular pattern on each side of the Thermal Detonator."
-
And that's why we have this thread .
-
Good observation
-
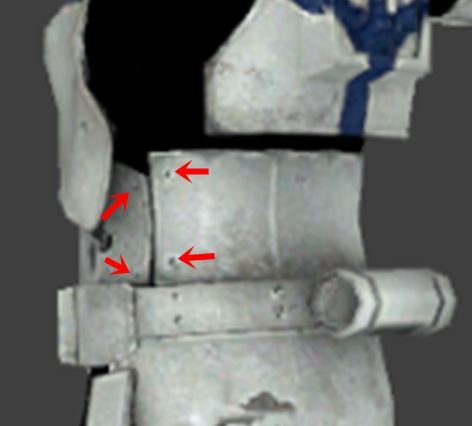
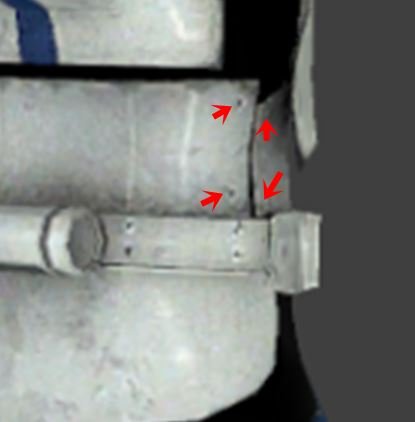
If we use standard TK armor measurements as a baseline looking at the following gallery photos and I'm thinking the rivets heads would be the standard size TK rivets. IMO, keeping them the same size as OT rivets would be a wise move As for their locations I'm guessing the upper Ab and kidney rivets would be roughly 25mm from the top edge and 20mm from the side seam. Since the TD is 70mm wide, and basing the comparison on that, I think those measurements are spot-on. The lowers would be a complete guess with the waist belt obstructing the lower armor edge view. My guess the lowers are roughly 80mm below the uppers, and 20mm from the Ab and Kidney seam. like the uppers. See above Only two rivets on each plate are seen so I'm assuming there wouldn't be much room for a 3rd . Agreed. The belt would cover it anyway, making it a bit superfluous. We'll also need to change the CRL regarding the 4 waist belt rivets on each side of the TD. The CRL description is vague. Based on the images, the outside rivets are definitely not "one inch from the ammo belt", but rather lined up with the ones on the kidney. The inside ones line up with the outside of the center ridge of the kidney. This may be a bit easier to follow for those aiming for L2 and 3
-
Copying from another thread. "If we use standard TK armor measurements as a baseline looking at the following gallery photos and I'm thinking the rivets heads would be the standard size TK rivets. As for their locations I'm guessing the upper Ab and kidney rivets would be roughly 25mm from the top edge and 20mm from the side seam. The lowers would be a complete guess with the waist belt obstructing the lower armor edge view. My guess the lowers are roughly 80mm below the uppers, and 20mm from the Ab and Kidney seam. like the uppers. Only two rivets on each plate are seen so I'm assuming there wouldn't be much room for a 3rd . We'll also need to change the CRL regarding the 4 waist belt rivets on each side of the TD. The CRL description is vague. "
-
This thread will be used for discussions regarding CRL updates for the Stomtrooper Commander. CRL - http://databank.501st.com/databank/Costuming:TK_commander High Res images - https://www.whitearmor.net/forum/topic/18019-high-resolution-stormtrooper-commander-images-32-images/
-
The entire armor is pretty much asymmetrical, or loaded with personality Thigh shape, absolutely normal. The following canon photos illustrate the position of the cover strip. Left Some builders like TM will curve their cover strip to follow the contour on the right thigh.
-
Excellent job!
-
LOL , I pretty sure when the plasti dip mfg states "apply in a well ventilated area" he's not referring to venting your room into the apartment itself. Nice work though
-
You're killing me smalls! Michael I think I said Anovos does a crappy job assembling the helmets and they need updates, but yea lol. Excellent work on those updates . Don't forget to change out the tip screens.
-
TK41774 requesting EIB status ANH STUNT (RS) [839]
ukswrath replied to vmax1974's topic in Request Expert Infantry Status
Excellent, see you then -
TK41774 requesting EIB status ANH STUNT (RS) [839]
ukswrath replied to vmax1974's topic in Request Expert Infantry Status
Hey Dave, welcome and thank you for your EIB application. Let's take a look. CRL and EIB Application Requirements: All required photos have been posted. Your armor displays all necessary elements as set forth in the level 2 CRL. Joseph and I would like to congratulate and welcome you to EI trooper. Other-Armor Fit/Assembly: In this section we review observations made by your fellow troopers and ourselves. Some observations may lead to suggestions to improve the overall look of your armor. If any suggestion affects any application, it will be listed separately in the above or below sections. We have a few areas to discuss so let's get started. As we go through these keep in mind the accuracy of your armor is ultimately up to you. 1. Starting with the helmet, not sure if it's just a photo issue however, the tear stripes appear to be thin and short compared to those seen in the reference photo provided. The frown should extend to the end of the mouth as seen in the reference photo provided, and lastly the tip screens should be metallic in color, again, as seen in the reference photo provided. Tears Frown Tip screens Reference photos Tears Frown Tip screens 2. As we move down, the shoulder bells should be almost touching your chest and back plates. Yours are looking pretty good yet if you remove more of the lower bell return edge this should draw them in even closer. Reference photo 3. Next up there should be minimal gap between the back and kidney plates. Tightening up the connecting should draw the two plates closer. Reference photo 5. We would like to see the Ab buttons cleaned up a bit. The edges are a bit rough. Reference photo 6. The upper waist belt ammo box should reside at or just below the lower Ab buttons. We're suggesting you adjust he belt placement. Reference photo 7. The cloth belt appears to be very thin and flimsy. So much your holster mounting hardware is ripping through it. We suggest you replace the belt with something stronger and a bit more rigid as seen in the provided reference photos below. *For the record if you choose to shoot for Centurion, at minimum we'll require you fix the mounting hardware tearing through the belt. Reference photos 8. Posterior should reside under the kidney plate. Tightening the strapping should resolve this. Reference photo 9. We know it's difficult t get the two sides together during assembly however, there shouldn't be a gap here. Were suggesting you fill the gap with ABS paste or at minimum place a piece of scrap material behind to conceal it. Reference photo 10. This goes for the rear as well, either conceal the gap or trim the return edge as seen in the reference photos. This next issue could just be a bad photo angle but it appears your cover strip is off center and angled inward on the right thigh (rear). It's off center compared to the left thigh. It looks as if the armor inner section was trimmed incorrectly. If this is the case there may not be much you can do at this point except replace the thigh however, if this this is a simple photo angle issue please disregard. Gap Cover strip angle Reference photos No lower gap and vertical cover strip Trimmed rear return edge option 11. Boots need to be touched up a bit, some areas are missing paint. Centurion Suggestions: In this section we prepare you the best we can for Centurion. If there are any areas of concern they will be discussed here. The left Ab to kidney gap is borderline acceptable. At EIB it is considered acceptable however, at Centurion there should be almost no gap at all. Tightening the connections in this area should resolve the issue. The CRL states: Level three certification (if applicable): Ideally there no gap between the abdomen and kidney armor. Reference photo The waist belt drop boxes are to be aligned with the outer edge on your ammo belt. We suggest gluing the drop box strapping to the cloth belt to help maintain alignment. The CRL states: Level three certification (if applicable): Drop boxes are vertically aligned with the end of the ammo belt with minimal gap between belt and box. Reference photo That's it. Great job. Congratulations once again and hope to see you at Centurion.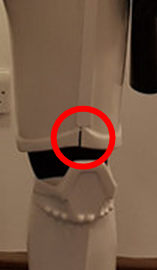
-
Cooling 101 love it
-
I'll take a look at some screen shots. Maybe I can come up with something
-
TK41774 requesting EIB status ANH STUNT (RS) [839]
ukswrath replied to vmax1974's topic in Request Expert Infantry Status
Yes perfect, nice job on those shims -
Mixing parts from different kits?
ukswrath replied to Weck's topic in Hard Armor (General Discussion)
Anytime -
Mixing parts from different kits?
ukswrath replied to Weck's topic in Hard Armor (General Discussion)
RS would probably be your closest bet considering Anovos has been accused of copying the RS armor -
TK41774 requesting EIB status ANH STUNT (RS) [839]
ukswrath replied to vmax1974's topic in Request Expert Infantry Status
One last request, please provide left and right side exterior photos of the added kidney shims please. Thanks again -
TK41774 requesting EIB status ANH STUNT (RS) [839]
ukswrath replied to vmax1974's topic in Request Expert Infantry Status
Thank you -
TK41774 requesting EIB status ANH STUNT (RS) [839]
ukswrath replied to vmax1974's topic in Request Expert Infantry Status
Hey Dave Joseph or myself will be with you shortly. While you;re waiting please post an action photo. Thanks -
Anzo's TFA FOTK/TLJ Executioner Builds (KB) aka the Terrible Twofer!
ukswrath replied to Anzo's topic in TFA Build Threads
Nice work AJ -
Thanks for your patience Zac Joseph or myself will be with you shortly
-
Electronics yes my fav
-
TK-10171 requesting ESB centurion status (AM2.0/TM) [403]
ukswrath replied to cjdesign's topic in Request Centurion Status
Alright Carl thank you for your Centurion application. Thank you for correcting your forearms and making the suggested repairs during your EI application. Let's get you approved shall we. CRL and Centurion Application Requirements: All required submission photos are present. Joseph and I would like to welcome you to Centurion. Great job on your AM build Carl Other-Armor Fit/Assembly: Only thing we have to add here is to watch the back to kidney to Back plate, and Kidney to Ab gap. There should be little to no gap. Other than that fantastic job on your build. Time to get out there representing the Empire
