

russellr2d2
-
Posts
369 -
Joined
-
Last visited
-
Days Won
2
Content Type
Profiles
Forums
Gallery
Articles
Everything posted by russellr2d2
-
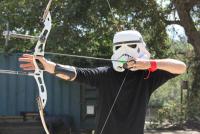
ATA Armor Build_My First TK
russellr2d2 replied to russellr2d2's topic in Build Threads Requireing Maintenance
Thank you! Today I visited the Orange County Squad which was having an armor party. Lots of building going in and I showed my armor to the guys. They approve. Uhhh I forgot to take pictures. [emoji37] EDIT! Ok one picture! But boy! what I missed....one guy brought a REAL MG32 machine gun...dang! it was heavy. And there I was munching on cookies and staring at it and never thinking of taking pictures! Sent from my iPhone using Tapatalk -
ATA Armor Build_My First TK
russellr2d2 replied to russellr2d2's topic in Build Threads Requireing Maintenance
Oh yea ...but just for basic approval and everyday use. THANKS! -
ATA Armor Build_My First TK
russellr2d2 replied to russellr2d2's topic in Build Threads Requireing Maintenance
Starting other pits and pieces: Hand guards get a plate inside that I THINK I will attach a pad of velcro. A velcro pad will be glued to the fabric back of the glove (basic approval). Thermal Detonator: At the hardware store they have scraps!! So try to find them (ask) before you buy a big length of pipe. I was GIVEN FREE a length of black pipe in the correct ATA diameter. Only problem was it was BLACK not GRAY. So I painted it. The pipe is really tight on the caps. I do not think I can get the caps on more than 10mm onto the pipe so, I cut the pipe short by 20mm. I will glue the caps on extended so they bring the total length to the required 7.5" This is a dark gray Rustoleum gray primer. I think I will leave it flat gray....looks cool esp. in contrast to all the shiny white armor. I used a blue tape to make a nice line to follow with a knife to score the plastic for snapping apart. The caps are 25mm tall. -
ATA Armor Build_My First TK
russellr2d2 replied to russellr2d2's topic in Build Threads Requireing Maintenance
Here is the armor all strapped up!! (I noticed in the photos one of my shins pulled up high off my boot!...maybe elastic stirrups?) The black gaps at the shoulders seemed to migrate a bit as you moved around. I also found that the gap depended on how far forward I rotated my bicep. If I rotated my bicep forward it would close up the gap at the bell/chest area. Rotate it backward and it would open up. I think in this photo my left arm is just bent a little more than the right so the gaps are different. But my OCD eye goes right to that spot anyway! YOU! Jawa come over here...NOW! What was nice was the shoulder bells would go right back to their place even if I raised my arms up and down several times. (happy-happy!) Taking this to the armor party tomorrow and try it out on the guys... -
ATA Armor Build_My First TK
russellr2d2 replied to russellr2d2's topic in Build Threads Requireing Maintenance
FITTING SHOULDERS: I made a strap with a snap only on the bell end so far. The loose end I used a CLECO CLAMP (you can use any clamp or a safety pin, or tape). I put the tip of the shoulder bell about 1/4" away from the shoulder strap so it will pull the bell up close and tight to the chest armor. Here is how it looks clamped up. In the photo the strap did not get set quite 1/4" but good for a test fit. Here are both shoulder bells clamped on for a test fit. Know i know how long a strap I want before I put in the final snap. The bell strap will be very short to bring the bell tip right up to the shoulder strap...1/4" gap is all. In the photo I have my right side better clamped. You can see the bells is tighter. ANY RECOMMENDATIONS HERE FELLOW TROOPERS??? -
@ukswrath You know me brother! Sent from my iPhone using Tapatalk
-
I have made a few scratches in my armor, even some tiny cuts. I found you can rub the back of your fingernail really hard on them back and forth and it closes them up. Something to try while you work...cause you will scratch/cut em' as you go. I am going to have a NOVUS polish party when I am done!
-
This is much appreciated because only yesterday I bought my plastic pipe so I can start building my ATA kit. Thanks for showing the dimensions too, that was most important. Sent from my iPhone using Tapatalk
-
I am just following this thread because I am also building with the intent of someday joining the ranks of Centurion. I must say the work you have done is an inspiration! Great rework of the rivets. Sent from my iPhone using Tapatalk
-
Let the FUN begin! I have an ATA kit also and, it has been a lot of fun building it. I am building for Centurion too, heck why not! Make sure you enjoy the process. Build only when you feel like it, don't rush it. I pour over everyones Centurion builds almost every day looking at all the tiny details. Look at others builds and post lots of questions!!! Lets see photos!!! Have fun!! Russell
-
ATA Armor Build_My First TK
russellr2d2 replied to russellr2d2's topic in Build Threads Requireing Maintenance
Thanks guys for to advice. Looks like there will be a period of adjustments and foam installing. I will have plenty of time during basic approval then EIB before the Centurion level attempt. Getting excited to see the arms and belt on. Sent from my iPhone using Tapatalk -
ATA Armor Build_My First TK
russellr2d2 replied to russellr2d2's topic in Build Threads Requireing Maintenance
TAH-DAH!!! First full body/leg "formal" fitting. I will take this armor to a build party this weekend (I hope) and see what the Southern California Garrison chaps have to say. Notes below: I am really happy with the front. If you see something please chime in ! AA) Maybe that right knee can be pushed over with foam so it lines up better with the shin. A) Looks like I have a slight gap on the right side but, I do not yet have a belt on to squeeze things together. Never mind the one open shin...I just left it open. But you can see the slot system and how it closes up on the other shin. That one is locked closed with big velcro straps inside. There is that darn gap under the back plate. Maybe stronger elastic back there??? Ohhh geez! flabby butt! A) Do I put in the shoulder bell snap forward of center to keep the bells forward? This is the amount of gap I have between back and chest. Seems good? A) Here is how high the chest rides above the AB. It is hanging by double elastic straps (4 of them). The thighs are hanging by a very comfortable garter I bought here. Seems to work great! Overall notes: I think it is fitting quite well. You guys decide and give me some feedback. One thing is that this armor is very comfortable so far (wearing it around the house) and I can walk very comfortably in it. The TK boots are superb !!! The shins and thighs meet at the knees at a good spot and I can bend my legs very easy and walk around without care. Rather clanky though! Looking forward to strapping on the shoulder bells and that will be it! Thanks for looking!! feeling the force here!! -
ATA Armor Build_My First TK
russellr2d2 replied to russellr2d2's topic in Build Threads Requireing Maintenance
OHHH GAWD! WHERE! NO! NO! Taking it lighter now and just getting the strapping done! Even if it's not perfect....did I just say that?? There is an armor party in Buena Park this Sunday. I plan to go and show my armor, put it on and let everyone point and laugh. Good time to get some advice in person. I'll even bring tools and strap materials to re-do things. -
ATA Armor Build_My First TK
russellr2d2 replied to russellr2d2's topic in Build Threads Requireing Maintenance
STRAPPING CONT. Gluing in the thigh snaps I have a garter system that used webbing snap plates. These will hold well as the glue gets into the threads of the webbing. Inside the thigh the magnets are holding down the snaps. Straps and snap plates for the AB plate and chest connection. I am going for THREE straps here because it seems I need a lot of pull to keep the chest from ridding up to my neck. Gluing in the snap plate across the chest and Ab plates. Magnets hold the plates in place. I have found these snap plates take a full THREE DAYS to dry. The glue on the outside drys overnight but the inside glue is still wet after two days ! These magnets are 1/4" x 1/2" and plenty powerful while not being too big to fit into areas. -
Zarlon's First ANH Build Thread (ATA)
russellr2d2 replied to Zarlon's topic in Build Threads Requireing Maintenance
I'm learning the warpy-ness is what makes armor "special"! [emoji51] Sent from my iPhone using Tapatalk -
ATA Armor Build_My First TK
russellr2d2 replied to russellr2d2's topic in Build Threads Requireing Maintenance
Lol. BUT ITS NOT PERFECT!!!! [emoji23] Sent from my iPhone using Tapatalk -
ATA Armor Build_My First TK
russellr2d2 replied to russellr2d2's topic in Build Threads Requireing Maintenance
Mother's Day Fitting (Mommy and daughter are out dong their nails and things ) WITH SHORT SHOULDER STRAPS - The previous fittings were with my long shoulder straps. General comments: On BOTH short and long straps I have the elastic doubled. This seems to be a bit too heavy duty, I am going to try a single layer strap to see if the front and back stop pulling against each other so much. Seems a bit uncomfortable on my shoulders now...like carrying a heavy back pack. After todays fitting my shoulders are tired! BOTH long and short straps seem to be about equal in how they hold the front and back up. I think the long does allow to back pieces to close up better and hang lower. Today's fitting with the short shoulder straps. Maybe go back to the long ones? Here is that butt plate popping out in middle of the back. How to pull it back in? Does the Belt take care of this???? I heat bended the ends to tuck in and it worked to an extent but, the back middle is pushing out. -
ATA Armor Build_My First TK
russellr2d2 replied to russellr2d2's topic in Build Threads Requireing Maintenance
MORE FITTING: Observations and comments (I welcome all your comments and suggestions!!!!!!!!!) Fitting the legs to the bottom of the AB. Too much space in the knee area???? Question: In this photo I wanted to show how high the bottom of my thigh is. The bottom of the thigh is not quite behind the sniper plate. It is above it. Is this OK? To make the thigh go behind the sniper plate I have to lower the thighs and I get a big wide gap at the crotch which doesn't look too keen. Here is a better photo with both thighs at about where they will end up, unless you guys see something wrong here. Note the bottom of the thigh is above the sniper plate, not behind it. OK??? blahh??? What do my brothers in white think? This is the largest gap I want under the AB / over the tops of the thighs. Another try at fitting the Chest & AB & Back armor. I think I have a better fit on the back except that gap under the backplate is still too wide. How to minimize those back plate gaps???? Again my back plate tabs at the top are up above my shoulders from being pulled over by the front of the armor. -
ATA Armor Build_My First TK
russellr2d2 replied to russellr2d2's topic in Build Threads Requireing Maintenance
FITTING DAY!!! This is a second trial fitting. I INVITE CRITIQUE, PLEASE! General comments... Fitting the upper body here. Below I am fitting the legs. THE FRONT: Here is where "I think" the ab armor should go in relation to the chest armor. The chest extends right down to the top of the line above the button plate base. It looks like I have the collar off a bit but that just needs to be pulled over by hand. I I was always pulling the chest and ab plates down to get the collar off my neck and stretch flat the shoulder straps. This also pulled the back armor apart to reveal black gaps. I also have to remember not to stand with my tummy sticking out.....stand up straight like your mother taught you! The armor fits so much better with good posture. In the photo I am pulling the thighs up to where I will hang them. They really cannot go up any more as they are skin tight in places now. So, the black showing at the top of the thighs is about what I will end up with this fitting. I have a garter belt for the thighs that I will need to draw the thighs up fairly tight. I am using my "long shoulder" straps. I also have a "short set". • For Centurion build ...NASA we have a problem. Big gaps! How to get these sealed up?????? • Should I "re-strap the back to pull the pieces harder together? What makes the back armor go together without gaps? • Does the Butt Plate snug in at the sides with the belt? What holds the two sides in to the hips? On my armor the two ends of the Butt Plate are sticking out like ears. how to cure this? • QUESTION: Should the AB Plate/Chest Plate straps be powerful enough to PULLLLLL the CHEST PLATE down over the top of the AB Plate...strongly or just hold it lightly over the ab plate? For me it seems that I needed to keep pulling the front of my armor down as it wanted to ride up. Doing that pulls open the back armor and shows the gaps between the parts. You can see the back armor being pulled up high (the shoulder tabs are lifted above my shoulders) -
ATA Armor Build_My First TK
russellr2d2 replied to russellr2d2's topic in Build Threads Requireing Maintenance
SOME BUILDING! AND A NEW FITTING ! Securing the right side of the kidney plate to Ab plate. I decided I did not like how the right side has no fixture to align the two pieces. I made a tongue and slot thingy to align and fix the two halves together. I will use two elastic straps to hold the halves together tight. Heres the idea. The big flat wide tongue will fit snugly into the other half and hold the alignment of the right side. The tongue slides flush but not tight in the slot I made with some pieces of thin plastic. I used my heat gun to put a bend in the tongue so it slides along the natural curve of the armor. After aligning the tongue with a masking tape trial fit I glued it in place. I made a couple straps to hold the side closed. I am using a soldering iron to melt holes in the straps for the snaps. Also melt the cut ends of the elastic so they do not fray. I put a very thin sheet of plastic between the elastic to make a strong base for the snap. This leaves "just enough" room to instal a snap. Two straps ready to be finished. Note the white mark on each. I snapped one side on the snap in the armor and stretched the strap across to the other side snap to see where I need to instal the second snap. I made them just a little short so they will pull the two halves together. The finished right side closure mechanism with straps holding it closed. Works well! Here is an outside view. The alignment holds fast. I aligned the top because this will show with the belt on and the bottom will not. -
ATA Armor Build_My First TK
russellr2d2 replied to russellr2d2's topic in Build Threads Requireing Maintenance
But it has to be perfect ! -
ATA Armor Build_My First TK
russellr2d2 replied to russellr2d2's topic in Build Threads Requireing Maintenance
That snap is all that keeps the RIGHT side of the ab and kidney plates together? I know it is all under your belt, but would it be better fitting with some sort of tabs that fit into slots inside to align them and keep them from shifting around? I saw one build with Velcro here. What is general opinion here? -
ATA Armor Build_My First TK
russellr2d2 replied to russellr2d2's topic in Build Threads Requireing Maintenance
HEY ! FOUL ! The hinged side of my ab/kidney opened up. Now it has about 1/8" of black showing. I was using webbing to avoid any stretch here. Its not perfect any more! I think this gap will NOT affect my centurion application in the future?? -
ATA Armor Build_My First TK
russellr2d2 replied to russellr2d2's topic in Build Threads Requireing Maintenance
Thanks Tony! I knew I could post this stuff go out and water the lawn, pull some weeds and come back and get some advice from you! -
ATA Armor Build_My First TK
russellr2d2 replied to russellr2d2's topic in Build Threads Requireing Maintenance
Strapping cont: I made new slightly longer (by 1") shoulder straps just to see what would happen with the length of the armor down my back. I think I have a small improvement but I cannot be certain until I get the ab strapped up. I made the connection on the left side to create the clamshell function. Inside on the left is a 3" wide elastic (black) with a plastic plate on top for protection and a little stiffness. Not too crazy about those exposed split rivets. I might put a blob of silicon on top of each one to protect my undersuit. Here is the outside with the split rivets inserted. Looks pretty tight and hardly opens at all when I tried wearing it. The notch is on each side. it actually gets covered by the belt anyway but there it is for centurion approval. The rivets get painted while later. I'll wait until I am done strapping everything and worry about paint later. BLLLAAAHHH! Not what I wanted to see!! • The back is too far down at the shoulders. Strapping the ab might pull it back to the front. •The butt plate is tilting because I am pulling on the crotch strap ....too much? what keeps the butt plate from tilting out like this? •This is hard to describe but: The kidney and butt plate look like they are splayed out wide on each side. Should I be heat bending them back in? The diameter of these things is larger than MY diameter as such. What way to being in the sides???? Why is it all so dumpy !???
