

russellr2d2
-
Posts
369 -
Joined
-
Last visited
-
Days Won
2
Content Type
Profiles
Forums
Gallery
Articles
Everything posted by russellr2d2
-
ATA Armor Build_My First TK
russellr2d2 replied to russellr2d2's topic in Build Threads Requireing Maintenance
OK! Thank you all for your comments and advice. Thats why I post here! Going back out to the garage to work now... -
ATA Armor Build_My First TK
russellr2d2 replied to russellr2d2's topic in Build Threads Requireing Maintenance
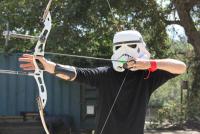
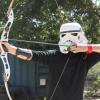
FIT REALITY CHECK ! How do the experts and centurions think of this arm fit. All these pieces are just laid onto my arm, no straps or foam padding inside. Overall what I am concerned with is the diameter being too large but maybe this is OK. Seems with the gloves the front end of the arm is covered/filled and it turned out pretty good. I defer to your good judgement sirs! Do you take care of this with foam to center the arm inside the tube? Here is the entire arm. All the pieces just placed on no straps or any padding yet. What do you think? To me wearing it for the first time it just seems so bulky and strange. But I "think" wearing armor is something you get used to. How tight should the arm armor look? Here I put on my under suite and glove to make it more real. -
ATA Armor Build_My First TK
russellr2d2 replied to russellr2d2's topic in Build Threads Requireing Maintenance
Thanks guys for the comments!!! HEY!! I almost forgot to do my shoulder bell pieces. Well....away we go! Here I am using the score and bend method to trim out the excess plastic. Make your first x-acto score real slow and light and you can do it freehand. Then score heaver a few times. I like this flat nosed pliers I have because it grabs a wide area of the plastic. That makes it easy to bend over a larger width of the plastic. bend it over and over a few times before trying to snap it off. I have not used any other trimming method yet this works so easy and, it is accurate. I trim off just outside of my final line and then sand down to my final return edge. i do a lot of sanding in my build. it is slower but also it lets you make boo-boos and stiff fix em. After sanding the broken edge you get a nice line. Just where you want it because you slowly worked back with sanding to get to the line you want. I also use fine sandpaper to round off the edge of the plastic so it is very smooth to the touch. Remember that iron job I did above? it left that big wide gap at the edge. Here is the gap filled with "GOOP" Just sand and it is gone. -
ATA Armor Build_My First TK
russellr2d2 replied to russellr2d2's topic in Build Threads Requireing Maintenance
Yup! You can see that happening in one of the above photos. On to the SHINS! More photos later. -
ATA Armor Build_My First TK
russellr2d2 replied to russellr2d2's topic in Build Threads Requireing Maintenance
Fixing up the edges with an iron: This turns out to be really easy. Set your hobby iron on high. Make sure you have the sock on it. Press the flat of the iron onto the edge of the plastic and let it heat up. move the iron back and forth and tilt the iron over the edge as in the photos below. I used a movement that pushes the hot soft plastic over with the flat of the iron. You take the iron away quickly and use your fingers to bend the plastic where you want it. It will be a bit wrinkly but you can sand that out. It takes a little messing with it over and over to get it where you want. Below is after I did a little sanding. The big open triangle between the halves will be filled with "GOOP"....I love "GOOP" Below is the "GOOP" recipe. -
ATA Armor Build_My First TK
russellr2d2 replied to russellr2d2's topic in Build Threads Requireing Maintenance
Finishing up forearms: This is the last cover strip on the forearms. I left the thing to sit for three days to allow the E6000 to get as rubbery as possible. This forearm had to be squeezed together to get the two edges to stay together and it is under stress now that the clamps are removed so i want the E6000 to be as tough as it can be. There is also a small inner strip. After removing the clamps I see some of the glue has squeezed out over the three day dry period. I put a lot of glue on the strip and I expected some of this. I want this connection to be really strong because the two arm parts did not want to go together and I had to force them into position. How to clean this up??? I first used a #11 blade (NEW) and cut into the glue. E6000 is rubbery and a little hard when it cures. After the cut I can then scrape away the glue with my finger nail. Its really hard to do this without cutting the glue first. Use a brand new blade. I then use Bestine Rubber Cement Thinner to clean up any left over glue film and oils. Bestine is a great cleaner for anything. It leaves no film and does not damage plastic. It makes a great small spot remover for suits too. Look how white and clean the cover strip area is now. -
R4ZORB4DE'S ATA Build
russellr2d2 replied to R4ZORBL4DE's topic in Build Threads Requireing Maintenance
Great work! I am on my ATA build too and know what you go through trying to decide how much to cut. Once cut you cannot put it back on! Your helmet looks great, paint the screw heads white and your ready to go troop! -
ATA Armor Build_My First TK
russellr2d2 replied to russellr2d2's topic in Build Threads Requireing Maintenance
Gluing up the forearms using E6000 and magnets/clamps. Apply glue and fit the pieces together with tape, pull the tape hard for strength. Then apply the clamps and magnets. I have been using a metal ruler as an extra piece to spread out the pressure of the magnets and press the joint down flat. I matched the front end of the arms because they are probably the most visible. The back end gets mismatched. Easy to iron down and fold over the extra bit and then sand and polish. SCORE! FREE scissors at Harbor Freight Tools with a coupon! Stainless steel edges too! -
ATA Armor Build_My First TK
russellr2d2 replied to russellr2d2's topic in Build Threads Requireing Maintenance
Here are some photos of the right forearm progress. First was lucky and decided to use E6000 glue and I could pull apart the arms (no more CA glue!) I next continued to sand down the arm edges as much as permitted. I left a min of 13-14mm. The cover strips will be the standard 15mm. Spread out a sheet of sandpaper and it helps make a nice straight line. Easy to control by applying more or less pressure at the ends while sanding back and forth. Do draw a line to stop at. It's hard to estimate the correct line with just eyeballing it. Gluing a new inside strip to the arm using E6000. Love clamps! Below is the new diameter of the right forearm. It is still large but as I have big black gloves and the hand guard I think this will be acceptable. Foam will also center it on my wrist making it look even smaller looking....DONE! -
Thank you for the move!
-
I did it too! I started my build thread in the wrong forum. Need it moved to the "ANH Build Threads" forum. Here is the link to my thread: http://www.whitearmor.net/forum/topic/29569-ata-armor-build-my-first-tk/ Thank you, and sorry for the extra work! Im sooooooo embarrassed! I hope the emperor does not take notice...oh but he notices everything.
-
ATA Armor Build_My First TK
russellr2d2 replied to russellr2d2's topic in Build Threads Requireing Maintenance
I have done a cpl things. I trimmed down the cover strip areas to a min 14-15mm (even a little bit of a cheat to 13) . Then I will put in some foam to keep the arm centered. Sent from my iPhone using Tapatalk -
ATA Armor Build_My First TK
russellr2d2 replied to russellr2d2's topic in Build Threads Requireing Maintenance
. -
ATA Armor Build_My First TK
russellr2d2 replied to russellr2d2's topic in Build Threads Requireing Maintenance
I have a Star Wars Costumes book of the original trilogy. It shows nice photos of all the stormtroopers armor and screen shots. In the photos you can see how large diameter the forearms are. But it is also evident that the gloves, under suit and hand guards hide much of the view up the arms as some have stated above. I had taken the raised section of the arm down to just 14-15mm. The bottom cover strip will be 13-14mm a little cheat. The right arm is fairly large now but not so open as it was before. Thanks troopers for the advice! Sent from my iPhone using Tapatalk -
ATA Armor Build_My First TK
russellr2d2 replied to russellr2d2's topic in Build Threads Requireing Maintenance
I just noticed that I should have been posting this thread in another place on the boards. I have asked the forum mods to move it. Lets see if they can. -
ATA Armor Build_My First TK
russellr2d2 replied to russellr2d2's topic in Build Threads Requireing Maintenance
FOREARMS: I am putting together the forearms and notice the right side is HUGE in diameter. Do any of you guys/gals have a trick to make it smaller. I really do not like the front of the forearm being so large because you can see down into it. I would like to know if any of you have taken this forearm down to make it smaller. Thanks!! -
ATA Armor Build_My First TK
russellr2d2 replied to russellr2d2's topic in Build Threads Requireing Maintenance
Finishing up the second bicep Jan 1 2015....HAPPY NEW YEAR! I had already started the trimming and gluing using the CA glue so it is together. But, for the cover strips I will start using the E6000 from now on in case I need to change something. This bicep went together a little more difficult this time. The edges met up Ok but there was some gaps at the two ends and, the shape of the bicep was a little too triangular to fit my arm well. I took off as much return edge as I could stand and it was still fitting tight on my arm ( guess I also forgot to test fit it before trimming away the sides and gluing it up! ) Look at the shape of the front of the bicep. It looks very triangular. This is squeezing my arm at the front end. At the back end it is loose. I am think after an hour of wearing this piece and it will hurt so I will do some adjustments. NOTE: I do not consider any of these conditions as a "defect" in the plastic piece. I have vacuum formed plastic myself and it is not a precision process. We should expect to do little fixes and fills and some bending in building armor. Hey its part of the fun as far as I am concerned! If I wanted to build a plastic model I would go to Revell or Tamiya ! I had an idea of using my heat gun and my vice. I put the bicep into my vise to squeeze out the triangle shape while I hit it really - super- carefully with my heat gun. I heated it without getting it soft. Just hot to the touch. I let the vice pressure do the rest and left it overnight. With the bicep in the vice. Warming it up with the heat gun...carufully! Now the front opening of the bicep is much more round. This is much better fitting! I also made some "GOOP". This is a great idea I gleaned from this site and all of you guys. For those that don't know what "GOOP" is, it is scrap pieces of your ABS armor kit chopped up and dropped into a jar of 1-2oz of acetone. Let it sit a day or two and you have a white paste that is great for filling gaps, and such. I filled in the gaps at each end of my biceps. It evidently takes a day or two to re-harden. Below is the "GOOP" making process. Add pieces until they melt and you get a nice gooey paste. Here the end gap is filled and I started to sand it. The GOOP is hard enough to sand overnight. I will continue to sand and polish this so it will be unseen later. Neat stuff! The two biceps almost done. This weekend I will glue on the two cover strips on the left bicep and fine sand the GOOP fillers then they are ready for snap plates! I will start using the E6000 now as others said it is a good idea in case of boo-boos. The last bicep getting its cover strips via E600 glue. Using a combination of clamps and magnets. Those little magnets are so powerful it is hard to split them apart. -
trooper12's RT-Mod ABS ANH Stunt Build
russellr2d2 replied to trooper12's topic in Build Threads Requireing Maintenance
Wow. This is a great thread. I am bookmarking it for my build I am working on right now. So keep it coming !!! Thanks for doing this thread. One good thing about stopping to take photos is it slows me down and I think about what I am doing much more. Regards! Russell -
ATA Armor Build_My First TK
russellr2d2 replied to russellr2d2's topic in Build Threads Requireing Maintenance
I'm getting some good tips here, thanks everyone. -
ATA Armor Build_My First TK
russellr2d2 replied to russellr2d2's topic in Build Threads Requireing Maintenance
Yea I was thinking about CA glue vs. E6000 while looking at my finished bicep. I feel like I got away with something and was lucky I didnt screw up. I will probably go to E6000 when I start my forearms. The forearms and legs are pretty screwey in shape and hard to tell lefts from rights. Thanks for the tip! -
Hello All! I am starting my ATA ANH Stunt build now. I want to put it up here and gather your helpful tips and comments. I eventually want to go all out for Centurion. I want a beautiful, awesome clean white TK when I am done. I have my bucket done and my blaster (in other threads here). I am in the Southern California Garrison area so that will be my base of operations and check in & approval. Well lets get this TK built! Here is my brown box day! I received the BB just a few days before Christmas so I decided to open the box on Christmas day. The ATA wait list is several months so, I have had lots of time to build my bucket/blaster and research and research some more. I have a collection of links and videos. Before I start cutting I have been watching Trooper Bay videos. He makes it look sooooo easy...haha! I have to comment on the ATA armor. It is much heaver than I imagined our plastic armor is! Very impressive! The complete collection in the box weighs over 12 LBS !!! I cannot imagine how much work it is to vacuum-form all this armor. My bucket is off to ATA! I am very happy with the quality. Ok the work begins!!! I decided to do the biceps first as they are the smallest body part to work on and not too confusing as to what half goes where. Marking the cut line 7.5MM from the edge for the 15MM cover strips. I actually ended up with about 16MM wide spaces for the cover strips. Below is generally how I would draw a good line. After a while I just held down the straight edge and marked it. The glossy plastic is slippery making it hard to lay a metal straight edge without it moving all over. Ok, I got all the bicep pieces marked. I used the score and break method. I am used to doing it so no problems. The ATA armor is really thick so you need to score 4-5 times and then work from the middle with your hands out to the edges slowly bending it. Then one big bend and the whole piece drops off. I want to put inside strips for extra strength ( My OCD in action ). Here I am glueing an inside strip using CA glue. I have E6000 but, so far I have not used it. WARNING ! THE BRAND OF CA GLUE I HAVE AND THE BRAND OF KICKER I HAVE ****MELTS**** THE ABS ! I do not have the name of the brand but I bought it at Hobby People. Please try your CA glue and kicker on a scrap piece first! The bicep put together showing some uneven corners (oh no! my OCD!!!) The uneven corner had to go! I wrapped the surrounding area with several layers of tinfoil and heated up the offending tab with my heat gun and bent it back down. Now the two ends meet up perfectly. Below is the result after some sanding of the return edge and the joint. This finished bicep ! QUESTION: HOW MANY OF YOU PUT IN THE PLASTIC HOOK TO HOLD THE ELASTIC STRAP THAT GOES OVER THE BICEP (like I see in the TrooperBay video) ?
-
My ATA helmet build.....what do you guys think?
russellr2d2 replied to hon143's topic in ANH (Stunt and Hero)
Wow nice build. I also finished an ATA helmet and am nervously waiting for my big brown box. Hopefully before Christmas! Again your bucket look very clean. Sent from my iPhone using Tapatalk -
Jedisaber's ANH Stunt TK Build
russellr2d2 replied to Jedisaber's topic in Build Threads Requireing Maintenance
Good luck! Work slowly an you will be a real live TK before you know it. Just an hour ago I received an email from ATA works that my kit will be made next week. OHHH boy! Sent from my iPhone using Tapatalk -
What's happening with your build? I am on the list for ATA armor since last March, and I am going ga-ga watching others build theirs. I finished my bucket already and am really happy with it. You are in for a treat with this kit. Happy building and let's see some more photos ! [emoji16] Sent from my iPhone using Tapatalk
-
Ok I have something you could do. First paint the ear bolts white. Then paint more gray on the teeth. I think you didn't go high and low enough I the teeth so you have some white space above and below the teeth. No gums! Sent from my iPhone using Tapatalk
