


russellr2d2
-
Posts
369 -
Joined
-
Last visited
-
Days Won
2
Content Type
Profiles
Forums
Gallery
Articles
Everything posted by russellr2d2
-
DF92 ATA Armor Build
russellr2d2 replied to Darth Fader 92's topic in Build Threads Requireing Maintenance
If you choose to attack the painting I recommend the paint kit Trooperbay sells. All the correct colors and the best brand of correct glossy paint. Sent from my iPhone using Tapatalk -
Your helmet looks great! I also have an ATA and am really happy with it. Take your time painting or decals and have fun. You will have a beautiful bucket for sure. Sent from my iPhone using Tapatalk
-
ATA helmet has arrived and Im.....
russellr2d2 replied to Polar's topic in Build Threads Requireing Maintenance
Leave some of the wrinkled plastic under the ear areas. I experienced much trouble on the left side (looking at the front) getting the two halves together without a gap because I cut too much plastic off early on. You will need the extra width of plastic to cover the gap between the back and face of the helmet. The left side (looking at the face of the helmet) is touchy in getting the two halves together without a gap. I freaked out over mine for a week. Leave lots of plastic on and only trim tiny strips off at a time. Once you get used to the fact that none of the parts actually match up and it is your job to make them look like they do, you will do fine [emoji6]. Sent from my iPhone using Tapatalk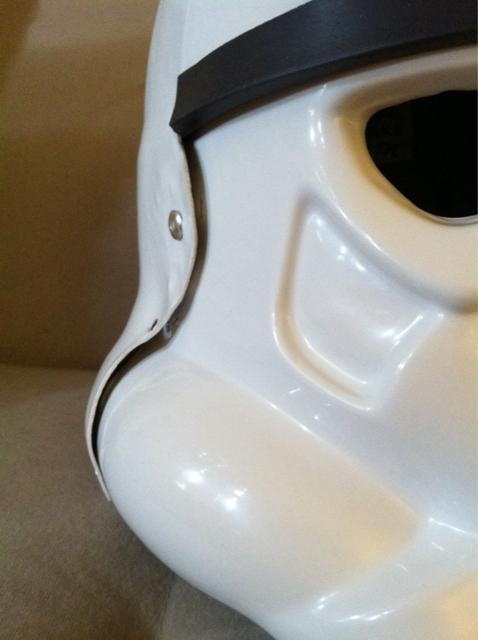
-
Sent from my iPhone using Tapatalk
-
Another First Time Doopy Build
russellr2d2 replied to cm325i's topic in Build Threads Requireing Maintenance
I just finished mine and it was fun to build. I almost want to build another! After finishing mine I had to do something so I built a stand so you see even after you finish there is still more to do! Your DD's looks great keep on building!! Good Luck, Russell -
Sent from my iPhone using Tapatalk
-
Painful painting
russellr2d2 replied to ClockworkRonin's topic in Build Threads Requireing Maintenance
Get the trooper bay stencils. Then paint in the BLACK line first then fill in the gray it is sooooo much easier. The stencils may need some fitting and trimming to fit. Experiment first with them. And yes buy a nice brush. I found a flat 1/4" brush most useful for the long sides and straight lines. Use a pointed brush for rounded corners. "Cut into the lines" with the brush. Move up to the outside edge with the black paint and brush. Yes! Practice first on scrap. I've been through art school so I know his to do this but you can too with some practice. Let the gray area dry overnight then use the trooper bay stencils to do all the thin vertical lines. Put the stencil down and rub the edges with a pencil eraser and then first paint over with the background color. Either white or gray. Then paint in the lines blk or blue. The tube stripes require you cut apart the stencil in a couple places because it does not lay flat over the compound curves of the tubes of the helmet. Paint white over them first. Allow to dry for an hour. Then paint the blue. Allow an hour then peel slowly. You will still need to do dome fixing. I still had a few leaks. I cleaned the up with 1000 grit sand paper and soapy water. Fold over the paper to create a sharp edge and use it to cut off the bleed. You will not notice the slight dulled area where you took off the bleed. Well pretty involved but the I best paint jobs come from slow work and a plan and patience to carry it out. I wish you all he best luck and have fun in the process! Sent from my iPhone using Tapatalk -
Debating whether to add cylinder wires or not
russellr2d2 replied to Snaps's topic in ANH BlasTech E11
I see they should connect to the front part of the counter but do they connect to the back of the cylinders? Sent from my iPhone using Tapatalk -
What is your greatest memory of SW outside the movies?
russellr2d2 replied to Snaps's topic in Off Topic
I was 19 then and bought the LP. It was, and still is, the ONLY LP I have ever bought! -
Yes that would be cool! I might take you up on it. I will look around again first. Maybe going back to the Tandy store and beg and grovel for a scrap piece. Talking to some people that tool their own leather I see that it is the way of things that leather comes like the Tandy store sells it. Mostly whole hides and shoulders and parts. I just might bail and buy one! But that's no fun .
-
I have a Tandy store two blocks away but I went there and all they had were whole cows! (moo). They had one piece of scrap neither large enough or black and no finish to it. Lots of cool hardware though so now I know where to buy snaps and such. But where do I get some nice 7-9oz leather with a slight grain finish (not pebble!) and black both sides? Enough to make a holster. I prefer to build one just for fun...part of the hobby you know, learn something new and, I've never done leather craft. Thanks! Russell
-
I really liked this piece you make. The communication and shipping went really fast! Thank you! I am glad I bought this magazine because it is so much more detailed than the Doopy's and it is longer even though I have it inserted into the magazine well right up to the little clip thingy on the back side (yes you open up the well a little at the edges to get it to fit). Its cool how the new magazine curves out a bit too. Looks mean! I really enjoyed getting the edges all weather up too, now it looks like it is a real metallic object. This magazine piece was the first part of my entire TK build I received ! Now I have a complete blaster and bucket ! Dang this is fun!
-
I finished my Doopy's blaster build and though I would share the results and how I did the paint and weathering. For the build I just did what all you guys did, following all these great build posts. Perhaps how I did the paint and weathering may help someone else with their build. Here is my blaster basic full view. One of the first things I did was to order "gazmosis" cast magazine that is a lot more detailed than the Doopy's one. I was puzzled at first because it is so much longer and did not actually fit into the Doopy's magazine hole. I figured that you need to cut it down and do some fitting and now I'm happy with the result. It fits right in there tight. In this photo you can see the back side of the magazine with the little details. I don't know why but my i-phone made all the photos look blue tint. Must be the fluorescent light in here. A closer view. I should probably explain now that I was not trying to replicate an original movie prop. My intent was to make an idealized "real" blaster that a stormtrooper would have. So the paint finish is different than a real Sterling gun. I'll explain how I got the paint finish to come out just the way I wanted. A flat black with just a bit of metallic look and the look of a couple yrs use. I used this paint for the overall finish of the "metal" parts of the gun. Any flat black would do but I like Rust-oleum these days because of the type of paint it is. It drys slowly over a period of days and really smooths out and creates a nice hard finish. The spray cap however is CRAP!!! Rust-oleum get rid of those caps NOW! They dribble paint all over the side of the can. But the paint is really-really nice. I even used it on my R2D2 build and it was awesome. I got a finish as good as if I had used a spray gun. PAINTING TIP: Here's how you get a really cool flat finish on your blaster! Use the flat black paint. LIGHT coats, 2-3 letting it dry about an hour between. This is an all day event here! Light coats mean just enough to get the paint wet on the gun, no more...don't fall to temptation to go back over a spot just to get it covered....let go Luke ! Use the Force! You will cover it on the next coat. Then to make it really cool (You need Rust-oleum for this) hold the gun back about 2+ feet away and spray from afar and let the paint hit it almost dry. No! it does not make a dry crunchy coat. It goes down just wet enough and creates a super-fine texture you almost cannot see. Makes your gun look like it is metal under that black paint. Really cool. By fine I mean like 1000-ish grit sandpaper. In the photos of my gun you can just barely make out this texture. Anyway thats what I did. Here is a close up of the back end of the gun... Can you see the fine texture? And it is hard as rock. I should also add that I used Rust-oleum Satin Black on the handle. The handle is supposed to be plastic and a bit more glossy than the gun. But I don't think any part of the gun should be shiny so I used the Satin black. Even the satin black was too glossy for me so again, I held the gun back about 2 feet from a can of Flat Black and dusted it until I dulled down the satin a bit. Now Its just a bit shiny mostly only in the highlights where light hits it without being shiny all over. I put in a red lens on the front end of the scope. Note the brass screws....nope their plastic. Below is the paint I used. Then went over with a very dry black brush. Here is another view of the end of the sight scope. I thought red would look menacing. The brass painted screws weathered up with dry black paint. Just a bit of brass coming through the black paint. I did this with a ver-very dry brush, just flipping it back and forth over the surface until I got it to where I wanted. Note it's really the edges you want to have the metal showing through, not so much in the middle spaces. Some very serious aiming going on here... Note again it's the edges that get weathered. All this was that brass paint in a very dry brush. Scrub the brush onto a piece of paper until there is hardly anything left that comes off. the brush back and fort until you build up the effect. The back of the counter with a lens I made and numbers i got from here. I went ahead and made it look metallic even though the real counters are plastic. But I am not building a prop-replica. I am building a Storm Trooper Blaster ! Here is the stuff you use to get the metallic look. Its a paste that you just use a teeny-finger tip amount. In fact I used only my fingertip to apply it. Wipe off the excess onto a piece of paper first and then wipe onto the edges of the gun only at first. Very rarely will the middle of a surface wear like the edges will. Feather light touch is needed to get juts a hint of silver applied. Build it up with layers, over and over. Do not apply a thick smear it will look like a .....thick smear ! This is the magic stuff. You get it a craft supply stores or online. I used silver juts because thats all the store had, but it turned out OK. I would rather have this and some metallic gray color too. Note the folding stock has the edges worn looking. Anyway! Thats how I did it! Hope it's worth a future approval when I get my armor built. Thanks, Russell
-
This blaster looks superb ! I want to know how it was painted. Did your friend use a spray gun or airbrush? What I notice right away is the very fine texture to the finish that I really like. Can you get us an idea of how it was painted? Thank you! Russell
-
Need some ATA Helmet advice
russellr2d2 replied to russellr2d2's topic in Build Threads Requireing Maintenance
I cleaned up the stencil leaks with a tiny piece of 1200 grit wet sandpaper. Fold it over so it has a sharp edge and go over the leaked out paint. I use spray soapy water to wet the paper . Novis polish is almost not needed. With the sandpaper folder over it has a shard edge the takes the leak off but not the edge of the stripe. It's a tiny piece about one half inch. Sent from my iPhone using Tapatalk -
Need some ATA Helmet advice
russellr2d2 replied to russellr2d2's topic in Build Threads Requireing Maintenance
Schmick eehh? Ok Ill take that It's hand painted using Trooperbay stencils. The stencils generally works OK except the blue tube stripes they were leaky. Had to do some clean up after painting. I used a sharp edge of 1200 grit wet sandpaper to clean up the edges of the blue stripes. -
Need some ATA Helmet advice
russellr2d2 replied to russellr2d2's topic in Build Threads Requireing Maintenance
Finished "Rufus" The Stormtrooper on the outside (except for the painting of the ear bolts white). Now I am on to pimp the inside with an Eco fan system and sound system and some other goodies. Hope he meets with your approval! Inside I mounted the green lens this way. This photo was taken in the middle of installation so its pretty dirty in there... Ear area and tube stripes. I like the teeth square cut but with rounded corners. I might be the only one but I think it looks more scary. -
Need some ATA Helmet advice
russellr2d2 replied to russellr2d2's topic in Build Threads Requireing Maintenance
Here is some more progress. I have sanded more off the back of the of the eyes and mounted one of the lenses. I am not going for screen accurate inside the helmet. Also the teeth got a little more square...but with rounded corners. I guess I must be the only one but I think the rounded look is more scary The lens has a little gap on the top and bottom to prevent fogging...hope it works. Its hard to see but the lens is in there... -
Does everyone wear your black under suit to a troop? Or change there? I supposed there needs to be a changing room. Never had that problem with R2 except he doesn't like people watching him get assembled out of the back of my car (Its embarrassing!)
-
Need some ATA Helmet advice
russellr2d2 replied to russellr2d2's topic in Build Threads Requireing Maintenance
Ok got my near final fit going on today. Ears cut out and sanded down to fit. I think I am at that point where you sand them then fit them and they are near prefect then bolt them down several times.... I am going in circles while the ears get thinner and thinner. They don't seem to be getting any better. I think this is it. Here is my process. Note how I apply sand paper to the cheek tube and lay the ear on it and sand then to fit. Seemed to work pretty good. I also mark each high spot with a pencil so I know where to sand them for a better fit. Below is the ear are on one side. The plastic was so bent up in the ear area I used a large washer to help hold down more area. This helped get my ears to lay flat. That rivet will never pull through the plastic!---------- -
Need some ATA Helmet advice
russellr2d2 replied to russellr2d2's topic in Build Threads Requireing Maintenance
You win Mike! This is a "Cleeco" for people that have never seen one. They are used to hold sheet metal together while riveting. I have a box of about a hundred from when my father build an airplane. They are great for holding things together while you fuss with those blasted pop rivets. For some reason I can never get my pop rivets to fatten up on the inside and they just about pull back through the hole. Anybody know any secrets to good pop riveting? Getting them super tight and spread out on the backside? Thanks. I will probable end up with three fasteners holding down the plastic on the side where the plastic is lifting up. Oh well it will be under the ear and nobody will see. Cheers! -
Assembling my ATA kit...helmet trim question..and more
russellr2d2 replied to LePaul's topic in Assembly, Mods, and Painting
Hey LePaul russellr2d2 from the R2 Builders here. I am starting my ATA helmet too. I just buttoned the face to the cap and did a horrible rivet job. Use small dia bolts like 1/8th and use washers pulling pop rivets stinks! The ears are next and I saw some great advice here. To lay the rough cut ear on the exact spot it will go ( pencil marks). And sand down and apply it on the side again repeat several times as you sand the edges of the ear down. In time you will have it. Sent from my iPhone using Tapatalk -
Need some ATA Helmet advice
russellr2d2 replied to russellr2d2's topic in Build Threads Requireing Maintenance
OK no more messing around! Helmet YOU are going together! Here is the result. I forgot snap rivets and I have a hate-hate relationship and my rivets juts are not very pretty, one pulled through the plastic all together. Left a hole the the ear will cover I guess. I plan to put a small bolt and washer in it anyway. The brow is nice and straight (because it is pulled down farther on one side then the other....but don't tell anyone ok?)---------- -
Need some ATA Helmet advice
russellr2d2 replied to russellr2d2's topic in Build Threads Requireing Maintenance
Woo hoo! By Jobe I think I've got it! Tinkering with the face and cap I picked up my smallest clamps and hey! They make the thing stay together all right. I made some photos. The black trim moves around a little so ignore and waviness its getting pinched by the clamps. I can straighten that out after riveting things together. But looks like I have the cap level and I want it low, maybe a little lower even. No big gap on the sides like I had before. Looks like I should pinch the sides together real hard and drill a hole in the sides. What do you guys think. Any advice to get the really good rivet job with the pieces tight? Any advice about the lower rivet and where the ear bolt will go later? Thanks!!
