Bone
-
Posts
450 -
Joined
-
Last visited
-
Days Won
3
Content Type
Profiles
Forums
Gallery
Articles
Everything posted by Bone
-
Looking goooood! Concerning the stripes: Yes, way too many
-

Which one is the right boot?
Bone replied to Vidakovic Igor's topic in Boots, Soft Parts, and other Accessories
It's weird that way ... -
Which one is the right boot?
Bone replied to Vidakovic Igor's topic in Boots, Soft Parts, and other Accessories
Whoa! What has happened here? Two threads merged? -
Which one is the right boot?
Bone replied to Vidakovic Igor's topic in Boots, Soft Parts, and other Accessories
Okaaaay! Looks like it will be number 8! Troopermasters comment sealed it for me! Thank you all for your quick answers! That was a fast one! -
Which one is the right boot?
Bone replied to Vidakovic Igor's topic in Boots, Soft Parts, and other Accessories
Thank you Firebladejedi! I intend to wear them with TM Armor ... -
Which one is the right boot?
Bone replied to Vidakovic Igor's topic in Boots, Soft Parts, and other Accessories
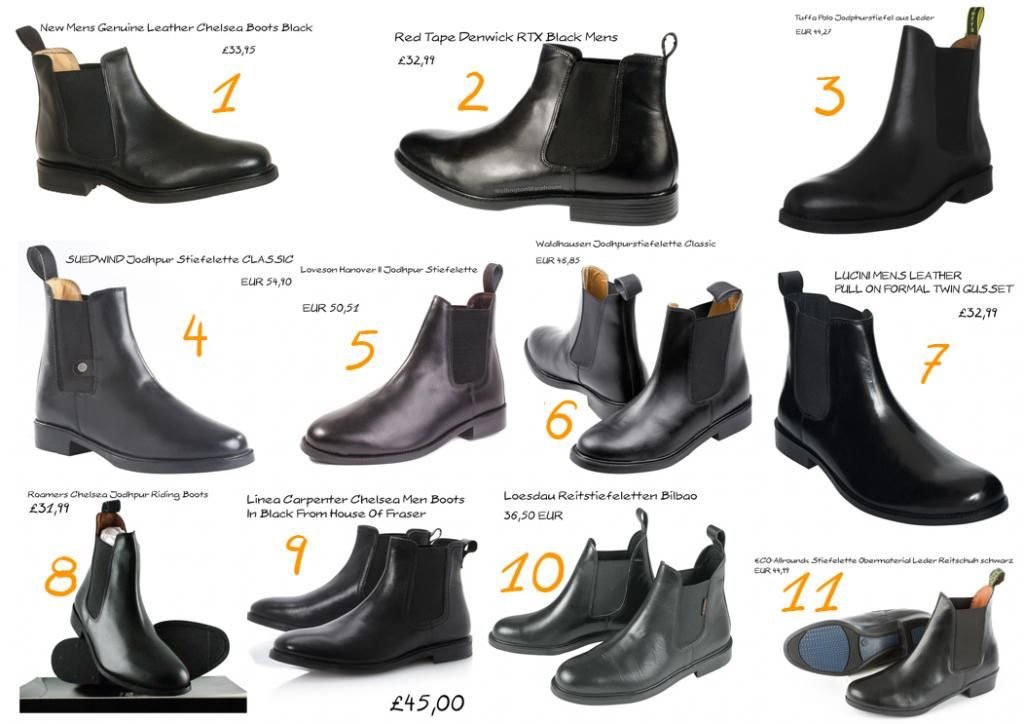
Hi there! While waiting for my armor to be delivered, I am doing what I suspect most people are doing: buying all the other neccessary stuff. I will go the "paint your own boots white" route and read all the appropriate threads. I can't (or won't) afford Loakes (my everyday shoes are not that expensive!) and so far didn't have any luck scoring vintage boots on the bay. Some of the boots that other troopers chose are simply not available to me or due to customs etc. too expensive. BUT ... I found a huge number of Jodhpur, Chelsea and riding boots online that might do the trick money- and appearancewise (is that a word, after all?) But ... I also need your help! As you know, the bigger the selection gets, the harder it gets to decide. Below is a numbered collection of boots. Which one might be the most appropriate one? I tend to number 7 and 8. What do you think? Thank you in advance for helping me!
-
Yes, hopefully we will get to see some full armor photos soon. Otherwise we need to rush the new armor to have it ready for the release of the movie, and that is something I really like to avoid ...
-
Looks terrific! Waiting for my own set ... :-)
-
Sterling Sub Machine gun from HobbyKing
Bone replied to Chivo's topic in Build Threads Requireing Maintenance
Vern, can you elaborate a bit more, please? The price is tempting, availability is given ... What would you change? -
Bone's TM Hero Lid, aiming for Han Solo
Bone replied to Bone's topic in Build Threads Requireing Maintenance
Okay guys and gals, I am preparing for the daunting task of painting the stripes! I thought about it for a long time and tried to imagine how they were done in 1976 by the stagehands. I couldn't imagine them cutting out templates for all the helmets. If that would have been the case, then all helmets should have the same number of stripes, right? What would be the quickest and less time consuming way, keeping in mind, that they handpainted all the other stuff? The quickest way would be to take some tape and mark the top of the stripes and the bottom and the just handpaint the stripes inbetween. Just half an hour after I put so much work into thinking it out, I read in another thread, that fellow troopers had the same idea. But years before me ... And I thought I could finally contribute something to the FISD ... Anyway, I kept in mind the sizing of the stripes (just a pencil thickness away from the upper edge and 2 cm wide) and masked of the part for the stripes. This is where I ended up: I was lucky to find sand colored tape that was exactly 2 cm wide. That was the placeholder for the tube stripes and I was able to place them exactly where I wanted them to be. I bought green frog tape (Yeah! Frog Tape! The good stuff! No paint bleeding!) and marked the upper and lower edge. (Picture one and two) I removed the sand colored tape and ended up with an exact field to paint. After that I measured the length, divided it with the right number of stripes (eleven on the right tube and thirteen on the left one) and marked them with blue sharpie (picture tree and four). I took this shot to see the spacing of the stripes (you can also see, that I tried to emulate the weird spacing of the stripes in the tears): Now I need a steady hand and stay away from the coffee. -
Standard TK with pauldron? Yay!
-
Frown Mesh - Material and Method
Bone replied to Koyaanisqatsi's topic in Assembly, Mods, and Painting
Well, actually the stuff I used is some kind of two component stuff. It hardens out after 5 minutes and is rock hard. But if you are thinking about having it removable, take a look at this thread: http://www.whitearmor.net/forum/topic/8687-howto-different-way-to-install-mesh-under-the-teeth/ -
Painting/coating the inside of the helmet
Bone replied to Koyaanisqatsi's topic in Assembly, Mods, and Painting
Or take a look at what fellow trooper Gazmosis did with this bucket (scroll down to end of page): http://www.whitearmor.net/forum/topic/28633-howto-ata-helmet-build-hand-painted-details-pic-heavy/ -
Frown Mesh - Material and Method
Bone replied to Koyaanisqatsi's topic in Assembly, Mods, and Painting
Or in case the superglue won't stick to the White plastic, you can use plumbers putty. Knead some small blobs, put them around and between the openings and press in the mesh. (you can see it painted black already in the lower right image) -
Painting/coating the inside of the helmet
Bone replied to Koyaanisqatsi's topic in Assembly, Mods, and Painting
Hi Ken! Welcome to the FISD! You can paint the inside of your bucket without any problems. You should preferably do it before you assemble the lid, because then you have the most control over where the paint ends up. The parts that should stay white must be masked off, of course. Paint it before you cut out the eyes, saves trouble ... Grab a semi gloss black rattle can with paint, that is intended for cars, like "Rallye Paint". It needs to be acrylic based, this will stick best to the plastic of your bucket and won't rub off a single bit. Of course it will smell, but that wears of after a week and the toxic fumes are long gone by then. I found, that painting the inside black definitely added some pizzazz to the helmet. For me it turned white plastic into a helmet that means business. I hope, that was helpful ... -
Hi Felix! You said you found a europeansource for the boots ... Can you point me in the right direction? Cheers, Bone
-
Bone's TM Hero Lid, aiming for Han Solo
Bone replied to Bone's topic in Build Threads Requireing Maintenance
So, let's pick up where I left last time: I had bolted together the two halves of the lid and now it was time for the ears. I used a tool I purchased long ago, albeit without knowing when or what to use it for. Please don't ask me what it is called in english, as I don't even know what it is called in german ... I took four measurements, two for each ear from the front and from the back, because, as we all know, the helmets are not symetrical, and the shape you have to cut out for the front is not the same as the one for the back. Then I traced these shapes onto the ears in lead pencil and cut it out. After some sanding I had a decent fit. I painted the inside of the helmet black before I put it together. It's not because of light issues or being able to see better, but pure taste. The lid looks more valuable and "I mean business"-like. I was amazed how sturdy that thing became after everything was affixed. I would never have guessed, that these "flimsy" plastic parts would become something that has a grip and a nice weight. Paul made the lenses from 3mm green perspex. How he did that is a mystery to me, because they are flawless! When you wear the helmet and look sideways,, your vision is slightly distorted, but if you look straight ahead, everything is distortionfree. For the padding inside the helmet, I went the cheap route: the pads are mouse pads with a wrist cushion from a Dollar store. I cut them out and hotglued the cutoff parts underneath them, to make them thicker. After that I velcroed them into the helmet. -
Well, in my opinion the problem actually is, that the boots and the handguards have a different hue of white in itself. You can't change the basic color with weathering, at least not with a black wash. TMs armor is off-white , the boots and handguards are brilliant white. (Off-White being a white that is toned down and can go in the direction of one of the three primary colors, blue, red and yellow.) Adding black washes makes brilliant white grey, not off white, and this only in certain areas. In my opinion you have to add some kind of yellow to the whole thing, but ever so subtle! Just a yellowish hue. Or maybe yellow-Grey, applied over the whole surface, with an airbrush maybe, and not only in the crevasses. If you are going with Turricans method, you could add a tiny (and I mean tiny) drop of yellow to the paint. Either way, keep in mind, that you are dealing with two different shades of white ...
-
Bone's TM Hero Lid, aiming for Han Solo
Bone replied to Bone's topic in Build Threads Requireing Maintenance
Aha! That's why I was so puzzled. Remember that I said that I couldn't find any decent screenshots? That is, I only found Images that said, that Han had "Standards" on both hands. And I knew, this couldn't be the case. Good god, you are really knowing the movies inside out, don't you? But .. one question remains: if I want to tag my future suit as a "Han suit"´, what shall I do concerning the handguards? Two standards or one standard and one alternative? -
Ah, yes, you're right. I now see the difference between neckseal and the tailoring puppet. The neckseal is from RSPropmasters? I couldn't find anything on their Website ...
-
Oh, Wow! Nice build! Did you already tell where you got that smashing neckseal from? Pleather is something I had in mind, too. But I am curios about the "shirt" that is attached ...
-
Bone's TM Hero Lid, aiming for Han Solo
Bone replied to Bone's topic in Build Threads Requireing Maintenance
@Tino: I have to confess, I took your photos as a template ... It looked so tidy and nice to look at. Germain, there's the german kink! But the wooden backround is coincidence, honestly, it is just my workplace. NRW? Where exactly? My homebase is Datteln. @Germain: yes, the brow is too low. That's where the idealized part comes into play. I am still battling myself about that, because I like the mean look with alow brow ... But I did my homework on the stripes: seven in each tear, twelve in the back, eleven on the right tube and thirteen on the left one. I even asked Karin about the handguards, because I couldn't find any decent screencaps: left hand "hero" and right hand "stunt" -
Bone's TM Hero Lid, aiming for Han Solo
Bone replied to Bone's topic in Build Threads Requireing Maintenance
Hey Gaz! So nice to have you as the first commenter! No coffee before painting will be the biggest sacrifice I have to do for this build! Yes, the drying time is really something to get used to. I had the impression, that it is a lot more than six hours. Avoiding fingerprints is so hard when all you want to do is pick up the helmet every five minutes to marvel at it. -
Hi there! A few months ago my budget was too small to order the full monty from Troopermaster (and, sorry, but it had to be Troopermaster and nothing else!), so I settled for a lid only. A hero lid. In 1.5 mm. A dream came true, after only 36 years ... Every few days I was unboxing it, was staring at the beauty und put it away again. (Not without running through the house, holding the two main halfs of the helmet to my head, of course.) Two months ago, after saving up some more cash, I finally had the funds and ordered my suit of armor in 1.5 mm from Paul. Yeah! And the waiting started ... But because I am really, really bad at waiting, I needed something to do. I finally unboxed the helmet parts for the last time and started building it. Everything needed was included: the faceplate, cap'n'back, two ears, two green perspex bubble lenses in 3 mm, four screws, four Pop rivets, two hovis (with mesh installed), the s-trim and the brow trim. I am building model kits since childhood and felt very confident about the helmet. I wouldn't call myself handicapped when it comes to building stuff. Trimming? Sanding? Painting? No big deal! Boy, was I wrong! Why? Pauls helmet kit is excellent. It is everything you can possibly wish for ... That's not it. No, wait, that is exactly it: I just didn't want to screw it up. I looked at screenshots and photos and compared Pauls helmet to the originals. And compared. And compared, again. I couldn't find anything, that is "wrong". It is just spot on. And then I took a look at what others did with their kits and suddenly felt the bar has risen a few notches. It took me some time to finally arrive at the state of mind to say "What the heck, if you screw it up, you'll just order another one, go for it!" And so I did. I started trimming the cap'n'back with ordinary household scissors and went on to the eyes. I dremeled out the eyesockets and then sanded them smooth. Paul often stated, that the original suits were far from perfect and I salute iconoclasta_88 for his attempt to make his suit in every detail look like a screenused one, but I wanted my lid to look like I remembered them as a child after viewing Star Wars for the very first time in 1978. Pristine, shiny, mean. (In every other thread there would be the first photos in this place, but I didn't take any while trimming the plastic. Forgive me, but I regard this thread as a kind of training ground for my suit and e-11 building thread, meaning: I am still learning how to do this properly.) Perhaps because of my model building Background I started to paint and affixing parts before I bolted together the faceplate and the back. I just felt safer that way and at that time I didn't have any idea how to attach the lenses. I finally found a way in using plumbers putty. It is a two component putty that is kneaded, dough-like, sticks to almost anything and dries stonehard. I placed Little blobs around the lenses and pressed them into the faceplate. This created enough surface for the lenses to securely attach to the plastic of the faceplate and evens out small gaps. I ordered the humbrol paints and started outlining the tears and the spots on the back in black first. After they were dry, I painted the inner area in grey, leaving a fine black line on the outside. I did the same for the tears. The Humbrol paint is great, but (and I found out the hard way) can be also very runny. It doesn't appear so while painting, but you can't leave it unattended or it will ruin your paint job by obeying gravity, as you can see at the ears and the tears in the photo above. I pieced the front and back together and have to confess, that I thought I had done something wrong, because it wouldn't fit at all. There were gaps where the ears were supposed to sit and the back was a lot wider than the faceplate. It looked horrible and completely out of shape. I nevertheless clamped the parts together and drilled a hole for the first pop rivet. (This is the part where I sacrificed my own blood to the gods of handiwork. It is a very bad idea to put your finger between the grips of the rivetgun while pressing them together. I was fortunate to be alone, otherwise my kids would have learned a whole bunch of new swearwords ...) All in all I had to use theree rivets on each side to stabilize the faceplate to my liking. The faceplate had a tendency to slip upwards and give the helmet a brow that was in the middle of the eyes.
-
Ah, now I know why the CRLs specify the s-trim so minutely ... I didn't know that about AP helmets. Thanks Germain!