

TK-32700
-
Posts
122 -
Joined
-
Last visited
Content Type
Profiles
Forums
Gallery
Articles
Everything posted by TK-32700
-
Neat ideas. Do you change into the entire armor in the tent, or just the undersuit? My "hack": I always wipe down the inside of my armor with isopropyl alcohol (60 % or more) after each troop. It is safe to use on ABS, kills smelly bacteria and funky fungi, and evaporates quickly. A cloth dampened in the alcohol works fine, but for the nooks and crannies of the backplate I use a spray bottle.
-
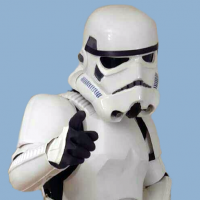
TK-32700 and TI-2096 Norwegian Garrison From the pride parade in Rana, Norway. Photo by Aline Hegglund

-
Donated
-
Wipe the insides with a clean rag. Get rid of that moisture, immediately! Clean with a soft washcloth and warm, soapy water if needed. Any liquid soap will work fine, I use dishwashing soap. Make sure everything is dry before storage. Cracks needs to be fixed as soon as possible. I use CA glue and spare pieces of plastics for a quick fix, and ABC paste made from spare pieces melted in aceton for a more permanent fix. If possible, repair from the inside. If the repair is visible on the outside, I sand it smooth with incrementaly higher grit sandpapers, and finish off with Novus polish. Scuffs is just battle damage and bonus weathering. It looks awesome (and movie accurate!) after a few troops. But if I want to shine, I rub away the scuff marks with an eraser, and then I wipe the armor with a soft cloth and isopropyl alcohol to get rid of any grime. I finish with Novus polish. Novus should work on all plastics, also PVC, but take a look at their website to be sure. It's novuspolish.com. Thighten all screws, nuts and bolts before storage AND before the next troop. Nothing is more annoying than losing a chicago screw on the holster in the middle of a troop. If you have an emergency repair kit (and you should!), check to see if you need to refill it. @Nairy: Yellowing has nothing to do with polish, but UV and heat. All white armor will turn yellow over time. Exposure to the sun will accelerate it, so do not store your armor near a window. I also advice against storing the armor near a heat source. But you can turn yellow plastic (temporarily) white again with a hydrogen peroxide and UV treatment. The tricky part is that it is difficult (and expensive) to submerge the armor in peroxide. The common way to solve this is to make a creamy peroxide gel to smear on the armor, that sticks to the plastic while the sun does its thing. Search "Retr0bright" for a recipe. Or get a ready-to-use mixture, like Trooperbay's ArmorWhite.
-

Help: How to move backplate up and chestpiece down?
TK-32700 replied to Shears's topic in Assembly, Mods, and Painting
I agree with gmrhodes13, adding strapping to the chest will help. I have the same bracket system as you, but with added straps: I would also suggest that you reposition your helmet a bit. This will help with the floating in the back. When wearing the helmet, the faceplate should be at an angle pointing up. Something like this: ( \ Not like this: ( | And definetly not like this: ( / You want to push the helmet forward because that makes it easier to see out of the lenses. But resist this urge, the less you see the more correct it will look.
-
Well, I spoke enthusiastically about the 501st when I applied for the job (maybe that's what landed me the job...?), so they knew from the start. And any co-workers that didn't know by then, understood once I took time off from work six months later to go to Celebration Orlando. I guess the 32 hour travel time - one way - tipped them off to the fact that Star Wars is something I enjoy.
-
It is difficult to remove super glue from armor. That's why I prefer to use a rubber-based glue like E6000. Acetone is often used to remove super glue, but this WILL melt plastic. Do *NOT* use on armor. Hot water is a possible method. Be careful, though. You don't want to warp the plastic. I have previously used isopropyl alcohol with some luck. It is a solvent, and doesn't (shouldn't) melt the plastic. Try it on a safe spot first just to make sure. You'll also have to pry and scrape and work it. Just take your time. Oh, and as for extra cover strips, you could get this from many suppliers. I'm sure WTF have them if you ask, but it's just flat white ABS, not specific to the maker. I got mine from Trooperbay, but any smooth white ABS sheet with the correct thickness will suffice. Check your local hobby shop, hardware store, Amazon/Ebay.
-
Haha, thanks! But it was a bit difficult to tighten the belt without a helper. Not 100 % imperial standard... That bottle had to be a Jedi or something. I swear, I had it right in my scope!
-
I just did the bottle cap challenge. I think I did pretty well... What do you guys think?
-
Flat lenses are approvable according to the CRL: http://databank.501st.com/databank/Costuming:TK_anh_hero If you are aiming for Expert Infantry or Centurion, though, you'll need bubble lenses.
-
Good work so far! If you have much return edge, you can trim some of that. But I wouldn't shorten the biceps just jet. Like others have pointed out, it looks like the shoulder bells are the culprits, not the biceps themself. You want the bells almost touching the shoulder ridge. This will force them a bit higher, making more room for the biceps. (This also helps you if you are aiming for Centurion. The edge of the bells should lie mostly flush with the edge of the chest, with minimal gap.) Also thighten the shoulder bell straps holding the biceps. Depending on the sice and shape of the biceps, the straps should almost be in tension when not in use. This should force the biceps to ride higher and fit better. Some troopers also have an additional hidden strap inside the bells connecting to the top of the biceps. It makes it a bit more cumbersome to put on and take off, but will keep everything in place while trooping.
-
Laura’s 2mm ABS ANH Hero TK build [TM] – aiming for Centurion
TK-32700 replied to Laura's topic in ANH Build Threads
Wow, look at that shiny faceplate! You've made a good start. Keep it up! -
Request your Centurion Certificate here:
TK-32700 replied to justjoseph63's topic in Request Centurion Status
Simon Hansen 32700 A4 Tony http://www.whitearmor.net/eib/certificates/32700-centurion.png -
TK-32700 Requesting ANH Stunt Centurion Status [TM] [358]
TK-32700 replied to TK-32700's topic in Request Centurion Status
Proud trooper here! Thank you! -
Name: Simon Hansen Legion ID: 32700 Garrison: Nordic GarrisonArmor: Troopermaster Helmet: Troopermaster Blaster: Trooperbay Expert Infantry Request Thread URL: https://www.whitearmor.net/forum/topic/43159-tk-32700-requesting-anh-stunt-eib-status-tm767/ Height: 179 cm Boots: TKboots Canvas Belt: Trooperbay Hand Plates = Sonnenschein handpainted latex Electronics: iComm w. Aker amp. Neal Seal Type: Darman w. zipper Holster: Trooperbay Full Body Front Full Body Back Full Left Left Side Detail Full Right Right Side Detail Butt/Kidney Detail Hand Plates Shoulder Bridge Back Shoulder Bridge Front Back/Chest Connection Thigh Pack Attachment Knee Plate Drop Box Back Cod and Butt Plate Attachment Interior Strapping Kidney Plate Notch Wrist side of forearms Helmet Front Helmet Right Helmet Left Helmet Back Hovi Mic Tip Detail Lens Color S-Trim Blaster Right Blaster Left Neck Seal Thermal Detonator Back Holster Attachment Ab Button Detail Link to photo album in case images doesn't show: https://photos.app.goo.gl/ZDtuJUYsvzDV3NnI3
-
Request your EIB Certificate here:
TK-32700 replied to justjoseph63's topic in Request Expert Infantry Status
Simon Hansen 32700 EIB A4 Tony http://www.whitearmor.net/eib/certificates/32700-eib.png -
TK-32700 Requesting ANH Stunt EIB status [TM][767]
TK-32700 replied to TK-32700's topic in Request Expert Infantry Status
Thanks Tony! That's awesome to hear I've already started with the abdomen and chestplate. There is some slack in the strapping due to wear and tear, so I have tightened the chest straps and made the chest overlap more. The ab and kidney also aligns better, but I'm not 100 % happy yet. More work is needed. I will also look into your other suggestions. Not sure about the thighs, though. They have somehow shrunk since building them. I'm not sure how -- it is definitely not related to cake each Friday at work -- but they don't fit me as well as they used to. -
Name: Simon Hansen Legion ID: 32700 Garrison: Nordic Garrison Armor: Troopermaster Helmet: Troopermaster Blaster: Trooperbay Height: 179 cm Boots: TKboots Canvas Belt: Trooperbay Electronics: iComm w. Aker amp. Neal Seal Type: Darman Holster: Trooperbay Link to photo album if images doesn't show: https://photos.app.goo.gl/hoJfvJ420TmpTYpH2
-
Requesting 501st access, please. TK 32700, Nordic Garrison http://www.501st.com/members/displaymemberdetails.php?userID=20024
-
TK 32700 reporting for duty!
-
I've spent two evenings on the tube stripes now. They were, as previously mentioned, a disaster. This is after some clean-up: New stencils would take too long, and I didn't dare to try freehand since this is more or less the first time I have used a paint brush in 25 years. So I took my time, armed with a toothpick, a box of cotton swabs and some paint thinner, and have cleaned up both sides. The stripes are a bit ugly up close, but if kept at an arms length away, you won't see it. And they are now the correct distance, one pencil width, from the cheek. Only the frown mesh remains, and the helmet should be done. Yes, this is the strips that came with the kit. I did not know of the 75 mm guideline. I figured that I liked the look with a front facing panel, and went ahead. I have now reread the CRL (something one should do often during a build!), and it does actually state: "The white control panel pad faces upwards". So thanks for the heads-up! Clips adjusted accordingly, without much hassle:
-
So, I redid the tube stripes, but had to use the old stencils. What a disaster. I don't know where to start with the clean up, let alone how. But I just have to figure out a way. While I work up some courage for that, I have assembled the Thermal Detonator. At first I was worried about bending the metal rods, but it turned out to be the easiest part of the TD. Some measurements, if anyone is interested: Screws: slotted pan head screws, head is 6 mm wide 2 mm high painted black, screw is 3 mm wide, total length 18 mm. Tube: 180 mm x 68 mm. End caps: 20 mm. Front face: 115 mm x 98 mm Metal rods: 210 mm x 27 mm
-
Thanks. I did use a pencil width, but I might have messed it up. I placed the stencils a pencil width away, not the stripes themselves. Rookie mistake. I had planned on doing clean-up tonight, but I might need to redo the stripes. I took a quick measurement. The stripes are 12 mm away, which is approx. two pencil-widths. What do you guys think? Should I clean them up and keep the stripes this way, or should I remove and redo?
-
No one has ever accused me of having steady hands, so the paint job was terrifying. The vocoder looks awful, but the rest is borderline OK. Done with all the grey and black details, and are working on the blue tube stripes. I used the "hand painted" stencils from Trooperbay for this. Can't wait to pull them off and see how it turned out! It looks like a couple of stripes have run a bit underneath, but that is nothing a toothpick and some paint thinner can't fix. Next, I'll tackle the Thermal Detonator.
-
Long week, working the late shift, but here is a image dump of some of the work since last update. I have glued the shoulder ridges. Also pictured is the white elastic and the snap plate. Split rivets set, 6 in the side, 1 in the crouch (not pictured here). The button plates on abdomen has also been glued:

