

tkrestonva
-
Posts
5,266 -
Joined
-
Last visited
-
Days Won
4
Content Type
Profiles
Forums
Gallery
Articles
Everything posted by tkrestonva
-
Rustoleum 2X Gloss White has been the recommended armor paint, and for exactly that reason. Another option is to take the helmet to a paint shop and have them come up with a custom blend that matches the helmet.
-

Almost Ultimate Heavy F-11D build – T5H v.18
tkrestonva replied to The5thHorseman's topic in Weapons of the First Order
Excellent job with the smoothing and sanding. I know I don't have the patience to use glazing putty and a ton of elbow grease, so I'll most likely use XTC as a shortcut. Nonetheless, it's clear that your hard work and determination is paying off. Also, those are some great build ideas with the triggers. I'll definitely be incorporating those in my build. Question for you - will you be installing any red lights in the barrel? Some of the behind the scenes footage shows that the blasters actually light up (but have no sound) when the trigger is squeezed, so I'm leaning towards gutting a toy blaster and transferring the electronics to this build. -
Almost Ultimate Heavy F-11D build – T5H v.18
tkrestonva replied to The5thHorseman's topic in Weapons of the First Order
Thanks for doing this! I also have one of Jerry's heavy F-11D kits which I'll soon be starting on. It'll be good to have some expert guidance. -
1st Build -- TKC Woman!
tkrestonva replied to DayFire's topic in Build Threads Requireing Maintenance
Well done. Great job with the paint and weathering. Looks like you can pull your shoulder bells in more. -
Near-boiling water is a much safer technique to use in gently reshaping plastic than a heat gun. The problem will be to find a pot that's large enough.
-
This is exactly how I installed my D-ring on my hyperfirm.
-
Best manufacturers for short frames
tkrestonva replied to Davian's topic in Build Threads Requireing Maintenance
Any kit will do, you'll just have to cut it down some. Sent from my iPad using Tapatalk -
If you are going for ANH Stunt, it is better to hand paint the details. If you must use stickers, just do the best you can - but I would try again with the one in the photo. That 90 degree turn is called the side twist, and it's completely screen-accurate. Only an oversized helmet (or an undersized head) will give you room enough to put it straight on.
-
Nice that the new AP comes completely pretrimmed. That will save you a lot of work.
-
At some point I would pick up a set of Lexan hobby scissors. They will help speed up the trimming process. Also, great call on the safety gloves. Some of the accidents I've seen by people who didn't use them are pretty gruesome. http://www.amazon.com/gp/product/B007KN0RQM/ref=s9_dcacsd_bhz_bw_c_x_1
-
Another option - the one I went with - is to take your entire kit and have it professionally painted by an auto body repair/paint specialist. I knew going in that my spray painting skills were lacking, and as expensive as the TFA kits are there was no way I was going to risk botching it up with a cheap paint job. A member of my garrison owns an auto body shop - complete with a pro-grade paint booth. I informed him of the recommended paint (Rustoleum 2x Gloss White), and he then bought a can and created a custom blend that was color-matched (via computer) to the Rustoleum paint and sprayed my entire kit (minus the fiberglass helmet) with it. It wasn't cheap (it cost me $375 US) but IMO it well worth it. That's not just my opinion, either. Several other Anovos TFA TK owners (including at least three in my geographic vicinity) have gone a similar route.
-
Done.
-
-
Nice job. Did the plastidip and padding help with the echo?
-
I would also check the Anovos Builders FB page. I've see a few kits come up for sale there as well. https://www.facebook.com/groups/838545079553903/ The whole idea about buying it abroad and bringing it back might be a little tricky. Other people have thought of doing that and it's more complex than you think. So I recommend you do some checking into your country's process on that sort of thing first - especially if they levy import and/or VATs.
-
When in doubt, always refer to original source material. For instance, the display costumes that were up at SWCA last year: http://www.originalprop.com/blog/2015/04/18/star-wars-celebration-anaheim-2015-photos-of-movie-props-costumes-and-models-from-star-wars-the-force-awakens/
-
Try sending a PM to Shana, i.e. "Plushie" here at FISD. I believe she is about your height, and may be able to offer some advice. She has a build thread up, but unfortunately it's in the 501st Only section (which you won't be able to see unless you are looking at it via someone else's account). http://www.whitearmor.net/forum/user/22799-plushie/
-
1. Find someone local to you with experience building TFA stormtrooper kits. These KB kits go together in a similar manner to the Anovos kits, and nothing beats having someone with hands-on experience looking over your shoulder. Furthermore, they are likely to already have the tools needed to get the job done. If you haven't already done so, I strongly recommend you reach out to the NEG: http://www.501neg.com/ 2. Order your gaskets and undersuit RIGHT NOW. There are a handful of gasket-makers out there, but the waiting list can be anywhere from weeks to months. You can do the rough trimming now, but for the actual fitting you need to have them - and they will change how the armor fits versus not having them. Alternatively, you could make your own. 3. Read and research - basically keep doing what you have been doing, except do more of it. UKswarth's thread is a great example of that. There are also shorter TFA stormtroopers who have had to mod their kits to their frame. Reach out to them and pick their brains.
-
Hitman's Jimmiraquois WIP
tkrestonva replied to thechosenhitman's topic in Build Threads Requireing Maintenance
You can use a standard TK neckseal. Regarding the Heavy Gunner vest, Chris makes an excellent product - I own one of his vests and I am very happy with it. But if you willing to have a go at making it yourself, you can start with a Flyye tactical vest and modify it using Ukswrarth's tutorial. -
That's how I do it now, and it makes getting into the kit much easier. Also, I don't have to guess how high up the forearms and biceps go and how much gasket at the elbow should show. Once you get them dialed after a few wears, you are set.
-
I've never heard of anyone doing so. Not sure how well it would work, but if you're game I'd love to see the results. But it seems like it would simply weaken the structural toughness of a Hyperfirm - which is the reason most people who buy them do so. Personally, I think you'd have a better time of it by modding a resin E-11 - more specifically, picking up a resin kit (such as DoopyDoos) and building the electronics into it.
-
I have both types of IG gaskets, and it's exactly what has already been stated. Rubber (specifically latex) is more screen accurate but harder to wear, cloth tends to be less screen accurate but easier to wear. It's a tradeoff as to what you prefer. Regardless of you choice, either option is better than the stock Anovos gaskets. The evidence of that being Anovos itself is now including latex gaskets with the kits that recently went on (preorder) sale to the general public.
-
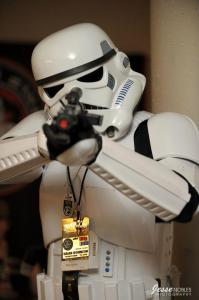
First photo - AwesomeCon 2015 (5/30/2015). First time wearing the kit in public. Anovos fiberglass helmet (original Alpha 75 lid picked up at SWCA), Anovos standard gloves, resin E-11 blaster, IG latex gaskets (v1), standard TK undersuit, TKBoots. Second photo - AwesomeCon 2016 (6/4/2016). Mitcheg helmet, Chris Hale's tactical vest, T5H's 3D-printed F-11D and SE-44C, IB gloves, Gio boots, IG fabric gaskets (v2). Not shown - KB Armory riot control shield, TrooperBay officer's pauldron, Extreme Racing undersuit. Upgrades in the queue: 3D-printed F-11D rifle (the larger version), Peter White's Z6 riot control baton, 850 Armor Works' Megablaster, Anovos standard helmet with the FN-2187 bloody handprint, new F-11D blaster and SE-44C sidearm (both are accuracy upgrades), upgraded belt pouches, upgraded belt with the proper foam lining between the rubber and nylon, upgraded front belt boxes, cutting out the pill holes on the chest, biceps, and shins and backing them with accurate fabric, R2Dan's metal thigh holster/resin chest detail/resin handguards (along with various repairs and a fresh automotive paint job), "Jakku trooper" snowtrooper backpack. Always more to do ...
-
Nah, I just sprayed it with a couple of coats of flat black paint. Makes the interior look better (IMO) and the reduced interior glare definitely makes it easier to see out of. The downside is that Greg had signed the inside before he shipped it to me - it was his fifth cast. So I'm going to need to get him to sign it again next year at Celebration in Orlando.
-
Anovos Build - Faster Drying, Stronger Glue
tkrestonva replied to Kazdoom's topic in ANH (Stunt and Hero)
You can use Zap-A-Gap or other CA glues and they'll set quickly, but as I'm sure you've already read - you have ONE shot at it. If you make a mistake it is very difficult (and often impossible) to undo it without permanent damage. Furthermore, Zap A Gap is very runny (which is not a good thing on the bendy areas) and tends to want to go places where it shouldn't - and it will INSTANTLY damage the finish to your armor. If you go with CA glue, I suggest you use a thicker "control formula". It takes a little longer to set than Zap A Gap (minutes vs seconds), but because it has a gel-like consistency it's a lot easier to control.
