

Grimez
-
Posts
315 -
Joined
-
Last visited
Content Type
Profiles
Forums
Gallery
Articles
Everything posted by Grimez
-
Kit arrived today....
Grimez replied to Capi'tanc'runch's topic in Build Threads Requireing Maintenance
Looks like AM. -
Kit arrived today....
Grimez replied to Capi'tanc'runch's topic in Build Threads Requireing Maintenance
My imperial cog tshirt seems to be stuck in an infinite loop at the Forth Worth Post Office if that somehow makes us closer. As a suggestion, the forearms and arms are probably the best place to start, they are the simplest and let you get used to trimming before you tackle things like the helmet. That's where I started. Good luck on your build! -
Ah, so only one side gets the rivets? I was wondering how I was going to get both sides with only 7.
-
Ok, i've been test fitting the kidney and ab plates together to see how the rivets on the side will work. For it to be a snug fit, the ab and kidney plates overlap. Should I send the rivet straight through the kidney into the ab plate or should I just trim them down until there is a space in between the two?
-
Jes Gistang [KWDesigns] build thread
Grimez replied to jnnfr72's topic in Build Threads Requireing Maintenance
The fact that this is Bloodfin makes it that much sweeter. Good luck, i'll be watching your progress! -
Jes Gistang - research thread
Grimez replied to Daetrin's topic in Legacy Stormtrooper (Joker Squad)
Wow, every single one of these pictures are astounding. Great work! -
This should be interesting - First Build
Grimez replied to nerdbaitplus3's topic in Build Threads Requireing Maintenance
The hero has bubble lenses and less teeth than the stunt. It also only has 3 bumps on the ears rather than 4. -
I've started trimming the torso, the chest and back plates are basically done - need to heat bend the shoulder straps. How much of a return edge should the butt, kidney, and ab plates have?
-
This is as low as they can go.
-
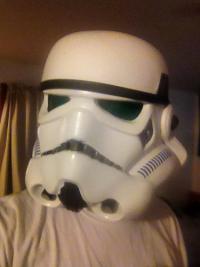
And, the grand reveal! (basically). I still need to wrap up the mic tips, S trim, and let the lenses finish curing then probably do some touch up paint work - but for the most part my impatience got my to finish the helmet tonight.
-
Lots of progress, and more to come. I spray painted the helmet and put on the greys just now, i'll let it dry while I do my next shift at work. Luckily the spray paint dries completely in like 10 minutes. Here are the next two steps i've gotten done so far. When I get back i'll do the blacks, then decals tomorrow morning or later in the night. Post spray-paint: Post greys:
-
Eh, 12 days isn't too bad. And this seems pretty relevant to my issue. I for the life of my cant figure out how i expect to get this s neck trim on my helmet. I think its due to the fact that I didn't trim the bottoms whatsoever, i have to do a lot of persuading to my helmet to fit my head in. The red line is a guess of where I think I would need to further trim the bottom to make it possible to both put the trim on and get my head in. Thoughts? ----------
-
Set blasters to fun, we're on course for painting.
-
Jes Gistang - research thread
Grimez replied to Daetrin's topic in Legacy Stormtrooper (Joker Squad)
WOW, that picture is fantastic! Nice work on the armor! -
Alright, since I got my new toys and am waiting on some rivets, I decided to dive head first (pun unintended) into my helmet build. All was well as the trimming and assembling progressed... But everything changed when the screw nation attacked This is where I am at the moment, these screws are giving me a headache. Given the fact that they were in the bag with the rest of my helmet materials, and that I have 6 (3 smalls for the ears and 2 large for the cap n back/faceplate section), that that is what was intended for the helmet to be built with. Now stop laughing, I know how a screw works, but the specifics of this are bothering me. The washes go on the inside, right? What do I do with all the excess screw that will be poking into my head when I wear the helmet otherwise? I considered just cutting it off but i'm not sure if I have the equipment for that, i'm sure there is an easier way i'm not considering. Help me trooper-wan kenobis, you're my only hope.
-
Question on the thighs, do I put a finishing strip over both sides of the back or do i just glue it to one side like you do with the shins?
-
Shins are done, I have trimmed the thighs but i'm waiting until i get larger rare earth magnets to put the finishing strips on. It feels really sketchy putting the shins on since you have to bend the plastic so they go around your calves.
-
It looks like you have some sort of FX kit or something close to it? It might get you cleared but I wouldn't recommend it.
-
Arms are done! (i think) Here are the finished biceps: I then went through such a hassle jury rigging all of these pieces to stay on. I don't have straps for the shoulder bells yet so I used rare earth magnets to hold them on: 2 on either side of the top of the shoulder bell, and then another underneath my compression shirt to hold it in place. I then slid on the biceps and for the most part my arm kept them in place, the forearms were sliding all over the place, then I put on my neck seal while all of the armor was on (definitely not easy), and grabbed the gloves and E-11 for a full picture. Enjoy.
-
Thank the maker.
-
Ooooookay, so I was following Trooperbay's video on trimming biceps and I noticed something after I trimmed my left bicep that I didn't before. I followed suit from my forearms and cut out the return edges on my left bicep but after reviewing the video it looks like the biceps keep a certain amount of edge on the ends. Did I cut too much on these? Will I need a replacement bicep if I did? I then investigated further on my right bicep and saw some impression in the bicep, the blue line is where I trimmed my left bicep and the red line is the one I think i'm supposed to follow, which is correct?
-
After some welcome information from my fellow statesmen at Bloodfin, i'm just about done with the bracers. The right bracer is fully assembled (minus foam) while the left one is trimmed and I am waiting for the E6000 to cure more on the first finishing strip.
-
Ignoring the odd environments, this is how my right bracer looks atm. I'm not touching the left one until I get this down. I'll work on the shoulder bells in the meantime. As it stands the forearm feels really big on me, its still really open even though there are only 5/16th of an inch of HIPS left on each one and it also seems a bit long. As you can tell when I put my glove on it covers basically the entire length of my forearm. How should I trim this to fit?
-
Cap gave me 2 sets of practice ears . I've started on the forearms and they are a little rough. How snug should they be to my arm?
-
AAAAAAAAAAAAAAAAAAAAAAAAAAAAAAAAAAAAAAAAAAAAAAAAAAAAAAAAAAAHHHHHHHHHHHHHHHHHHHHHHHHHHHHHHHHHHHHHHHHHHHHHHHHHHHHHHHHHHHHHHHHHHHHHHHHHHHHHHHHHHHHHHHHHHH Okay, that's out of the way. Let's get started! Paid for my set of CAP-W before I set off on vacation and had it arrive the day I got back (today), here it is! So many pieces, I have no idea where to start. And i'm not entirely sure I have every tool I need. Any ideas? As many juicy details and insight and links as possible are appreciated!