

skyone
-
Posts
326 -
Joined
-
Last visited
Content Type
Profiles
Forums
Gallery
Articles
Everything posted by skyone
-

arduino: a cheap board for E11 blaster effects
skyone replied to skyone's topic in Electronics for Helmets / Blasters
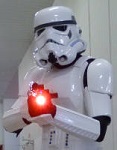
testing that everything is still working before assembly and paint the hengster counter everything working fine :)the sd-card slot now is moved on the upside because in the front side i didn't consider that the receiver doesn't allow to eject or insdert the sd-card (dumb me!)i am going to install a transparent palstic sheet to protect the led bar. I drilled the hole for the led status. I added inside the box a filter in the front side. -
arduino: a cheap board for E11 blaster effects
skyone replied to skyone's topic in Electronics for Helmets / Blasters
if you are using the same mp3 player board u can get my code here [not final] http://arduino.cc/forum/index.php/topic,109432.0.html you must login the forum to be able to download as for the wiring u need to connect the RX of the mp3 board to the TX of the arduino to send data, as well the 5volts and the audio pins. -
yes you are right, so i removed the gray sickers and i painted myself sometime i needed Turpentine to remove the paint tomorrow i will give another coat where needed ------
-
thanks guys, that batman was attracted by the dark side of the force
-
this is a video i made last year to promote our garrison, like to share here
-
i would like also the shield
-
-
umm i just took some flash photos with the reflex and with a compact camera and i can't see my eyes, that visor seems flash proof and maybe the black painted inside help then i am not going to change the lens, but i will add plastic net on frown ---------
-
green lens make eyes visible when people take photos with flash
-
completed ------------ ---------- next upgrade: brown lenses and Mich army helmet pads inside
-
arduino: a cheap board for E11 blaster effects
skyone replied to skyone's topic in Electronics for Helmets / Blasters
today worked on the hengster box first i desoldered and removed the pins from the board because the space inside for the use of the pins is not enought; i soldered only the wires needed for the project (power, R-L audio in/out, RX, data ground) then i secured the led bars on the back with 3 screws from inside then i planned the work on the box: that red part will be removed to insert and eject the SD_CARD an hole will be made on the hidden side of the box to let the wires go inside the blaster pipe the mp3 board will be secured with 4 screws over 4 small bases of forex, glued (E6000) inside the box -
arduino: a cheap board for E11 blaster effects
skyone replied to skyone's topic in Electronics for Helmets / Blasters
today i got the right screws to secure the toggle switch, so i installed it now all the 3 buttons are fully operative, tested with tester in the back part of the pvc pipe there is enought space for the arduino nano, then the speaker. in the front part, the second speaker, the constant current regulators and finally the RGB led time to work on the mp3 player house (hengster counter) and then on the receiver where to store the battery (a phottix Lp-E8 for canon 550D) can't wait to see it working -
you can see that pads inside the helmet of user Dearmeat, link in my previous post
-
arduino: a cheap board for E11 blaster effects
skyone replied to skyone's topic in Electronics for Helmets / Blasters
today i worked on the reload button first i prepared the cover in alluminium where to install the toggle switch, that cover will protect also the first speaker the toggle switch is installed on a second sheet of alluminium, then secured with 2 screws on the cover. I didn't find the right screws for that job, tomorrow will buy them. the cover is secured on the pipe trought the 2 screws of the scope rail, and the 2 screws of the handle. -
yea and i have found that the user Dearmeat already installed the same pads in his helmet here: http://www.whitearmo...?showtopic=9529 so cool -
-
that's cool, i just ordered the same pad set that remember me the pads inside the riddel version can you post bigger pictures of inside of your helmet? i can't see your work on lenses, i presume you had to cut and shape them. I am also interested to buy real lenses because of UV eyes protection.
-
i was looking for pads for my ATA helmet first i checked the pads included inside the latest mich airsoft helmet --------
-
Help with assembling ATA Helmet
skyone replied to roony2311's topic in Hard Armor (General Discussion)
thanks -
Help with assembling ATA Helmet
skyone replied to roony2311's topic in Hard Armor (General Discussion)
this month i finally had time to finish to assembly my ATA armor actually at this time i am working on the helmet, armor and pvc blaster, included arduino electronic inside this is the helmet update ------------ i stil have to paint vocoder, add lenses, add the button on ears to paint the vocoder i will apply a mask and use spray gloss black -
i i applied the suggested Trooper Bay AP version on my ATA helmet and i think it's not the right one.. this left sticker is different from the shape (pov of the observer: left) (right, looks better) I think the SDS version should be better because the two stickers are different as the above shape on the helmet http://trooperbay.co...-helmet-decals/
-
i would like to order these boots because the quality and accuracy seems very good, but the high shipping cost to Europe and the very high risk to pay custom tax (+20%) make me desist to place an order.. for now..
-
i will use screws to mount the folding stock on pvc pipe, not glue
-
arduino: a cheap board for E11 blaster effects
skyone replied to skyone's topic in Electronics for Helmets / Blasters
handle grip and trigger mounted! hard work but i did it the trigger mechanism is installed straight to the pvc pipe (1 screw on pipe, 2 screws on trigger), in that way If an accident happens to the handle can be replaced easily i also added a bit of grease that i use for airsoft gun into the trigger gear: now it stopped to make any noise next stages are: install the reload button install the mp3 player inside the counter install the battery inside the receiver -
arduino: a cheap board for E11 blaster effects
skyone replied to skyone's topic in Electronics for Helmets / Blasters
so strange, that game is full of mp3s, maybe u have to unzip some audio file, i cant remember today i worked on the trigger guard, made in alluminium it's secured by two screws, the same that will keep the trigger-microswitch box attached on the PVC pipe. there is a third screw on the back of the handle tomorrow will solder the wires on the trigger-microswitch and try to install all on the pvc pipe. -
arduino: a cheap board for E11 blaster effects
skyone replied to skyone's topic in Electronics for Helmets / Blasters
clean samples from Jedy Knight academy PC game
