
Leaderboard


Popular Content
Showing content with the highest reputation on 05/03/2026 in all areas
-
Alright, I've been working on a few additional mods for the past while and in light of a few makers and others taking on the task of giving us more options (possibly more accurate) for helmets and armor, I thought I'd better put these out in the universe before they become completely irrelevant. But I'm sure there will always be those who still want to 3D print their own helmets and this can still provide a fairly close option, certainly approvable, if constructed and finished properly. The first change was to create mic tips that appeared closer to the production used mic tips. After years of collecting reference and studying some up close images of production helmets, it became obvious that they weren't the same "found-part" mic tips that were used in the OT. So I modeled these as closely as I could to the reference I had, at the same time taking into account the proportion to this helmet and the current shape of the area on the chin where they attach. They do tend to look different in real life than they do in Blender. So I made at least 20 test prints before I was happy with the version I arrived at. I also added screw on base and a hole in both the base of the mic tip and the chin for easy installation with a washer and fastener and also to make it a bit easier to install the wire mesh. (I highly recommend printing these on a resin printer if possible) Here is the comparison between the original mic tip files and my new version: ___________________________________________________________________________ The next change is to the dome piece. I always felt the dome was a bit too squared off, so I finally took the time to modify the shape of the dome and made it more round above the temples on each side, and changed the sloping from the front to the back. You can see the difference in this comparison here: front view: side view ___________________________________________________________________________ The next change I made was to the right eye (your left). I added a curve to the top inner corner, so it didn't have the 90º angle as before. I also slightly exaggerated the eye bump, just to make it more apparent, as it was a bit too subtle before: ___________________________________________________________________________ Next I made a couple changes to the chin. I pulled down the pointy edges to either side of the vocoder and I also decreased the size of the outer edges of the mic tip inset area. In addition I added an angle to the area where mic tips lay, eliminating the need for the angling shims I had in the previous mod iteration. I also adjusted the ears slightly. On the previous mods to the ears, they made the helmet appear a bit too narrow, so I adjusted the angle of the caps slightly and went back to the original ear shapes, while preserving the full circle of the cap. Here you can see all the new mods in comparison to the previous mods: __________________________________________________________________________ For reference, here is a comparison of the original helmet files with the newest mod iteration: And lastly a comparison of all 3, the original files, the previous modifications and the newest iteration:3 points
-
For the belt i should still have a bunch of ribbed material I can cut some out and send to you. get this foam for the middle layer. We use it in Mountain Garrison for all our FO builds. It’s not heavy, soft but thick to give it the right depth. - https://a.co/d/01hKdfWR the inner layer is just 2in nylon with 2in buckles. You Chicago screw one side and the other I size and stitch or glue together for final assembly.3 points
-
Hey man! After going through three helmets (and somehow gearing up for a fourth… long story), the biggest tip I can give is to paint everything fully disassembled, then assemble it after your paint and clear coat are done. It seriously cuts down the chances of runs, and if you need to do touch-ups later, you won’t have to respray the whole helmet—just the sections that need it. For paint, I’ve had really solid results with Rust-Oleum Acrylic Lacquer White. Lately though, I’ve been testing Home Depot’s Behr #52 White (shoutout to @TheRascalKingfor the recommendation), and honestly—it’s been phenomenal (and it's in stock locally for most stores). And if you’re planning on printing Nico’s helmet, definitely hit up TKModder for the updated files. It makes the whole process way easier. It technically goes against the CRL… but TPU is honestly your best bet for printed shoulder straps. The main downside is the layer lines—I still haven’t found a great way to smooth those out cleanly. PLA is just too brittle for this instance, so unless you’re okay risking cracks, I’d avoid it. At a minimum, PETG is a better middle ground—it can be post-processed more easily than TPU, but just keep in mind it won’t have the same flexibility.3 points
-
Most tend to use Nico's files, DM @TKModder421 with a copy of your Nico purchase and he will happily share (say pretty please) . You can find his build And here @TheRascalKing helmet painting Some go for flexible shoulder straps Shoulder Strap 3D files printed in TPU Unfortunately the seller of flexible shoulder straps is no longer supplying them3 points
-
Alright, I apologize, I've been meaning to post a few things and I keep procrastinating. I wanted to show how I went about adding the dark backing in the recesses of the tears and traps. I essentially hand-painted the bottom of the recesses a matte black, but just around the edges where it's seen. I wanted to leave the majority unpainted to avoid adding adhesive on top of paint. (Note: this print is an older version of my mods that did not yet have the added mortise and tenons (alignment hole and tabs))1 point
-
Nico’s files are basically the go-to in the community for overall accuracy, but it’s been shown a few times they’re not a perfect 1:1 to what we see on screen. That’s where guys like Greg/TKModder have been stepping in to refine things. It’s mostly small details—teeth, tears/traps, Hovi mics, ear greeblies—but for basic/Level 1 approval, Nico’s files are more than solid. The reason I brought up the CRL with shoulder straps is the “no visible layer lines” rule for 3D prints. That’s where TPU gets tricky—you can’t really sand those out cleanly. PLA and PETG don’t have that issue since they’re much easier to sand and finish. That said, if your strap files already have a natural curve, those materials can work fine. But for designs like the ones Glen shared (and the set I printed), you need some flexibility to get the bend, which PLA and PETG just don’t handle well. Rubber isn’t required, but it’s definitely a better option than those two if you’re thinking long-term durability. As for the side wings—yeah, it doesn't look they're required for basic (odd, but good catch), but they do help stabilize the chest and back so things aren’t flopping around. My approach has been to permanently fix one end (either chest or back) with adhesive, then use Velcro or magnets on the other side. You can also trim the wings down since there’s no strict requirement on how much needs to be visible. Just be a bit careful if your print isn’t 100% infill—but they’re usually thin enough that a quick pass with a Dremel won’t cause any issues.1 point
-
Thanks, believe it or not I was actually going through your build thread when you sent this. I'll try to test out the Behr white when I get the chance if I print this helmet over the summer. I've also noticed some people saying that TKModder hasn't been responding, but since these files are already accurate enough I wouldn't really be disappointed in just printing Nico's. I 3D printed the shoulder straps for my last stormtrooper outfit in the photos above (got ran over and some armor got crushed on Halloween) but they were WAY too long but before cracking they worked out pretty well and had a bit of flex in them. Also I'm not trying to be smarty-pants when I say this but I noticed that on the CRL it doesn't say that the shoulder straps have to be made of rubber, or at least I can't find where it does. Same with the black side connectors that most people swear on their grandmama's soul is absolutely required although it's only needed for levels 2 and up, but I just thought that was interesting.1 point
-
Wow thank you so much for all this I really appreciate it.1 point
-
Since some of the proportions of my armor weren't that great, I decided to redo the chest, back, thighs, and forearms because multiple people noticed that they were too big. I scaled all of these down so that they wouldn't hang off me and am hoping to begin working on them within the next month or so during the summer (I am a full time student). Here are my updated stormtrooper pieces: One of my first questions is over the shoulder straps and whether or not anyone has any tips for them overall, including attachment, how they should look, and most importantly if there are good printer settings in order to print them in PLA or PETG. Another project that I was planning on involves remaking the helmet. After looking through multiple build threads and reading about Nico Henderson and NTX3D have some of the best STL's, and I was planning on buying one (most likely Nico's) and really putting a lot of effort into it. I've looked through all of Sayless's 3D printed ROTK build thread for his helmet, and any and all advice for this helmet is greatly appreciated. Additionally, I am looking for help for the best spray paint colors for the whites and grays (I have been using Rustoleum's charcoal gray and brilliant blue), any issues with the helmet that can be modified such as scaling (I saw another thread that TKModder421 made a lot of modifications for accuracy), and I own some chicken wire that I was hoping to form into the aerators but I just don't know where to find a model to form the wire into the correct shape to fit it in. Any and all advice is really appreciated as I take all constructive criticism. Please keep in mind that I am going for a level 1 certification and I doubt I will upgrade to level two anytime soon, thanks.1 point
-
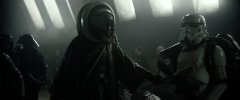
From the album: Solo Bluray References
1 point -
1 point

.thumb.JPEG.090a51d263498dd94183c8dca58c9ff4.JPEG)
