
Leaderboard


Popular Content
Showing content with the highest reputation on 05/06/2024 in Posts
-
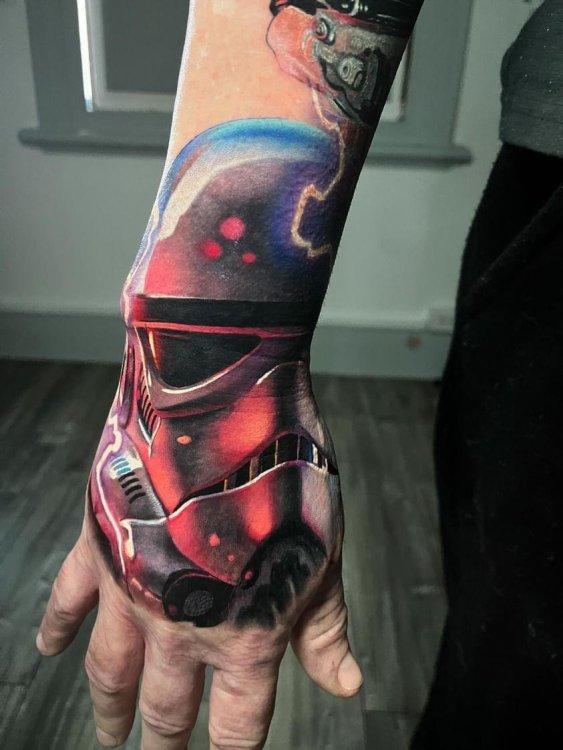
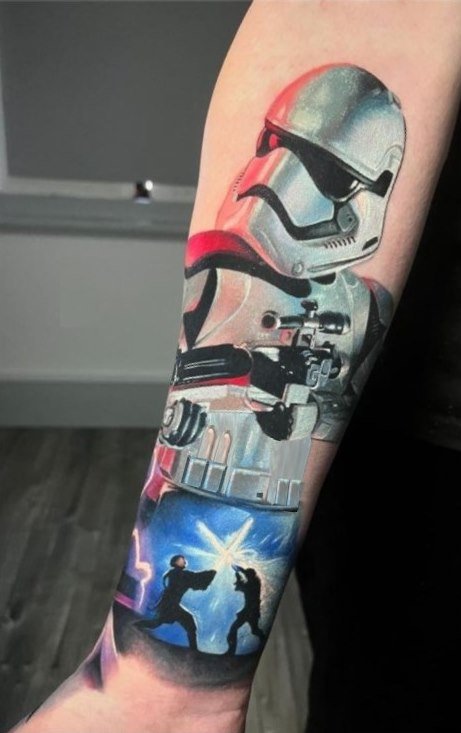
First May 4th in 12 years I didn't troop, but I celebrated the day in another way Still some work to go, but very happy with the artist and yes, "research is the key"
 2 points
 -
Happy Star Wars Day everyone! This seems like a good day to start posting about my little project. I am making a set of 3D printed Rogue One Stormtrooper armour. Once it's ready I hope to join the 501st UK garrison. I've studied every thread on this forum on the subject of 3D printing and R1TK armour (including all thirty pages of discussion on the CRL). This ain't my first rodeo: during lockdown I sculpted, moulded, cast and painted a full-size wearable Boba Fett helmet: Work In Progress Boba Fett helmet gallery Fnished Boba Fett helmet The next year I did a Mando helmet: Mando WIP Mando Final Last year I 3D printed a Rogue One Stormtrooper helmet from Nico Henderson's files: I enjoyed that project so much that I just decided to keep on going, so here we are! After looking at lots of files on CGTrader and other sites, I settled on a set of files by Alain Rivard. These looked more accurate than the Akira Yuming files which everyone uses. Turns out, they are but they have their own problems which I may get into later. To supplement these files I also used tk421jag's Thermal Detonator from Thingiverse Plus the sniper knee from the Akira-Yuming set as it is much better than the Alain Rivard piece. Also, Big Jasoni's Belt boxes: I also plan to print out the excellent Hovi-Mix parts from chrioboy: Finally, I obtained the updated Nico helmet files from TKModder421 and printed a second helmet: Since the start of February, I have 1) Printed out all the pieces 2) Filled, sanded and primed the abdominal section. I have a long way to go, and I expect this project to keep me busy for the rest of the year! Unfortunately it's been raining Loth-cats and banthas here in the UK recently, which has slowed me down a bit: it's hard to work up enthuiasm for shed time when it's as wet and muddy as Mimban outside. However, today was nice and sunny, so I got some photos. Everything: Abdomen piece (nearly finished!) Helmet: Chest and Back: Belts and Butts: Arms: Legs (big pieces): Legs (small pieces): More to follow!1 point
-
The fourth is no longer with us... today is revenge of the sixth! Thank you for the kind word Glen. I forgot to mention how much I used the gallery The Celebration 2022 gallery was especially useful - I gleaned a lot of detailed information about the construction of the armour from that single gallery. it heped me to figure out that I needed to make my own shoulder straps, for instance, with exactly 13 large and slightly rounded segments. Also the pictures of the extras resting at Canary Wharf station from Rogue One helped me to see how the armour fitted on actual people (as opposed to the manikin used in the Celebration pictures). Using this I was able to scale the shin and leg pieces properly for my body. Some of the screenshots were useful for getting a good unobstructed view of the side or the back of the stormtroopers: the Alain Rivard armour is missing the raised area on the buttplate, and these photos helped me to size it properly. Talking of which: one thing I haven't quite figured out yet is how to attach the codpiece and the buttplate. Does anyone have any advice for doing this step on Rogue One armour?1 point
-
glenn, thanks! I'm getting ready to head out right now but I will take some photos for you to look at. Thanks for the other tips as well. Brought a hook up with some folks locally as you suggested. Very sad to hear about ATA/Terrell. Also, I'm not familiar with WTB...is that a site within the forums? Thanks again.1 point
-
New update! All of the pieces are trimmed with the exception of the forearms, which I'll tackle tomorrow. In addition, I glued together the abdomen, and hope to begin the filling tomorrow. I did a mock fitting, and am finding that the tips of the chest dont sit flat, so I'll need a way to flatten them. Here's some pics; Abdomen before: Abdomen after: Chest before: Chest after: Yolk before: Yolk after: Back before: Back after: Spine before: Spine after: Spats before: Spats after: Hands before: Hands after: Here is the abdomen glued:1 point
-
I haven't been slacking. well... I've kinda been slacking. Instead of working on my armor I decided to build my E-11b. Because you need a blaster for EIB, right?! Back around Christmas, Santa brought me THIS! It's the Sterling airsoft gun that was the E-11b base. Same blaster used in the movie for the hero shots and from which molds were taken. I'd planned to use Bryan's @trooper96 excellent 3D files, but since this metal one dropped in my lap, who was I to say no? And I used a lot of Bryan's 3D files anyway. They're all accurate to the E-11b and are based on this same airsoft gun, so they all fit. I was surprised to see this Siraya resin mix come out translucent. Once cured it's far less clear, but it sure looks cool on the build plate. The funky power cylinder straight from the printer. Everything required extremely minor sanding to get perfectly smooth. Since it's the airsoft gun, I went for the all metal hero blaster rail variant. I printed up the little blocks for rail mounting, but this way just seemed nicer. I also drilled and tapped the resin printed scope for mounting. Pretty sweet that the resin is that resilient. (Siraya 80% Fast ABS-like / 20% Tenacious FTW!) I splurged on the short magazine from evike. It's fully functional and apparently holds about 50 pellets. Instead of destroying my long magazine to cut it down, spending $28 on this seemed like a good choice. And the length matches the R1 screen-used ones. The weather has been terrible here lately. I've been waiting for a day warm enough to paint for ages. I finally just did some small spraying in the garage. Here's everything after about 5 coats of Krylon Fuzion. A last step with the scope getting lenses fitted to it. I love the red lens in my resin Quest Design blaster and thought it would be fun to have in this one as well. annnnd... here's the result of about two week's work. I tried to weather it the same as the promo blaster in the reference thread including the slight bend in the scope rail. . I've got the large eagle scope on this one since that's what I had laying around. This counter came from Blaster Factory and was meant to hold the BlastFX electronics in my Leia Leveller... but I've given up ever receiving that kit. I think it looks lovely on this blaster and am planning to keep it. Hopefully the small eagle counter isn't a CRL requirement. .... literally after typing that I looked at the CRL and discovered the small eagle IS required for Centurion. Guess I'll be printing another counter soon. ugh. Anyways, continuing on... Replica M300 flashlight and a VERY hard to find picatinny rail with the mounting holes outside of the three rails. It's not perfectly accurate since the far edges of the rail don't slope inwards, but it IS metal and works very nicely. The flashlight also works. Correct 1943 scope and R1 power cylinder. The folding stock is back in this shot, but I seem to have not taken one with the stock out and the blaster laying flat... You can even see an image though the scope. It's not very sharp, but you can see through it! I also printed my TK number on the counter. And lastly... a glimpse into my disorder. How does this happen you might ask? Gradually. It happens gradually. Next up I hope to start tearing into some helmets.1 point


