Leaderboard


Popular Content
Showing content with the highest reputation on 09/14/2022 in Posts
-
5 points
-
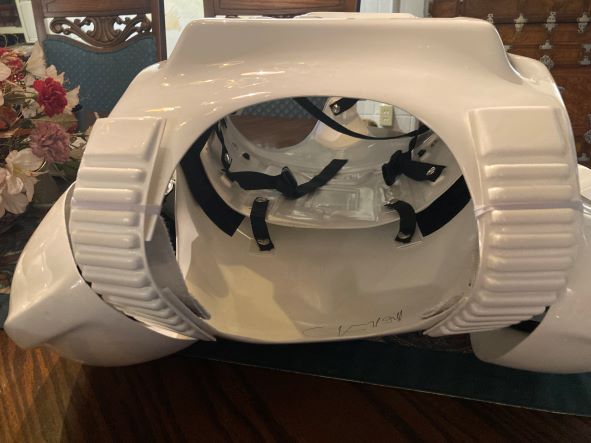
More TK Hero build updates; helmet electronics. Thank you Ukswrath for all the electronic goodies and guidance The cooling fans came from Henry's Fans. I'm good-to-go for L1 approval but will need to find 3-ear bar earpieces to meet higher levels. I've got a flat green eye piece that can replace the L3 approvable grey bubble lens for trooping. I'm pretty much blind with the bubble lens in. Full audio system+chatter loop system+hearing assist system + dual fans. Helmet pads: Amazon.com : Airsoft Helmet Pads Set - Tactical Paintball Helmet Replacement Memory Foam Padding Kits for ACH Fast MICH MT IBH AF PASGT : Sports & Outdoors Additional padding, comfort level: Amazon.com: 2 Rolls 2 Inch W 1/2 Inch T Air Conditioner Open Cell Foam Seal Tape, Window Insulation High Resilience Weather Stripping for Doors Window,Total 10FT : Tools & Home Improvement Additional padding, base level: Sponge Neoprene Stripping W/Adhesive 1-1/2in Wide X 1in Thick X 15ft Long: Amazon.com: Tools & Home Improvement Power supply for fans: Amazon.com: Miady 2-Pack Portable Charger 5000mAh, 3.45oz Lightweight Power Bank, 5V/2.4A Output & 5V/2A Input Battery Pack Charger, Mini Portable Phone Charger for iPhone, Samsung Galaxy and etc : Cell Phones & Accessories Fans are mounted in the jaw area of the helmet blowing towards my mouth with a layer of 1/2" padding over them. The suction side of the fans are towards the helmet with the curve of the jaw line providing the input. The speakers for the hearing assist system are above the fans with a layer of padding under them so they fit close to my ears. Power button for the fans is inside my right jaw area. Power/volume rotary button is above the fan button in my right jaw area. Volume knob for hearing assist system is in my left jaw area. Microphones for the hearing assist system are on the bottom of the helmet S-gasket on each side of the jaw area. All three controls are accessible with my gloves and helmet on. 4 different rechargeable batteries to power everything. The hearing assist system uses a 9V battery pack separately.2 points
-
Glen you are an extremely valuable asset to this detachment.2 points
-
Name: Christine Harris Armour: Anovos Helmet: Anovos Blaster: Resin Blaster EIB thread: https://www.whitearmor.net/forum/topic/36821-tk-61102-requesting-anh-stunt-eib-status-anovos570/ Height: 5’10” Boots: TKboots Canvas belt: Custom Hand Plates: Silicon Electronics: N/A Neck Seal: Custom Holster: Anovos Hello, thank you for taking the time to consider my TK build for Centurion. I built this kit to Centurion level when I originally built it in 2016. Due to health issues and then the pandemic my application was delayed….I am FINALLY doing it!! I have read over the requirements and found a couple changes that have been added since 2016, which I went ahead and updated. -painted my mic tips outer edge white -glued abs backing behind the lower thigh ridges and will be adding slurry next to cover. Please note: My bucket S trim is glued so it can't be lifted easily for a photo. I posted a pic of the obvious extra ridge the S trim has but if you need a photo of the inside of the trim, let me know, I'll need to peel the glue. (above) my driveway is sloped a bit that's why I may look a tad crocked in the butt.1 point
-
That's good know! I'll continue the trimming on the shins so I can get the boots on and much. Thanks!1 point
-
OK troopers, I'm impressed with some of the replies so far. THANKS! This place rocks Just a reminder, I am presently trying to get my first level approval for initial entry into the 501st Legion, Bloodfin Garrison of the Indiana realm. As I'm doing modifications to my SDS kit, I'm trying to shoot for an eventual application for Centurion level, but not yet. For instance, I am not reworking the biceps, forearms, thighs & shins to the butt & cover strip configuration just yet. I did flip the Velcro on the right shin so the overlap faces inward, not outward as it came from SDS. Oh, for your tactical enjoyment, here's some pics of my work space; 22'-3.5" (6.8 m) work bench. Various adult refreshments are strategically located Maybe I need to host a Build Party some day...1 point
-
This kit still lives in my living room, and it's still a nicer build than my own, hahaha Still looks great, and still fits amazing. Should be an easy pass (again)! ;)1 point
-
Thank you for your submission, Christine! One of us will be with ya' as soon as possible.1 point
-
I found that tutorial from another post you replied to. Thank you!1 point
-
1 point
-
Yes, E6000, clamped & dried 48 hrs. The velcro is gone...
 1 point
 -
Hi everyone, I though I would post the process I used to make my neck seal for others to use if they want to try and make their own. Materials: Stretch fabric - I used a tshirt type elastic material for the bib and the inside of the neck piece and a elastic stretch fabric with a shiny rubber like surface for the outside of the neck piece. Batting Paper for making a pattern. Right angle ruler. Sewing supplies. My neck size is 17”, so you may need to adjust some of the sizes accordingly. Based on your neck size. Step 1 - Make the pattern: Using a corner angle ruler, make a rectangle that is 26 inches wide by 14 1/2 inches tall. Mark the middle of the pattern along the long side of the rectangle with a dotted line. mark one side front and back Make a mark 10 1/2” from the edge of the front side. Make a second mark on the midline 12 inches from the edge back edge. Make a mark 13 3/4 inches from the back edge and 3 1/2 inches in from the side on each side of the pattern. Now using a pencil, make an oval on one half of the pattern from the 12 inch mark to the side marks at 13 3/4 inches and around to the 10 inch mark. Fold the pattern in hale and cut out the oval. Now we make the neck piece pattern: First make a fitted template for the neck part. This is essentially a rectagle measuring 4 inches tall and 17 inches wide (width is the same as your neck size). Mark the midline of the long side of the rectangle and make a mark 3 1/4 inches from the bottom of the neck piece. Freehand draw the curve from the marked spot up to the top of the neck piece as shown. Fold the paper on the midline and cut out the curve. Next, use the sized neck piece to create a pattern by adding an inch or two on either side and a half inch on the top and bottom to allow for seams. Seep 2: cutting the fabric: Pin the pattern to the favric and cut the fabric following the pattern, including the hole in the bib. For the neck piece, cut one piece of the outer fabric using the pattern and cut the inner fabric using the same pattern but leave extra length on the bottom to allow for the seam on the neck. use the fitted pattern to cut the batting. I used 3 layers of batting. Next, pin and hem the edge of the bib. Step 3: making the neck piece. On the non showing side of the outer piece of fabric, use the fitted template to mark the fabric along the seam line using a white fabric pencil or chalk. Pin the outer and inner pieces together along the top border of the neck with the inside and outside surfaces facing each other. Next , lift up the upper piece and fold the lower piece up to sit in between the two pieces. When the upper piece is dropped back down, then pin the upper and lower pieces along the bottom side of the neck piece. Now sew along the top and bottom sides of the neck piece. Do not sew the sides. Once sewn, this will create a tube. Turn the piece inside out so that the proper sides are now on the outside. Slide the batting into place by putting your hand in the tube and gently pulling it through. Take some time to position the batting inside the neck piece properly. Starting at the bottom of the neck piece, use a sewing machine with a walking foot to sew straight lines along the length of the neck piece. Use the previous line as a guide for the next one. Continue up the neck piece to the top. Step 4: attach the neck piece to the bib. Mark the centre of the front and back of the neck opening as well as the outermost points of neck opening at the shoulders. Next, mark the mid point , the back points ( I sewed lines from the top to the bottom where the neck piece will meet at the back), and the side points at the shoulders. Now, using the marked point to line up the pieces, pin the neck piece to the bib start at the middle front and then do the shoulders, pin the areas in between next and work your way all the way around the seam. This takes some time and several readjustments to get it right. Trimming off the excess length at the back of the neck piece helps a bit. You will have a gap of about an inch or so in the back but this is ok, the zipper will close it up. Make sure that the correct sides (inside and outside) of the neck and bib are in correct position. Now sew around the neck from the edge of one back point to the other back point. You likely will have a fair sized gap between the 2 back points, simply cut down the back of the bib in the middle of the space and sew a zipper in place that runs up the back and onto the neck section. you now have a completed neck seal. Happy trooping.1 point